Comments on cam belt change DW10ATED
Well I think I may have answered my own questions…
I trust someone will be quick to correct me where I am wrong.
The special tools needed to change the cam belt on a DW10ATED engine are:
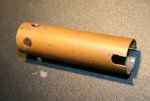
1. A pin to lock the camshaft sprocket into the head. Nominally this is 8mm diameter but I found 7.8mm to me just nice. This needs to be about 40 mm long with some sort of grip on one end to ease removal.
2. A pin to lock the crankshaft/flywheel. Again 7.8mm works nicely. This needs to be about 200mm long with a 45 degree bend 40 mm from one end. I added a spring to allow it to be fixed in the locking hole. You do not want to lose the crank position at any point in the operation.
I did not receive comment about the correct way to set cam belt tension so I “followed my nose” and used my normal methods of setting cam belt tension. This seems to have worked for me but I would not suggest or recommend to anyone else to take my word for it. Make your own decision.
The process to change the belt was quite different to any description I found in my manuals.
Both manuals (referring to DW10ATED engine) describe an adjustable camshaft sprocket. This is a fairly common occurrence on competition engines and nothing to be scared of. In fact, it is a great idea to enable very accurate setting of the camshaft position relative to the crankshaft – this is critical to engine performance/efficiency (to within about 1 degree!)
My engine (DW10ATED, ‘03 Peugeot 406 2.0 HDI) does not have an adjustable cam sprocket but does have a quasi adjustable crankshaft sprocket. While this is about the worst method I think I have seen to allow cam timing setting/adjustment I guess it works – but I think it merits special mention to make it work properly and reliably.
This adjustable crank sprocket is merely a wide key slot in the crank sprocket that allows it to rotate a bit on the keyway. I didn’t measure this but I expect it is about 4 degrees. The sprocket will lock only when the ancillary drive belt pulley is tight.
For me, this meant I was unable to check the existing cam timing accurately because I had already taken the ancillary drive pulley off before I realised what was going on.
My suggested variations to the book method of cam belt change:
1. Remove front right wheel, inner guard plastic ware, undertray etc etc. to expose the cam belt side of the engine. (I want to say “front” of the engine here but I realise this is not the place for such talk)
2. Remove the 2 top parts only of the cam belt cover to expose cam sprocket and diesel pump sprocket.
3. Insert your new flywheel locking tool into the hole behind the started motor above a cut away in the engine block casting. This cutaway is a window to the back of the flywheel and will allow you to see what you are aiming for with your locking pin. There are two small plates mounted on the back of the flywheel 180 degrees opposed. One plate is a “T” shape the other has a square shaped hole that will fit your (round) lock pin.
.‘Never rotate engine backwards’ – is a good rule to never have a belt jump a tooth and cause disaster. Rotate engine clockwise (ie normal direction of rotation) using a spanner on the crank pulley until the hole in the camshaft sprocket is at about “8 o clock” position. Insert the flywheel lock pin to lock the flywheel.
Remember, because the camshaft rotates at half the speed of the crankshaft the flywheel has 2 lock positions for every one lock position of the camshaft.
4. Try to insert the camshaft lock pin through the hole in the camshaft sprocket into the hole in the cylinder head behind. If the camshaft timing is correct both these pins will slide in at the same time.
If the camshaft lock pin will not fit. Remove the flywheel lock pin and move the crankshaft very slightly until you find the position where the camshaft pin will engage. If you had to move the crank in the direction of rotation slightly before the camshaft pin would engage this means the camshaft timing is retarded. If the camshaft pin engages before the flywheel is in the correct position to lock, the camshaft timing is advanced.
To remove the old belt follow the directions in the manuals. Take careful note of the warning to keep camshaft and flywheel locked at all times while the belt is removed.
When you have the crankshaft sprocket off, inspect it closely for excessive wear around the key slot. Significant bruising will indicate that it has not been tight and has rocked backwards and forwards. As well as wearing the key and the key slot this would also allow the camshaft timing to vary wildly while in operation and probably make a ghastly noise. Clean the mating faces of the sprocket and the ancillary drive belt pulley. Inspect the drive belt pulley and you will see that the key slot is smaller than the key slot on the crankshaft cam belt sprocket. The crankshaft sprocket is held tight only when the ancillary drive belt pulley is tight against it.
I used a small amount of Loctite between the ancillary drive belt pulley and the crankshaft cam belt sprocket faces to ensure they locked securely. If you do this, use it sparingly and only between the two pulleys. If you lock the sprocket to the crankshaft it will be very hard to remove it next time whereas the ancillary drive belt pulley has facility for a puller to aid removal.
To set the cam timing on the new belt.
1. Leave the flywheel and camshaft pinned with the locking tools, refit the lower part of the cam belt cover.
2. Refit the ancillary drive belt pulley and tighten the bolt slightly. This will lock the timing enough to allow full tension of the ancillary drive belt pulley bolt. Remove both locking pins, lock the flywheel with the appropriate tool onto the ring gear and tension ancillary drive belt pulley bolt to spec. NEVER apply significant load to the pinned & locked flywheel or camshaft.
3. Check the timing of camshaft with the new belt fitted & tensioned as above.
4. Continue with the remainder of the reassembly procedure.
Have fun,
Regards,
FarmPug
Well I think I may have answered my own questions…
I trust someone will be quick to correct me where I am wrong.
The special tools needed to change the cam belt on a DW10ATED engine are:
1. A pin to lock the camshaft sprocket into the head. Nominally this is 8mm diameter but I found 7.8mm to me just nice. This needs to be about 40 mm long with some sort of grip on one end to ease removal.
2. A pin to lock the crankshaft/flywheel. Again 7.8mm works nicely. This needs to be about 200mm long with a 45 degree bend 40 mm from one end. I added a spring to allow it to be fixed in the locking hole. You do not want to lose the crank position at any point in the operation.
I did not receive comment about the correct way to set cam belt tension so I “followed my nose” and used my normal methods of setting cam belt tension. This seems to have worked for me but I would not suggest or recommend to anyone else to take my word for it. Make your own decision.
The process to change the belt was quite different to any description I found in my manuals.
Both manuals (referring to DW10ATED engine) describe an adjustable camshaft sprocket. This is a fairly common occurrence on competition engines and nothing to be scared of. In fact, it is a great idea to enable very accurate setting of the camshaft position relative to the crankshaft – this is critical to engine performance/efficiency (to within about 1 degree!)
My engine (DW10ATED, ‘03 Peugeot 406 2.0 HDI) does not have an adjustable cam sprocket but does have a quasi adjustable crankshaft sprocket. While this is about the worst method I think I have seen to allow cam timing setting/adjustment I guess it works – but I think it merits special mention to make it work properly and reliably.
This adjustable crank sprocket is merely a wide key slot in the crank sprocket that allows it to rotate a bit on the keyway. I didn’t measure this but I expect it is about 4 degrees. The sprocket will lock only when the ancillary drive belt pulley is tight.
For me, this meant I was unable to check the existing cam timing accurately because I had already taken the ancillary drive pulley off before I realised what was going on.
My suggested variations to the book method of cam belt change:
1. Remove front right wheel, inner guard plastic ware, undertray etc etc. to expose the cam belt side of the engine. (I want to say “front” of the engine here but I realise this is not the place for such talk)
2. Remove the 2 top parts only of the cam belt cover to expose cam sprocket and diesel pump sprocket.
3. Insert your new flywheel locking tool into the hole behind the started motor above a cut away in the engine block casting. This cutaway is a window to the back of the flywheel and will allow you to see what you are aiming for with your locking pin. There are two small plates mounted on the back of the flywheel 180 degrees opposed. One plate is a “T” shape the other has a square shaped hole that will fit your (round) lock pin.
.‘Never rotate engine backwards’ – is a good rule to never have a belt jump a tooth and cause disaster. Rotate engine clockwise (ie normal direction of rotation) using a spanner on the crank pulley until the hole in the camshaft sprocket is at about “8 o clock” position. Insert the flywheel lock pin to lock the flywheel.
Remember, because the camshaft rotates at half the speed of the crankshaft the flywheel has 2 lock positions for every one lock position of the camshaft.
4. Try to insert the camshaft lock pin through the hole in the camshaft sprocket into the hole in the cylinder head behind. If the camshaft timing is correct both these pins will slide in at the same time.
If the camshaft lock pin will not fit. Remove the flywheel lock pin and move the crankshaft very slightly until you find the position where the camshaft pin will engage. If you had to move the crank in the direction of rotation slightly before the camshaft pin would engage this means the camshaft timing is retarded. If the camshaft pin engages before the flywheel is in the correct position to lock, the camshaft timing is advanced.
To remove the old belt follow the directions in the manuals. Take careful note of the warning to keep camshaft and flywheel locked at all times while the belt is removed.
When you have the crankshaft sprocket off, inspect it closely for excessive wear around the key slot. Significant bruising will indicate that it has not been tight and has rocked backwards and forwards. As well as wearing the key and the key slot this would also allow the camshaft timing to vary wildly while in operation and probably make a ghastly noise. Clean the mating faces of the sprocket and the ancillary drive belt pulley. Inspect the drive belt pulley and you will see that the key slot is smaller than the key slot on the crankshaft cam belt sprocket. The crankshaft sprocket is held tight only when the ancillary drive belt pulley is tight against it.
I used a small amount of Loctite between the ancillary drive belt pulley and the crankshaft cam belt sprocket faces to ensure they locked securely. If you do this, use it sparingly and only between the two pulleys. If you lock the sprocket to the crankshaft it will be very hard to remove it next time whereas the ancillary drive belt pulley has facility for a puller to aid removal.
To set the cam timing on the new belt.
1. Leave the flywheel and camshaft pinned with the locking tools, refit the lower part of the cam belt cover.
2. Refit the ancillary drive belt pulley and tighten the bolt slightly. This will lock the timing enough to allow full tension of the ancillary drive belt pulley bolt. Remove both locking pins, lock the flywheel with the appropriate tool onto the ring gear and tension ancillary drive belt pulley bolt to spec. NEVER apply significant load to the pinned & locked flywheel or camshaft.
3. Check the timing of camshaft with the new belt fitted & tensioned as above.
4. Continue with the remainder of the reassembly procedure.
Have fun,
Regards,
FarmPug