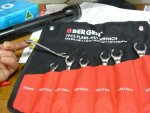
The "Special Tool" thread

Attachments

  • facom_metric.jpg
    facom_metric.jpg
    49.2 KB · Views: 1,060
They are a ratcheting open ender.
I have one in 11mm, never been too confident with its use. No longer in the main tool box, has been banished to the secondary box.
 
They are a ratcheting open ender.
I have one in 11mm, never been too confident with its use. No longer in the main tool box, has been banished to the secondary box.

I've seen them around too... but always thought "no way I'd round every fastener I try it on" :confused: A good quality ratcheting ring spanner would probably be better :)

seeya,
Shane L.
 
I have a socket that works on the same principle--- drives on the flat contact not on the points of the nut. Have a good look at its design. The harder you push the tighter it locks on to the nut. Quite brilliant actually.
Cheers Gerry:cheers:
 
I have a socket that works on the same principle--- drives on the flat contact not on the points of the nut. Have a good look at its design. The harder you push the tighter it locks on to the nut. Quite brilliant actually.
Cheers Gerry:cheers:

Do you have photos or make and model information by chance? Sounds interesting.
 
I bought a set of ratcheting spanners from REPCO last year. They have a cam in the head. Good for tight spots to keep things moving but for final tighten you would use a normal spanner. Beats those situations where you have to keep flipping the spanner to get that 8th of a turn movement.

I will be getting some Craftsman crow foot spanners in the next few weeks too, via some friends who are off to the USA for a holiday.
 
I've seen them around too... but always thought "no way I'd round every fastener I try it on" :confused: A good quality ratcheting ring spanner would probably be better :)

seeya,
Shane L.

I too needed convincing.
They work and work well.
The "Short" claw grips in the centre of the nut and is less inclined to strip or round the nut than a conventional open ender. As always if the nut is a bit cr@ppy in the first instance use a different tool, (6 sided socket), or take the risk of loosing knuckle skin.:cry::eek:
 
Those spanners arrived today.

They are even better than expected, they appear well made, have a nice offset and grip *really tightly*. I had to wiggle the spanner quite a bit to "encorouge" it over the hydraulic line nut. I'm impressed given the price :)

attachment.php


attachment.php


THe "head" of the spanner is not to thick like a lot of spanners either (a lot are way to bulky to be of any use on hydraulic lines where access is restricted). That was an incredibly frozen pipe nut, so a good test. It undid it without crushing or rounding it (possibly a nut I may have had to crush and remove in a vice usually.... yep, frozen).

seeya,
Shane L.
 

Attachments

  • spanner1.jpg
    spanner1.jpg
    65.9 KB · Views: 2,186
  • spanner2.jpg
    spanner2.jpg
    95.4 KB · Views: 2,324
Those spanners arrived today.

They are even better than expected, they appear well made, have a nice offset and grip *really tightly*. I had to wiggle the spanner quite a bit to "encorouge" it over the hydraulic line nut. I'm impressed given the price :)

THe "head" of the spanner is not to thick like a lot of spanners either (a lot are way to bulky to be of any use on hydraulic lines where access is restricted). That was an incredibly frozen pipe nut, so a good test. It undid it without crushing or rounding it (possibly a nut I may have had to crush and remove in a vice usually.... yep, frozen).

seeya,
Shane L.

Just had a call from SWMBO letting me know my set have arrived, how quick was that :eek: :wink2:

Thanks again Shane, always wanted a set, at that price delivered to my door couldn't resist :approve:

Cheers
Chris
 
Hi Guys,

I can't believe how fortunate I am, a very trusting aussiefrogs member has sent me several CX special tools down to measure/copy if possible. There is a couple of bits missing (they have after all been used in a workshop for a 30year period), but enough to easily allow us to copy them.

6304T -- definately a rollbar droplink puller, though I can't find it in the manuals (I'll sort out it's exact usage when I get the wheel off a car :) ).

This one appears really simple to make, however I've tried making a couple of versions of it in the past, but have never been sucesful given the space restrictions. It's the "tube and bolt length" in the puller that allows it to fit and work, this is what I haven't been able to get right in the past.
 

Attachments

  • 6304_8.jpeg
    6304_8.jpeg
    62.8 KB · Views: 526
  • 6304_12.jpeg
    6304_12.jpeg
    77.3 KB · Views: 521
  • 6304_11.jpeg
    6304_11.jpeg
    63.2 KB · Views: 535
  • 6304_10.jpeg
    6304_10.jpeg
    72.9 KB · Views: 538
  • 6304_9.jpeg
    6304_9.jpeg
    56.8 KB · Views: 507
  • 6304_7.jpeg
    6304_7.jpeg
    59.4 KB · Views: 549
  • 6304_5.jpeg
    6304_5.jpeg
    62.7 KB · Views: 525
  • 6304_6.jpeg
    6304_6.jpeg
    61.1 KB · Views: 520
  • 6304_2.jpeg
    6304_2.jpeg
    62.5 KB · Views: 1,911
  • 6304_1.jpeg
    6304_1.jpeg
    69 KB · Views: 622
Last edited:
6304t

This is the bit that will need to be right:

attachment.php


the bolt length will have to be exact too, otherwise it will not fit in there (been there, done that in the past).

attachment.php


Note: the bolt is offset. The tool the manual references is slightly larger with central bolt (6320T).

seeya,
Shane L.
 

Attachments

  • 6304_21.jpeg
    6304_21.jpeg
    50.5 KB · Views: 459
  • 6304_18.jpeg
    6304_18.jpeg
    70.4 KB · Views: 475
  • 6304_20.jpg
    6304_20.jpg
    74.2 KB · Views: 1,934
  • 6304_19.jpeg
    6304_19.jpeg
    54.7 KB · Views: 449
  • 6304_15.jpeg
    6304_15.jpeg
    62.1 KB · Views: 445
  • 6304_13.jpeg
    6304_13.jpeg
    61.6 KB · Views: 475
  • 6304_14.jpeg
    6304_14.jpeg
    63.1 KB · Views: 456
  • 6304_17.jpeg
    6304_17.jpeg
    59.2 KB · Views: 467
6320t

The rollbar balljoint extractor. 6320T (this is the one mentioned in all of the manuals)
 

Attachments

  • 6320_8.jpeg
    6320_8.jpeg
    56.6 KB · Views: 476
  • 6320_10.jpeg
    6320_10.jpeg
    62.5 KB · Views: 454
  • 6320_9.jpeg
    6320_9.jpeg
    57 KB · Views: 476
  • 6320_7.jpeg
    6320_7.jpeg
    72 KB · Views: 457
  • 6320_6.jpeg
    6320_6.jpeg
    76.1 KB · Views: 474
  • 6320_5.jpeg
    6320_5.jpeg
    56.2 KB · Views: 434
  • 6320_4.jpeg
    6320_4.jpeg
    64.5 KB · Views: 471
  • 6320_3.jpeg
    6320_3.jpeg
    65.4 KB · Views: 474
  • 6320_2.jpeg
    6320_2.jpeg
    58.1 KB · Views: 519
  • 6320_1.jpeg
    6320_1.jpeg
    67.4 KB · Views: 1,649
6320t

Note:

It's missing the sleave and bolt. I imagine the tool doesn't fit if this is permenantly attached, so you would sit the sleave onto the droplink balljoints thread, then clamp this over the top. No doubt we can copy the sleave and bolt from 6304T above and use here.

All we need to make these is some 6mm plate steel and the tube/bolt ... should be easy enough!

You can get 65 x 6mm metal plate from the local metal place and 20mm round bar for the center bush. For $10 you'll have enough to make several of these pullers. mild steel should do.

seeya,
Shane L.
 

Attachments

  • 6320_11.jpeg
    6320_11.jpeg
    66 KB · Views: 492
  • 6320_12.jpeg
    6320_12.jpeg
    62.9 KB · Views: 474
  • 6320_13.jpeg
    6320_13.jpeg
    62.9 KB · Views: 444
Last edited:
6314t

If your used to hammering, screaming, chiseling, burning, ... followed by smoking yourself out of the shed, then prying and bashing .... with lots of ranting and raving :cussing: at the lower arm bushes in a desperate effort to get them out .................. You gonna love making this one :) (making the tool will take a fraction of the effort of removing even one bush without it).

6314T

attachment.php
 

Attachments

  • 6314_11.jpeg
    6314_11.jpeg
    67.7 KB · Views: 467
  • 6314_2.jpeg
    6314_2.jpeg
    76.9 KB · Views: 529
  • 6314_10.jpeg
    6314_10.jpeg
    67 KB · Views: 475
  • 6314_9.jpeg
    6314_9.jpeg
    72.6 KB · Views: 471
  • 6314_8.jpeg
    6314_8.jpeg
    67.7 KB · Views: 485
  • 6314_6.jpeg
    6314_6.jpeg
    59.6 KB · Views: 486
  • 6314_5.jpeg
    6314_5.jpeg
    69 KB · Views: 479
  • 6314_4.jpeg
    6314_4.jpeg
    76.8 KB · Views: 478
  • 6314_1.jpeg
    6314_1.jpeg
    57.3 KB · Views: 1,930
  • 6314_7.jpeg
    6314_7.jpeg
    63 KB · Views: 471
6314T

Everyone will have a bolt in there shed they can use for the threaded bit. I found everything that is needed at the local metal place (except 30mm round for the centering bush) I'll find something somewhere though.

seeya,
Shane L.
 

Attachments

  • 6314_16.jpeg
    6314_16.jpeg
    66.6 KB · Views: 468
  • 6314_19.jpeg
    6314_19.jpeg
    71.5 KB · Views: 422
  • 6314_18.jpeg
    6314_18.jpeg
    56.2 KB · Views: 570
  • 6314_17.jpeg
    6314_17.jpeg
    73.4 KB · Views: 416
  • 6314_15.jpeg
    6314_15.jpeg
    65.9 KB · Views: 407
  • 6314_14.jpeg
    6314_14.jpeg
    58.7 KB · Views: 470
  • 6314_13.jpeg
    6314_13.jpeg
    61.7 KB · Views: 388
  • 6314_12.jpeg
    6314_12.jpeg
    59.5 KB · Views: 407
6312t

Hi Guys,

6312T .... This is the one I needed the most :) You won't believe how tiny it is. This looks like the remains of two tools. The only thing missing will be an allan key bolt through the center and the other "cone" will likely be threaded.

The tube is smaller than my little finger... and the "cone" smaller than my thumb nail (little wonder they would easily be lost).

attachment.php
 

Attachments

  • 6312_3.jpeg
    6312_3.jpeg
    64.7 KB · Views: 423
  • 6312_10.jpeg
    6312_10.jpeg
    67.5 KB · Views: 407
  • 6312_9.jpeg
    6312_9.jpeg
    64.2 KB · Views: 441
  • 6312_8.jpeg
    6312_8.jpeg
    63.6 KB · Views: 429
  • 6312_7.jpeg
    6312_7.jpeg
    72.7 KB · Views: 405
  • 6312_6.jpeg
    6312_6.jpeg
    67.7 KB · Views: 487
  • 6312_5.jpeg
    6312_5.jpeg
    67.6 KB · Views: 452
  • 6312_4.jpeg
    6312_4.jpeg
    68.4 KB · Views: 419
  • 6312_2.jpeg
    6312_2.jpeg
    56.2 KB · Views: 466
  • 6312_1.jpg
    6312_1.jpg
    76.3 KB · Views: 1,660
Note: There is a very gradual internal taper in the tube. Vinces diagrams specify "silver steel" for this sleave. I have found some here (it took some finding):

http://wic043u.server-secure.com/vs4487_secure/dept.asp?q=&cmx=103&r=90&id=52

5/8ths is close to perfect (15.875mm). enough for three tools... So I guess I'll be making 3 (or should that be I get three goes at making just one ??).

Note 2:

the "tightening" key is important:

attachment.php


It sets the position of the tool in the arm. If you look at the piccie, it locates it inside both bushes.

seeya,
Shane L.
 

Attachments

  • 6312_11.jpeg
    6312_11.jpeg
    71.3 KB · Views: 452
  • 6312_12.jpeg
    6312_12.jpeg
    40.8 KB · Views: 1,829
  • 6312_13.jpeg
    6312_13.jpeg
    64.3 KB · Views: 446
  • 6312_14.jpeg
    6312_14.jpeg
    74.3 KB · Views: 420
  • 6312_15.jpeg
    6312_15.jpeg
    72.1 KB · Views: 430
  • 6312_16.jpeg
    6312_16.jpeg
    81.4 KB · Views: 439
  • 6312_17.jpeg
    6312_17.jpeg
    60.3 KB · Views: 457
  • 6312_18.jpeg
    6312_18.jpeg
    71.4 KB · Views: 419
Top