
You are using an out of date browser. It may not display this or other websites correctly.
You should upgrade or use an alternative browser.
You should upgrade or use an alternative browser.
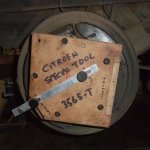
The "Special Tool" thread
- Thread starter DoubleChevron
- Start date


While we're at it, I just had the rear drums machined so I thought I'd adjust the brakes to suit.
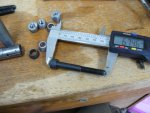
Whipped up this little number in a short but very pleasant, session in the shed.
The knobs are threaded 1/4" whitworth and come from a power substation metering board.
Used the drum as a template for the holes. The holes are an interference fit on the studs so you just line them all up flush and bob's yer father's brother!
I must confess, I made one of these many years ago when I had the DS23 and since modified it for use on other cars. You might know, I can't find the bloody thing at all now, hence the manufacture of this one.
Must have a shed cleanup one day!
Cheers, Pottsy
Attachments
John, do you mean photos of the socket or of the flare nut spanner?
Cheers Gerry
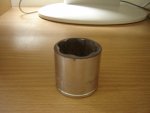
The socket Gerry, thanks. Been away again.....
Here it is John. The brand is Metrinch. It nominally covers 1 1/4 AF and 31-32mm sizes. Because of the wave form drive it can readily adapt to drive on the flats of all these sizes. I bought it to undo the C-Matic filter plug which is an aluminium hexagon with the magnetic rod glued in the back. They are easily broken and can be a B****er to undo if some brute "Muchanic" has laid into it with plenty of elbow. The points are easily rounded off with a conventional 12 point socket. Notice that I have modified it by grinding the surface flat. This allows the socket driving faces to go all the way over the aluminium hexagon.
Cheers Gerry
Cheers Gerry
Attachments
Last edited:
Here it is John. The brand is Metrinch. It nominally covers 1 1/4 AF and 31-32mm sizes. Because of the wave form drive it can readily adapt to drive on the flats of all these sizes. I bought it to undo the C-Matic filter plug which is an aluminium hexagon with the magnetic rod glued in the back. They are easily broken and can be a B****er to undo if some brute "Muchanic" has laid into it with plenty of elbow. The points are easily rounded off with a conventional 12 point socket. Notice that I have modified it by grinding the surface flat. This allows the socket driving faces to go all the way over the aluminium hexagon.
Cheers Gerry
Thanks Gerry. Nice concept, and actually the C-matic filter was a job I was thinking of tackling before long. I imagine I can find them locally.
Cheers and have a good Easter.
John
John, I haven't seen Metrinch sockets around for a long time. If you can't find one the the next best would be a six pointer.
All the best for the Easter Hols.
Cheers Gerry
All the best for the Easter Hols.
Cheers Gerry
John, I haven't seen Metrinch sockets around for a long time. If you can't find one the the next best would be a six pointer.
All the best for the Easter Hols.
Cheers Gerry
I must be showing my age...... Thanks for the advice. I have a new filter unit coming from CX Basis if I recall.
Hi Guys,
I spent a day tinkering in the shed today. It's taken some serious tinkering with the bloody car, but I finally have a usable rollbar droplink extractor tool for the top arm.
First I tried "Fenwick special tool 6403".... "Citroen rollbar balljoint extractor. I was thinking maybe this one is for a GS or something. Definately CX though (here's one that was sold recently ... labelled CX rollbar balljoint extractor).
http://cgi.ebay.de/ws/eBayISAPI.dll?ViewItem&item=250794654483#ht_1516wt_1141
I'm pretty sure I have got this one figured now. It didn't fit any CX here.... Then I noticed this:

The rollbar droplink retaining bolt does not fit into the extractor. 1976 model CX2200's had a different rollbar droplink with a much smaller diameter thread, and a "sleave" type nut. 6403T is likely to be a rollbar extractor for a 1976 CX.
Ok I put this one aside. Lets try the tool the manual states I should use. 6320T
The first thing I noticed was it's a "full" tool, I could never understand given the picture of the factory tool how it could work without just twisting off:
The fenwick tool I decided would be much supperior. I made the threaded sleave for it and tried it. I shit you not .... the fenwick tool does not fit. the reason the factory tool is cutaway on one side is the droplink itself is in the way. The fenwick tool will need the side of it cut off to match the factory tool from what I can tell.
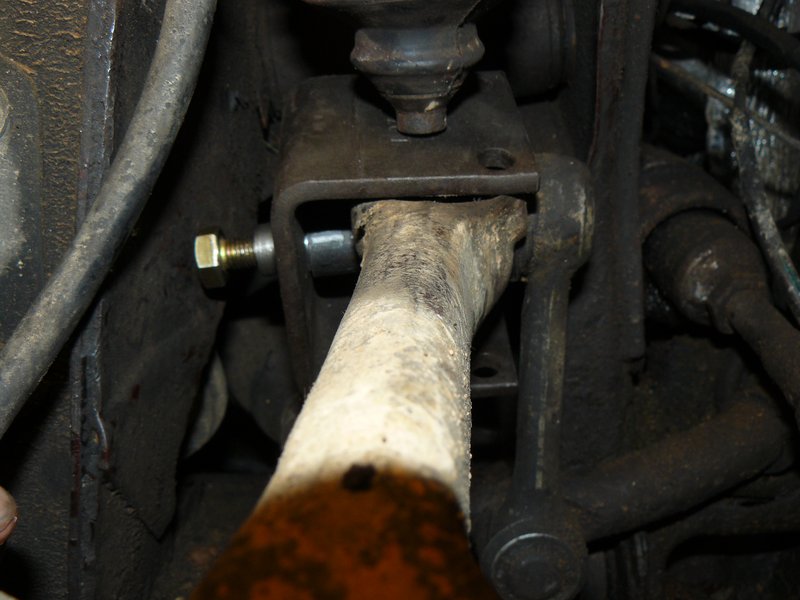
see it hits against the droplink, preventing the tools moving on far enough to drop either of the pins through.
At about this point I gave up ..... bugger me the two factory tools designed to remove the balljoint, and it's appears they never worked from day one (this one looks un-used either way).
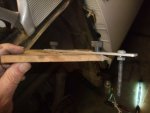
So I made an deminsionally exact copy of the 6320 Fenwick tool and cut the sides off so it was the same as the factory tool..... To find, yes just as I thought it would, it twists itself off....... AAARRRRhhhhhhh, was there ever a tool made that actually worked ??

that sleave is **very** tight fit onto the droplink stud, however you can see it's just twisting off as it's only anchored from one point (this is what I thought the factory tool would do too.... just by looking at it).
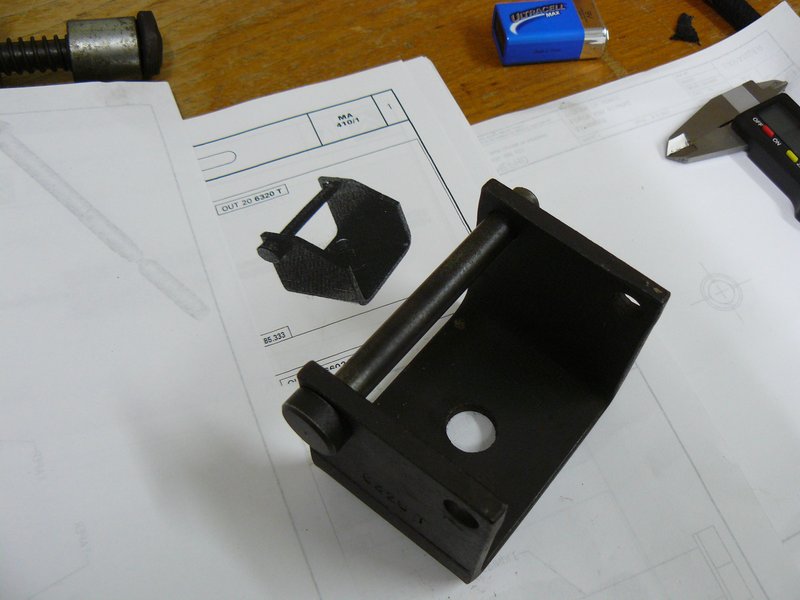
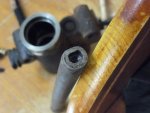
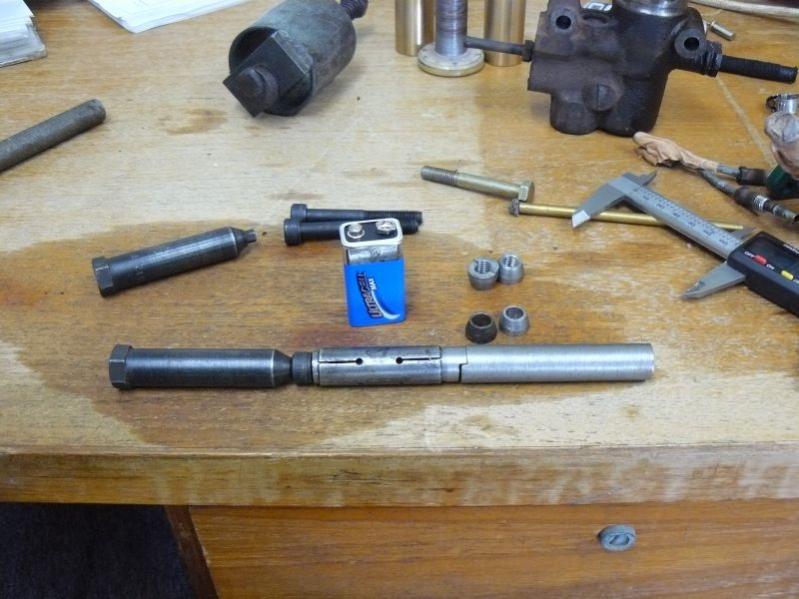
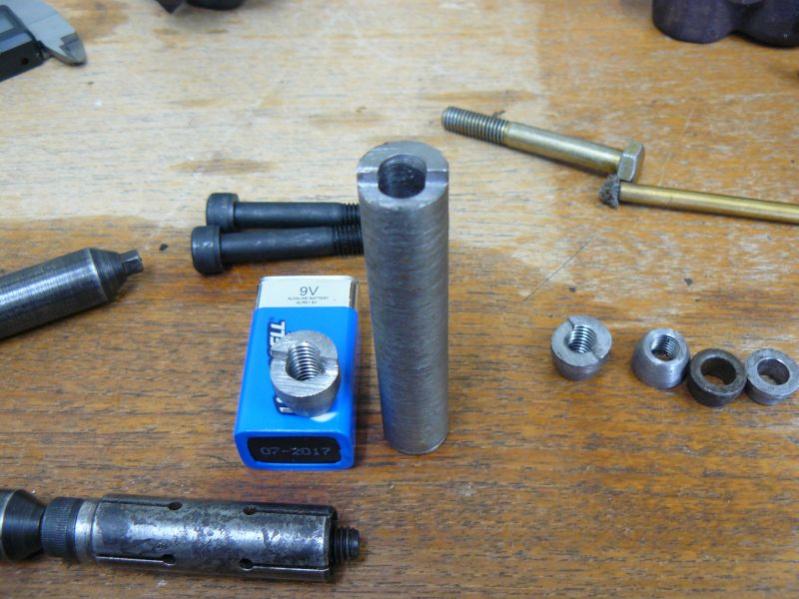
OK, time for a dodgy DoubleChevron creation. Given I have the measurements of the correct tools that actually fit in the available space, I modified the copy to work.
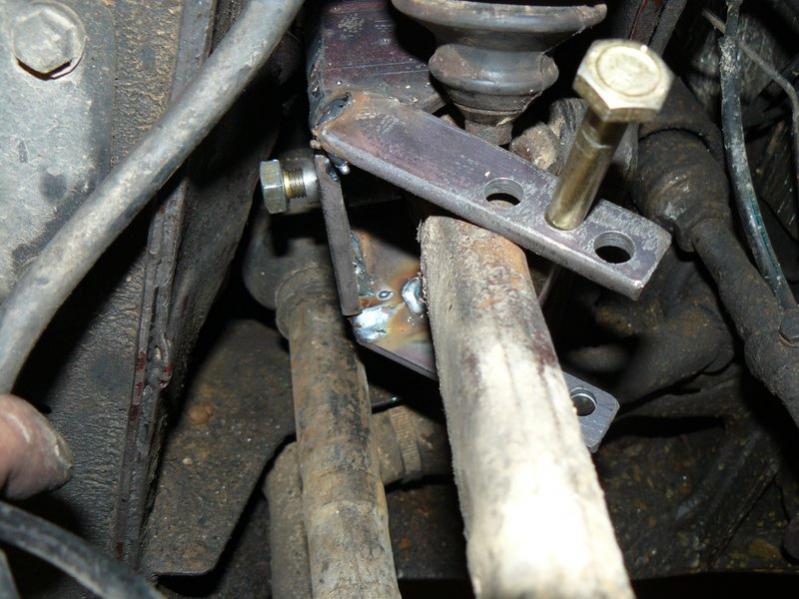
This actually allowed me to apply immense pressure to the balljoint to the point where I was scared to do it up any tighter. So I went in search of a good heavy lump hammer to give the ball joint a whack with when I heard a "crack" from the other side of the shed..... Yep, it broke it's hold ........................... FINALLY after at least 5 attempts to make on of these tools I have one that works :banana: :banana: :banana: :banana:
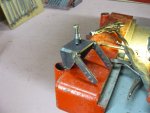
The DoubleChevron special:
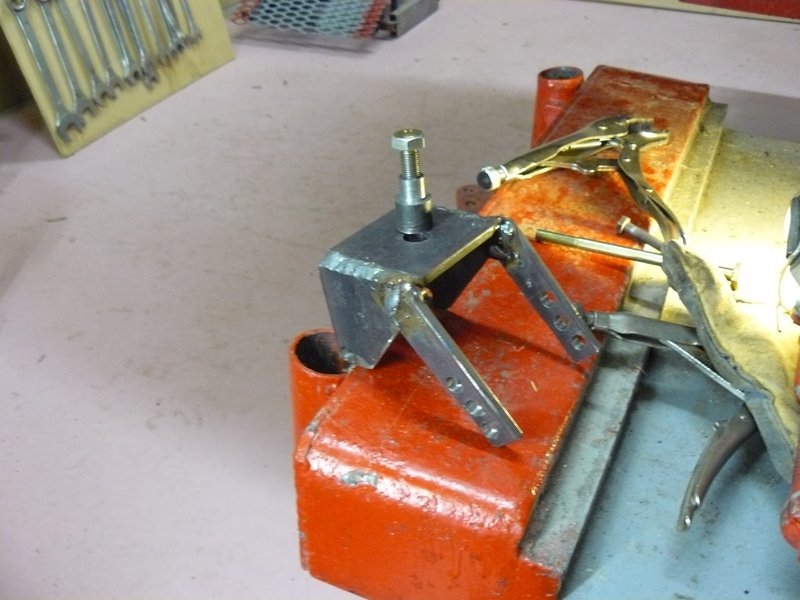
with the two proper tools, that I couldn't get to work.

The dimensions of that threaded insert is the critical aspect you need to get right, in order to get the tool to fit in the available space.
To fit the puller screw the bolt all the way into the sleave and fit the sleave into the tool, wiggle it into position and wind the bolt back out until it touches the bodywork. Then drop your two pins through and tension the ball joint and give it a hefty thump and it should fall off")
seeya,
Shane L.
I spent a day tinkering in the shed today. It's taken some serious tinkering with the bloody car, but I finally have a usable rollbar droplink extractor tool for the top arm.
First I tried "Fenwick special tool 6403".... "Citroen rollbar balljoint extractor. I was thinking maybe this one is for a GS or something. Definately CX though (here's one that was sold recently ... labelled CX rollbar balljoint extractor).
http://cgi.ebay.de/ws/eBayISAPI.dll?ViewItem&item=250794654483#ht_1516wt_1141
I'm pretty sure I have got this one figured now. It didn't fit any CX here.... Then I noticed this:
The rollbar droplink retaining bolt does not fit into the extractor. 1976 model CX2200's had a different rollbar droplink with a much smaller diameter thread, and a "sleave" type nut. 6403T is likely to be a rollbar extractor for a 1976 CX.
Ok I put this one aside. Lets try the tool the manual states I should use. 6320T
The first thing I noticed was it's a "full" tool, I could never understand given the picture of the factory tool how it could work without just twisting off:
The fenwick tool I decided would be much supperior. I made the threaded sleave for it and tried it. I shit you not .... the fenwick tool does not fit. the reason the factory tool is cutaway on one side is the droplink itself is in the way. The fenwick tool will need the side of it cut off to match the factory tool from what I can tell.
see it hits against the droplink, preventing the tools moving on far enough to drop either of the pins through.
At about this point I gave up ..... bugger me the two factory tools designed to remove the balljoint, and it's appears they never worked from day one (this one looks un-used either way).
So I made an deminsionally exact copy of the 6320 Fenwick tool and cut the sides off so it was the same as the factory tool..... To find, yes just as I thought it would, it twists itself off....... AAARRRRhhhhhhh, was there ever a tool made that actually worked ??
that sleave is **very** tight fit onto the droplink stud, however you can see it's just twisting off as it's only anchored from one point (this is what I thought the factory tool would do too.... just by looking at it).
OK, time for a dodgy DoubleChevron creation. Given I have the measurements of the correct tools that actually fit in the available space, I modified the copy to work.
This actually allowed me to apply immense pressure to the balljoint to the point where I was scared to do it up any tighter. So I went in search of a good heavy lump hammer to give the ball joint a whack with when I heard a "crack" from the other side of the shed..... Yep, it broke it's hold ........................... FINALLY after at least 5 attempts to make on of these tools I have one that works :banana: :banana: :banana: :banana:
The DoubleChevron special:
with the two proper tools, that I couldn't get to work.
The dimensions of that threaded insert is the critical aspect you need to get right, in order to get the tool to fit in the available space.
To fit the puller screw the bolt all the way into the sleave and fit the sleave into the tool, wiggle it into position and wind the bolt back out until it touches the bodywork. Then drop your two pins through and tension the ball joint and give it a hefty thump and it should fall off
seeya,
Shane L.
Attachments


C-clamp
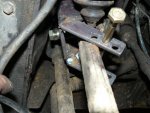
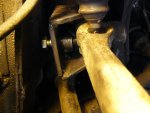
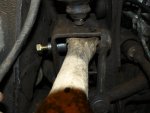
I use a C clamp for the upper arm ball joint. It makes the job very easy. The time consuming part is the unfastening of the bolt inside the hub. For this I have cut a bit of a 24mm spanner, so that it can at least make 25% of a turn for each new grip. The C-clamp recuires quite a bit of force, and then the joint pops out nicely. The new one will slide in nicely as well, with a little grease on it. I have done this many times, and the tool paid for itself with the first joint.. Sorry about the lousy images.

removal

Refit

I use a C clamp for the upper arm ball joint. It makes the job very easy. The time consuming part is the unfastening of the bolt inside the hub. For this I have cut a bit of a 24mm spanner, so that it can at least make 25% of a turn for each new grip. The C-clamp recuires quite a bit of force, and then the joint pops out nicely. The new one will slide in nicely as well, with a little grease on it. I have done this many times, and the tool paid for itself with the first joint.. Sorry about the lousy images.
removal
Refit
That's nicely done. Where did you find a 'C' clamp tough enough for that job I actually damaged my 12ton press pushing top CX balljoints. That tool would save me having to pull the whole arm out to swap ball joints
seeya,
Shane L.
I actually damaged my 12ton press pushing top CX balljoints. That tool would save me having to pull the whole arm out to swap ball joints seeya,
Shane L.
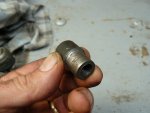
It is many years since I bought this. The C clamp came from a north american webshop. It was listed as an ball joint tool for light trucks and 4x4 cars. The lucky thing with this has been that the adapters in the box fit the CX parts perfectly, making the upper balljoint an easy task to take on. It is very solid and handles tremendous pressure.
Searching the net I think it was this:
Astro Pneumatic 7865 - Ball Joint Service Tool
The photo on this website looks exactly like my box.
http://www.tooldiscounter.com/ItemDisplay.cfm?lookup=AST7865&source=froogle&kw=AST7865
Searching the net I think it was this:
Astro Pneumatic 7865 - Ball Joint Service Tool
The photo on this website looks exactly like my box.
http://www.tooldiscounter.com/ItemDisplay.cfm?lookup=AST7865&source=froogle&kw=AST7865
Hi Guys,
I was getting frustrated with a '64 ID19 last weekend as I still couldn't get the rollbar clamp loose (it's front rideheight was way to low)... I've tried to loosen it the last couple of times I've had the car here.
Anyway, I looked at it last weekend and though "bugger me I'm an idiot"...... And went off searching through toolboxes. I've always wondered what the hell this tool is:

The tools *should* have the rounded corners as shown, that's how the bolt is on the rollbar clamp.

You should be able to make one by drilling a 6mm hole and ovalising it out with a dremel tool.
THis makes setting the ride height on DS's incredibly simple .... IF YOU HAVE FULL LENGTH RAMPS. Don't try this unless you have full length ramps or a pit.
seeya,
Shane L.
I was getting frustrated with a '64 ID19 last weekend as I still couldn't get the rollbar clamp loose (it's front rideheight was way to low)... I've tried to loosen it the last couple of times I've had the car here.
Anyway, I looked at it last weekend and though "bugger me I'm an idiot"...... And went off searching through toolboxes. I've always wondered what the hell this tool is:
The tools *should* have the rounded corners as shown, that's how the bolt is on the rollbar clamp.
You should be able to make one by drilling a 6mm hole and ovalising it out with a dremel tool.
THis makes setting the ride height on DS's incredibly simple .... IF YOU HAVE FULL LENGTH RAMPS. Don't try this unless you have full length ramps or a pit.
seeya,
Shane L.
Attachments

Hi Guys,
CX ( GS ?? ) lower arm inner bush tool
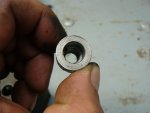
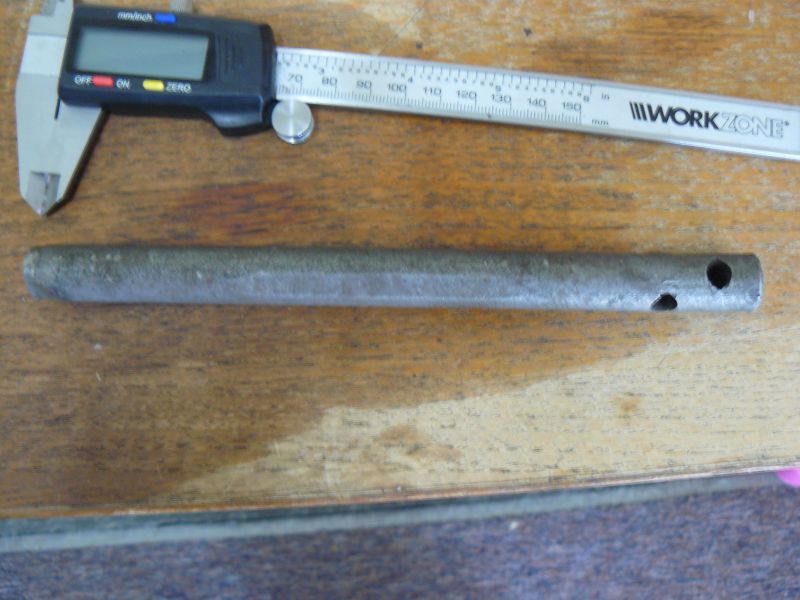
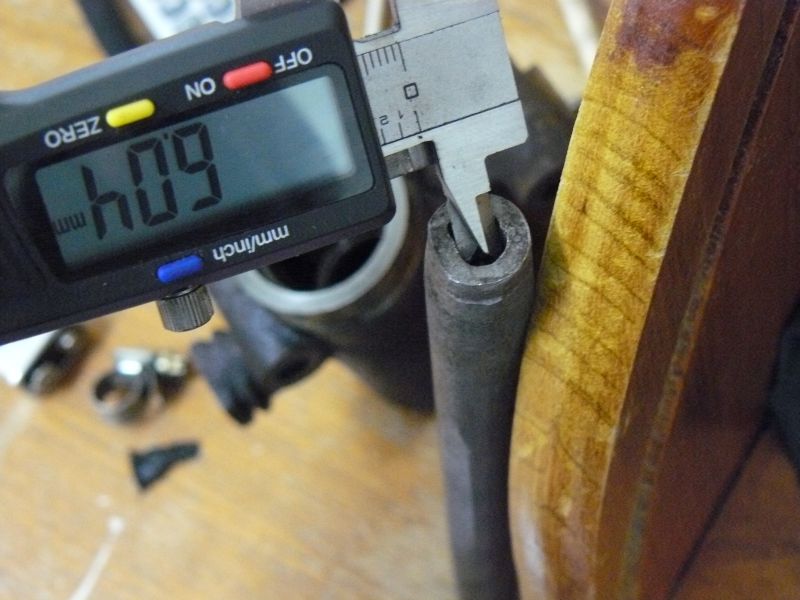
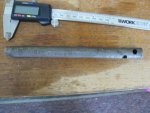
it looks like I'm going to have to buy in enough silver steel to make 20 of these tools ..... Arrrhhhh If there is any interest I could cover costs by making four of them for sale @ $35.00 + postage: (silver steel the cheapest I have found is $70 for 1meter ... enough for 20 tools ). 16mm mild round steel is cheap as chips from your local metal place. The alan head bolts M8 x 1.25 are readily available in the exact size required from the local bolt store. I just tapped a M8 x 1.25 thread into the end cone.

seeya,
Shane L.
CX ( GS ?? ) lower arm inner bush tool
it looks like I'm going to have to buy in enough silver steel to make 20 of these tools ..... Arrrhhhh
If there is any interest I could cover costs by making four of them for sale @ $35.00 + postage: (silver steel the cheapest I have found is $70 for 1meter ... enough for 20 tools ). 16mm mild round steel is cheap as chips from your local metal place. The alan head bolts M8 x 1.25 are readily available in the exact size required from the local bolt store. I just tapped a M8 x 1.25 thread into the end cone.seeya,
Shane L.
Attachments


Anyway, I looked at it last weekend and though "bugger me I'm an idiot"...... And went off searching through toolboxes. I've always wondered what the hell this tool is:
The tools *should* have the rounded corners as shown, that's how the bolt is on the rollbar clamp.
You should be able to make one by drilling a 6mm hole and ovalising it out with a dremel tool.
THis makes setting the ride height on DS's incredibly simple .... IF YOU HAVE FULL LENGTH RAMPS. Don't try this unless you have full length ramps or a pit.
seeya,
Shane L.
Shane,
If you drill a 6mm hole, that's what you have. Making the sides straight is also a mjor part of the equation.
If you take a piece of round stock, machine ( or file, or cut with a grinder, whatever ) to diameter of the straight sides the required width, then machine a tube the same ID, silver solder it to the first piece and Robert's either mums or dads brother. No slipping.
If you look carefully at the original fastener you will note a radius in the top of the head.
Those with a little lateral thought will recognise this can be replicated in the tool by the application of a drill bit, then there is a perfect fit.
Or cut them from a less than favourite elcheapo 1/4" drive socket.
The tool need only be made from mild steel.

FYI, there are three different sizes of this particular head on fasteners fitted to various Ds.
1. The steering column collar securing sleeve
2. The anti-roll bar adjuster
3. The transmission case to engine fasteners.
Shane,
If you drill a 6mm hole, that's what you have. Making the sides straight is also a mjor part of the equation.
If you take a piece of round stock, machine ( or file, or cut with a grinder, whatever ) to diameter of the straight sides the required width, then machine a tube the same ID, silver solder it to the first piece and Robert's either mums or dads brother. No slipping.
If you look carefully at the original fastener you will note a radius in the top of the head.
Those with a little lateral thought will recognise this can be replicated in the tool by the application of a drill bit, then there is a perfect fit.
Or cut them from a less than favourite elcheapo 1/4" drive socket.
The tool need only be made from mild steel.
FYI, there are three different sizes of this particular head on fasteners fitted to various Ds.
1. The steering column collar securing sleeve
2. The anti-roll bar adjuster
3. The transmission case to engine fasteners.
That's brilliant!! All I'd need to do is learn how to silver solder ... the damn thing would never work if I soldered it together

I'm finding the hardest bit is getting the raw materials. For the lower arm bush extractor I ended up wandering the yard in search of a bit of "round bar" that is 27mm (or larger so I can turn it down). I couldn't buy it from the local metal places.... But I found a Renault 12 driveshaft on my scrap metal pile was the perfect diameter. I'll cut some chunks of metal out of that :roflmao:
seeya,
Shane L.
Good work Shane. There's a vendor on Oztion.com.au (Now Quicksales) who deals in offcuts. I know he sometimes has silver steel on offer. He's in Sydney and I think it's offcutsgalore or somthing like that. It may be less expensive for you. However, for the occasional use you might get away with mild steel in some cases.
Good work Shane. There's a vendor on Oztion.com.au (Now Quicksales) who deals in offcuts. I know he sometimes has silver steel on offer. He's in Sydney and I think it's offcutsgalore or somthing like that. It may be less expensive for you. However, for the occasional use you might get away with mild steel in some cases.
Thanks David,
yes I found him. 5/8th round he has for sale is perfect. His 900mm length is $90.00 + postage (about $25 from memory). So he's nearly $50 more expensive. If he had a 200mm length ... it'd be perfect, I emailed him last week asking did he have shorter lengths and received no response
No biggie either way... I'll make up half a dozen tools and flog them off on the CX list for enough to cover the $70 and I then have my own for nothing
(other than lots of time and a little effort).The oztion guy sure does make finding the "impossible" quite easy (that being small amounts of any of this stuff).
seeya,
Shane L.
That's brilliant!! All I'd need to do is learn how to silver solder ... the damn thing would never work if I soldered it together
seeya,
Shane L.
http://www.cupalloys.co.uk/silver-soldering-tips-c25.html
Then you can make hydraulic lines and test equipment...
Cam Belt tools; DW10ATED engine
Hi Toolys,
Can anyone help with dimensions of the tools (really) needed to change the cam belt on a DW 10ATED HDI engine.
Also is there a reliable alternative method for measuring the belt tension? i.e. alternative to "special tool". I have always set cam belts according to the Audi recommended method of setting the belt tight enough to allow 90 degrees of belt twist in the longest unsupported free length. Does anyone suggest a problem with this method on Peugeot/Citroen?
regards,
FarmPug
I have some of the original "Citroen training videos"..... It's bloody hilarious, they use those special tensioners for the belts..... It's so incredibly easy ................................................................ When the engine is bolted up to an engine stand like it is in the videos. I imagine it would be utterly bloody impossible to fit any tensining tool in there with the motor fitted to the car. :roflmao:
Take a look at ebay.co.uk ... search for "timing belt tools". There is a full kit you buy that'll pin everything and lock the crank. David S I'm sure will now more.
seeya,
Shane L.