The "Blue Danube"

Pulling things apart is certainly always easier than trying to remember how things go back together, in what sequence and what nuts and bolts go where.... But half the fun!

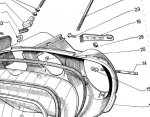
spent a few hours rooting around putting the bloody radiator condom back together... It was a pain to pull apart, and even more so to reassemble it! It was my first go at bifurcated rivets - not the easiest suckers to intall, especially in confined spaces like the shroud...

But the result turned out quite well!


View attachment 83181

The second part (after the pesky rivets) were the staples. They actually went in ok after drilling out the holes in the straps. I was quite happy with the result... And then realised I put the vinyl sleeve onto the outside of the top frame, not from the inside - thought it was a little tight. So I had to pull the whole frame apart again, lucky I glued the felt onto the frame as well..., NOT! :D:mad:

View attachment 83182

Just in case: here the rivets, from Bunnings...

View attachment 83183

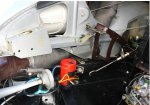
The Sunday was occupied adding the wheel arch covers, the radiator shroud and the air ducts, as well as the front valance - my first blue metallic panel! Looks fantastic! The blue with the white wall tyres, the black frame and the golden bolts... Very nice, really like the combo!

View attachment 83184

Beats me... Sorry for the photo being upside down (again).

Needed some fine finger work to get all the screws for the air ducting in place. Normally I guess they are being installed before the shroud and valance panel goes on, but I couldn't remember which bit goes where, so it was a bit tight. anyway, all good now, bolts still left loose, to enable adjustment.


View attachment 83186

Next will be the front bumper and some more ancillaries like horns, then onto the side panels.

no good news from the upholsterer: he can not find the right fabric...

does anyone know of a supplier of the blue velour fabric in Australia? Might ring around a few more trimmers to see whether they can help... Worst case I might have to get seat and door trim covers from Citro-Toon. But not really what I like to do.

so, any help would be appreciated!

Sven


I wonder why I never thought of turning the car on its back to show off that beautiful paint job on the underpan.

SF.
 
The hardest part was lifting it up to the ceiling... Then I just used double sided tape to hold it there.... DOH! :)

Sven
 
Choices, choices....

Three days off... Always nice to have a long weekend to get things done. First off was the front bumper: after a bit of pushing and prodding all the freshly powdercoated and polished parts fitted together well and sat level on the frame and front valance panel. Final adjustment will be when the bonnet and front fenders get put back on.

image.jpg

Yes, I know... Not everyone is a fan of white walls. But I like them! And with the newly plated nuts... Lovely. Who doesn't like gleaming golden nuts? :roflmao:

image.jpg

Horns all back together, again, I am a sucker for the golden electroplate... Horn porn!?

image.jpg

Also got my badge back from A Class Metal Finishers in Adelaide... Not cheap, but as those badges aren't available any more, it had to be redone. And as always, they have done an excellent job! Last thing I need is a freshly painted car and then stick a corroded badge on it...

image.jpg

Contrary to my above experience, I started unwrapping my new interior handles from Der Franzose. The existing ones were badly peeling as you can see, and as I couldn't remove the plastic toggles (one is screwed in, so ok to remove, but the main one has a pressed in pin... And even drilling it out didn't really work) I had to buy repro ones...

As you can see, the new ones have chrome toggles, and the fit wasn't good. The toggles didn't lock and jammed up - started getting a bit peeved again with the repro fit.... But after a bit of thinking...

image.jpg

I filed a little groove into the main toggle which enabled it to move a little more and the second lock latch then worked. If you look closely you can already see the pitting in the cast - wouldn't be surprised if they corrode within a year.... Jury's out! :mad::mad::mad: But not impressed. at least the other three were a little better fit.

image.jpg

So onto the doors: as always, had to wreck my brain cells what had to be put in place first, but after a little mucking around it all went together much easier than I remembered when I pulled the doors apart.

image.jpg

Especially using Chris' column tool for the horseshoe clamp... Easy as...

And also my panic about the window guides: No trouble at all.

So, for the novice, here the sequence for reassembly: First the outer door handle. Then the locking mechanism with internal door handle. Then the window guides, then the window winder mechanism, then put the glass with guides in and push it all the way down so the top of the door is unobstructed again. clip the fuzzy and the outer seals in and lift the glass back out. Then clip the horseshoe and the other two guide arms in, the two locking screws - and voila: the window glass winds up and down nicely!

image.jpg

Now to the fun part (maybe)....

And here we go again: the pain of picking a colour - this time for the interior. As mentioned before, I am struggling to find blue velour fabric. So the trimmer suggested suede. I am starting to like it and Warwick has a great choice of colours as you can see. And therein lies the challenge: too much choice?

image.jpg

I still like a blue interior (9th or 10th from the bottom right)... My wife pushed a caramel ( top left). My neighbour had a psychadelic fit and suggested orange of all colours... Crikey! Even I had to balk at that... Green was also in the race at one stage. But blue is original and I do like it, so:

As the swatches are small, I went to the Haberdashery store (don't you like that word? Haberdashery...:D) and bought a couple metres of blue fabric to see what it looked like draped over the seat. After I turned the car on its side that was of course, SF...


image.jpg

So now I only need to decide... 50/50 chance.... One minute I am going for the lighter blue, then the darker one again. And if all else fails I get my wife and she tells me none of those two really match as the blue metallic has a green tinge in it depending on the light... Fun, eh?

image.jpg

I will let it percolate a little more through my brain - it will come to me... The light or dark side ... Hmmmmmm, who to join?

As you can see I reattached the doors straight away to see whether they still shut and align - not bad for a first go.. After a little adjustment of the striker plate, the doors shut nicely and the glass sat well against the door seals, too. The driver's side didn't align as well, maybe I made an error writing down what shims go where - anyway, not hard to fix.

But doesn't it look great! It will become a nice little car when it is done. Can not wait! A couple more months and she will be back on the road. Then I have to find a name for her...

Sven
 
But doesn't it look great! It will become a nice little car when it is done. Can not wait! A couple more months and she will be back on the road. Then I have to find a name for her...

Sven

It does look great, I bet she will look even more so once she sees the light of day.

You are doing a fantastic job, love the colour and the paint looks good, I know you had to press your painter to attend to detail but it really is worth it. Painting the doors fully on the inside, important with a colour change :approve:

We are let down by repro parts, I found a supplier who manufactured the inner door handles in brass and then chromed - heavy as but the finish is superb and should outlast the car.

Very impressed with your approach - look forward to seeing her first hand :wink2:

Cheers
Chris
 
Three days off... Always nice to have a long weekend to get things done. First off was the front bumper: after a bit of pushing and prodding all the freshly powdercoated and polished parts fitted together well and sat level on the frame and front valance panel. Final adjustment will be when the bonnet and front fenders get put back on.

View attachment 83680

Yes, I know... Not everyone is a fan of white walls. But I like them! And with the newly plated nuts... Lovely. Who doesn't like gleaming golden nuts? :roflmao:

View attachment 83681

Horns all back together, again, I am a sucker for the golden electroplate... Horn porn!?

View attachment 83682

Also got my badge back from A Class Metal Finishers in Adelaide... Not cheap, but as those badges aren't available any more, it had to be redone. And as always, they have done an excellent job! Last thing I need is a freshly painted car and then stick a corroded badge on it...

View attachment 83683

Contrary to my above experience, I started unwrapping my new interior handles from Der Franzose. The existing ones were badly peeling as you can see, and as I couldn't remove the plastic toggles (one is screwed in, so ok to remove, but the main one has a pressed in pin... And even drilling it out didn't really work) I had to buy repro ones...

As you can see, the new ones have chrome toggles, and the fit wasn't good. The toggles didn't lock and jammed up - started getting a bit peeved again with the repro fit.... But after a bit of thinking...

View attachment 83684

I filed a little groove into the main toggle which enabled it to move a little more and the second lock latch then worked. If you look closely you can already see the pitting in the cast - wouldn't be surprised if they corrode within a year.... Jury's out! :mad::mad::mad: But not impressed. at least the other three were a little better fit.

View attachment 83685

So onto the doors: as always, had to wreck my brain cells what had to be put in place first, but after a little mucking around it all went together much easier than I remembered when I pulled the doors apart.

View attachment 83686

Especially using Chris' column tool for the horseshoe clamp... Easy as...

And also my panic about the window guides: No trouble at all.

So, for the novice, here the sequence for reassembly: First the outer door handle. Then the locking mechanism with internal door handle. Then the window guides, then the window winder mechanism, then put the glass with guides in and push it all the way down so the top of the door is unobstructed again. clip the fuzzy and the outer seals in and lift the glass back out. Then clip the horseshoe and the other two guide arms in, the two locking screws - and voila: the window glass winds up and down nicely!

View attachment 83687

Now to the fun part (maybe)....

And here we go again: the pain of picking a colour - this time for the interior. As mentioned before, I am struggling to find blue velour fabric. So the trimmer suggested suede. I am starting to like it and Warwick has a great choice of colours as you can see. And therein lies the challenge: too much choice?

View attachment 83688

I still like a blue interior (9th or 10th from the bottom right)... My wife pushed a caramel ( top left). My neighbour had a psychadelic fit and suggested orange of all colours... Crikey! Even I had to balk at that... Green was also in the race at one stage. But blue is original and I do like it, so:

As the swatches are small, I went to the Haberdashery store (don't you like that word? Haberdashery...:D) and bought a couple metres of blue fabric to see what it looked like draped over the seat. After I turned the car on its side that was of course, SF...


View attachment 83689

So now I only need to decide... 50/50 chance.... One minute I am going for the lighter blue, then the darker one again. And if all else fails I get my wife and she tells me none of those two really match as the blue metallic has a green tinge in it depending on the light... Fun, eh?

View attachment 83690

I will let it percolate a little more through my brain - it will come to me... The light or dark side ... Hmmmmmm, who to join?

As you can see I reattached the doors straight away to see whether they still shut and align - not bad for a first go.. After a little adjustment of the striker plate, the doors shut nicely and the glass sat well against the door seals, too. The driver's side didn't align as well, maybe I made an error writing down what shims go where - anyway, not hard to fix.

But doesn't it look great! It will become a nice little car when it is done. Can not wait! A couple more months and she will be back on the road. Then I have to find a name for her...

Sven

Hi Sven
Your car looks like new, beautiful in all aspects I can appreciate how much work you put in to it and as always it seems a never ending story but now being so close to the finish line its a huge satisfaction and unforgettable experience.
Well done
PS my surname is Svensson are you Swedish?
 
German. The Swedish name is to throw people off track.... But after 20 years in Australia more Aussie than German these days....
 
I bought a roll of red velour from Ken (kenlin) maybe pm him to see if he has the details of his supplier? Where there is red you'd assume there may be some nice blue also. There must be some around somewhere Sven. Have you looked at any US auto upholstery sites, tried Darrin at Citroen Classics in UK, it should be pretty easy I would have thought.
 
Well, while waiting for my last rear quarter panel to arrive, I focussed on the door locking mechanism on the drivers side and the bootlid.

been having trouble with both driver side doors: I cannot get them to shut as easily as the passenger side! No new seals, same shim arrangement as before, locks look fine, striker plates a tad worn, but... I just don't seem to have enough adjustment in the chassis to move them out further so the "star roller" (I am sure it has a technical name) locks into its second stage...

image.jpg

I filed the sharp edges a little, which makes the roller roll into it easier, it clicks into stage one, but I then don't have enough give in the seals to get the star to turn another click into stage two. I moved the plate out as far as I can, no better... Am I missing something? There are not a lot of things to play with, there is no adjustment in the door...

image.jpg

So I gave up (for now) and focussed on the boot lid. After the fun part of installing the lock and the chevrons I started gluing on the new sponge seal.... Bit of a bugger, must admit it didn't stick too well. Kwik Grip doesn't seem to be strong enough and the trim adhesive only a little better.

image.jpg

Got it to stick but may need a little more fiddling. So I installed the lid to get it out of the way, but also to have the seal under pressure. It may settle over time as it takes the shape of the boot edges.

image.jpg

Bit more bling. New springs and plated lid stays. Now the lid stays open, rather than being limp...

image.jpg

Repro rubber... As many said before: how do you get it to sit flat? Time? Heatgun?

image.jpg

A nice new boot lid installed. Must admit, I think this is my favourite panel on the car...
image.jpg

Some detail.... Love it!

image.jpg

Swaying away from the brighter blue now... Looking at Navy Blue interior to not make it too lolly pop, but still funky...

image.jpg

Sven
 
Repro rubber... As many said before: how do you get it to sit flat? Time? Heatgun?

View attachment 83885

Sven

Sven,
Try applying a little stretch to the rubber as you round the corner - new clips will help hold the rubber under slight tension and make a nice seal to the glass.

attachment.php


I can't help with the door strike other than to say your adjustment might be at the connecting rods inside the door - if set too short you may not have the required movement to reach the second latch, once you have this right you should be able to move the door strike back to where it should be.

Cheers
Chris
 

Attachments

  • DS Boot rubber clip.JPG
    DS Boot rubber clip.JPG
    26 KB · Views: 743
looking incredible Sven. Stay patient and keep on keeping on, you'll get there in the end. Take your time as this is a very fun bit that will all be over pretty soon. Just remember it is like christmas day opening all those presents and stacking them into a perfect DS shape.
cheers Tony
 
been having trouble with both driver side doors: I cannot get them to shut as easily as the passenger side! No new seals, same shim arrangement as before, locks look fine, striker plates a tad worn, but... I just don't seem to have enough adjustment in the chassis to move them out further so the "star roller" (I am sure it has a technical name) locks into its second stage...

View attachment 83880

I filed the sharp edges a little, which makes the roller roll into it easier, it clicks into stage one, but I then don't have enough give in the seals to get the star to turn another click into stage two. I moved the plate out as far as I can, no better... Am I missing something? There are not a lot of things to play with, there is no adjustment in the door...

View attachment 83881

Beautiful work Sven - can't wait to see the car at the grand Display this year...!

A couple of things to try.

1. Often it's the angle the lock is on that makes it - try tilting the bottom of the latch upwards a tad - this means the teeth are a little closer - sometimes enough to make it latch nicely.

2. Try swapping the front and rear latches.

3. I would suggest not to file the teeth (apart from a de-bur) - that can make it worse. I tried this once and had to throw away the latch.

4. This upsets panel alignment so is probably the last to try - the tracks the door frame rubbers sit in can be bent inwards a little to deepen the depth the door goes into the frame (to a point - the bottom of the door hitting the sill is the hard stop. I've seen them bent out towards the outside of the car a lot, to the point where the door does not close nicely.

A nylon drift behind the rubber (fold it back) and a heavy hammer can move the mounting strip the rubber runs on so it's bent more towards the inside of the car.

The only safe way to do this is to pull the rubber out of the channel just on the pillar on the lock side of the door opening. You can gently pull out the rubber just on the outside (not the inside) so the drift is contacting the metal directly.

I think in the past they were tampered with to get a good seal on the door.

Watch the glass fit if you do this...! The door closing deeper could mean too much tension on the top of the glass and possible breakage.

5. If there is enough space between the bonnet and B-pillar you can take out a shim from both top hinges - this can help - but watch the glass warning above.

6. Sometimes the latches are just too worn and replacement is the only option. I'm sure replacements could easily be found on the list - lots of rusty rear doors around with relatively un-used lock mechanisms.

Cheers,

Mark...:)
 
A couple of things to try.

1. Often it's the angle the lock is on that makes it - try tilting the bottom of the latch upwards a tad - this means the teeth are a little closer - sometimes enough to make it latch nicely.

2. Try swapping the front and rear latches.

3. I would suggest not to file the teeth (apart from a de-bur) - that can make it worse. I tried this once and had to throw away the latch.

4. This upsets panel alignment so is probably the last to try - the tracks the door frame rubbers sit in can be bent inwards a little to deepen the depth the door goes into the frame (to a point - the bottom of the door hitting the sill is the hard stop. I've seen them bent out towards the outside of the car a lot, to the point where the door does not close nicely.

5. If there is enough space between the bonnet and B-pillar you can take out a shim from both top hinges - this can help - but watch the glass warning above.

6. Sometimes the latches are just too worn and replacement is the only option. I'm sure replacements could easily be found on the list - lots of rusty rear doors around with relatively un-used lock mechanisms.

Thanks Mark, just saw the grand display date... Should make July...

will play around a little more with your point 1. Done 2, made no difference. 3: Have maybe filed too much now, but not sure yet. 4 and 5: haven't touched the rubbers and the doors locked prior to disassembly... So I think I leave the rubbers alone for now.

Sven
 
Quite a complex sucker.....

No matter how many photos you take, the one you need you haven't taken... That was pretty much the summary of this weekend's front fender assembly.

I must admit I was a little apprehensive of the assembly of the headlight, trim details and getting the light to seal against the glass. The flimsy trim actually went on a lot better than I expected, the new paintjob build up didn't interfere with the trim and it clipped in well, including the joiner clip... Phew, paint not scratched either!

After reattaching all the sealing rubbers and riveting on the flaps, the next stage was the glass: After a few trials I finally worked out that the glass is held by four clamps: knew about the two plastic holder with the long and short extensions... But didn't remember that the bottom edges of the glass were held by the two M7 clamps - thought those two were holding the lamp holder as well. After a bit of swearing and cursing I finally worked it out.


image.jpg

After gluing the sealing rubber into place and tightening the clamps, I checked with a feeler gauge whether any gaps remained... And there were none, so it should be water tight - time will tell!

image.jpg

And then I "just wanted to budge the locknut that was seized up a little"... And one of those moments: the bolt snapped, should have known, aluminium after all... Of course no spare...

image.jpg

After a bit of soul searching and ferreting around in the nuts and bolts storage... Found an M6 joiner. So, recut a thread, screwed the two halves together and it was (almost) as good as new: Lucky! :approve:

image.jpg

Didn't take any shots of the lamp holder reinstall... Needed all my hands and more to fiddle the screws, spacers, seals, but in hindsight it is not a bad design. It went together pretty well and I think the seal is ok, too.

The old indicators were pretty worn, chrome peeling off, so I bought new ones... Again: Repro altert! The fit wasnt great, needed some bending, filing and pushing to make it fit.

image.jpg

New air tubes assembled, mesh strapped up and pre-bent, ready to shove into the fender...

image.jpg

Worked better than I thought. The new tubes are quite stiff, and compared to the old ones certainly rounder... But they went in Ok and slipped into the blower. Only thing is that I cannot find the clamp that holds them in place... I am sure I got them back from the powder coater, but for the life of me I cannot find them... Anyway, they will turn up...

image.jpg

Again, three pairs of arms made light work of slipping the fender into place, pushing it into place and trying to align it with the front door. Still a little more adjustment to finish it off, but sufficient for now until the second one is in place and the hood as well - then the adjustment fun starts...

image.jpg

But looks good, doesn't it?

image.jpg

One side complete - a nice feeling and satisfying...

image.jpg

Back to the interior. You might remember that I have been tossing up suede fabric in various shades of blue. Picked a navy, but then my trimmer came up with a nice blue fabric that he used on a previous job. So again, same as with the paint colour: last minute change, but feels like the right choice. A nice mid blue.

image.jpg

Carpet choice picked as well... A lighter grey that goes well with the sill vinyl and the blue. Done! Interior dropped off last week, door cards primed and ready to get it done. Might take four weeks, but that's fine, still plenty to do on the car anyway.

image.jpg

More next week.

Sven
 
Hi Sven

regarding the door jam. I had similar trouble with my front left door.... wouldn't latch in the closed position, just rebounded into the secondary position. After adjusting the strike plate every which way I applied some WD40 to the star wheel and striker plate and hey presto problem solved. Perhaps a combination of lubrication and the correct position for the plate will work. :2cents:

Matthew
 
Quick one... as I get to the end of the assembly... I have some bits left over (oops) and no idea where they are to go. But I am sure one of you experts will recognise the parts

The top one are two M7 square nuts - any idea where they belong?

The bottom plates I think go below the aluminium cross brace fender to fender, but not 100% sure either?

IMG_3822.jpg

Appreciate guidance! Thanks in advance.
 
Quick one... as I get to the end of the assembly... I have some bits left over (oops) and no idea where they are to go. But I am sure one of you experts will recognise the parts

The top one are two M7 square nuts - any idea where they belong?

The bottom plates I think go below the aluminium cross brace fender to fender, but not 100% sure either?

View attachment 84433

Appreciate guidance! Thanks in advance.

Are you sure two square nuts are M7? I would be tipping they are M5 and are used for assembly of the headlight buckets item #20

attachment.php


Yes, the two plates are as you suggest and sit under the cross brace/tyre support.

attachment.php


Cheers
Chris
 

Attachments

  • Headlight bucket M5 nut.JPG
    Headlight bucket M5 nut.JPG
    56.3 KB · Views: 623
  • Tyre support plate.JPG
    Tyre support plate.JPG
    74.4 KB · Views: 614
Thanks Chris. They are definitely M7, the square M5 nuts are already installed in he head light buckets.... So the M7 must go somewhere else
 
Top