wow they must be the shiniest vents in the bloomin world Sven! the radiator intake can be reattached quite well with bifiburcated rivets, beats stuffing around with staples which are a royal pain. We'll need some advice on your polishing techniques!

You are using an out of date browser. It may not display this or other websites correctly.
You should upgrade or use an alternative browser.
You should upgrade or use an alternative browser.
The "Blue Danube"
- Thread starter bleudanube
- Start date
Sven, velour is great stuff. Every bloody car has leather seats these days, so boring. If not velour then vinyl! I remember the utter luxury of velour seats as a kid, particularly when combined with the super comfy seats of a DS - Plush with a capital P.
cheers Tony
cheers Tony
Will post photos of the headlight buckets next week. I think i got the right colour now... Surfmist.... We will see!
Sven
Hi Sven,
Love your work.
I think your choice of colour is beautiful - one of my favourites. And it's not only a DS colour - it's correct for the year...!
I also think as far as I can tell on a computer screen that 'Surfmist' is a good choice for the buckets. The key to painting the buckets is not to make them too glossy - freshly sprayed acrylic without being buffed is pretty close.
Keep it up - the grand display is only 4 months away...!
Cheers,
Mark...
")
We'll need some advice on your polishing techniques!
easy: just a calico polishing wheel on a bench grinder with the standard polishing block... Nothing fancy. Just time consuming and a bit of gruntwork to get the residue off afterwards.
Sven, velour is great stuff. Every bloody car has leather seats these days, so boring. If not velour then vinyl! I remember the utter luxury of velour seats as a kid, particularly when combined with the super comfy seats of a DS - Plush with a capital P.
cheers Tony
Must agree Tony... One of the things my kids loved compared to being squeezed into the 911 I had a few years ago are the plush velour seats and that you can make them into a bed
and stretch out... With lots of room in the front still remaining.and I just love the bright blue.
Sven
Got to the headlight buckets this weekend. I had primed and sanded them last weekend, so all i needed to do was paint them. The Anchorbond Surfmist worked really well, both in colour match and in gloss level. Put on two coats and then a couple of dust coats to take some of the satin gloss off. I think they loook great now.


Close up of the gloss / surface... Don't think it shows that well.

Here the can. One can did both buckets... i liked the flow and nozzle, too. And seemed to have a good volume of paint in it, not like some of the cheaper cans..

As mentioned last week, my wife found a metal zipper at Spotlight and sewed it in - $8.00 later... Done!

Also spend a couple of hours scrubbing rubbers again, getting 45 years of gunk off them. I have bought a can of Meguiars rubber /trim conditioner and must admit: almost like hand cream.... Rubbers now nice and soft and black again!

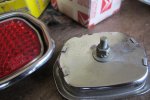
The last job for today was to pull apart the cats eyes of the rear fenders. Amazing how crappy and brittle they had become. Almost disintegrated into a dozen shards after dropping out of the holder.

Panels should be back from the painter this week and I got to get the next lot of zinc plating off to CP Plating. Besides the front bumper all the bits I have taken off to date have pretty much been restored, and I am looking forward to getting into the engine bay / heaters / cooling system, etc. And the interior of course...
A question I had a while ago: how did you guys restore / clean the underside of the chassis? On a hoist or else? Can not think of a way to pressure wash the underside if not on a hoist... And don't want to skip it. Ideas anyone?
Sven
Close up of the gloss / surface... Don't think it shows that well.
Here the can. One can did both buckets... i liked the flow and nozzle, too. And seemed to have a good volume of paint in it, not like some of the cheaper cans..
As mentioned last week, my wife found a metal zipper at Spotlight and sewed it in - $8.00 later... Done!
Also spend a couple of hours scrubbing rubbers again, getting 45 years of gunk off them. I have bought a can of Meguiars rubber /trim conditioner and must admit: almost like hand cream...
. Rubbers now nice and soft and black again!The last job for today was to pull apart the cats eyes of the rear fenders. Amazing how crappy and brittle they had become. Almost disintegrated into a dozen shards after dropping out of the holder.
Panels should be back from the painter this week and I got to get the next lot of zinc plating off to CP Plating. Besides the front bumper all the bits I have taken off to date have pretty much been restored, and I am looking forward to getting into the engine bay / heaters / cooling system, etc. And the interior of course...
A question I had a while ago: how did you guys restore / clean the underside of the chassis? On a hoist or else? Can not think of a way to pressure wash the underside if not on a hoist... And don't want to skip it. Ideas anyone?
Sven
Got to the headlight buckets this weekend. I had primed and sanded them last weekend, so all i needed to do was paint them. The Anchorbond Surfmist worked really well, both in colour match and in gloss level. Put on two coats and then a couple of dust coats to take some of the satin gloss off. I think they loook great now.
The last job for today was to pull apart the cats eyes of the rear fenders. Amazing how crappy and brittle they had become. Almost disintegrated into a dozen shards after dropping out of the holder.
Sven
Buckets look great Sven, don't forget the shades on your spot lights :wink2:
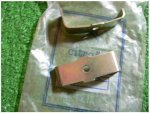
The rear reflectors should have a threaded stud, and brackets to hold them in place. . .
I should have some new or better lenses if you get stuck.
Cheers
Chris
Attachments
Interesting Chris...
Mine were bogged into the fender and I have been wondering how they were attached originally. Have to see whether I can buy the bracket... Worst case I build some myself, they don't look overly complex.. Or did you say you had spares that I could take off your hands (and return the welder as well... I should have completed all the welding now, not expecting to find more in the engine bay).
Sven
Mine were bogged into the fender and I have been wondering how they were attached originally. Have to see whether I can buy the bracket... Worst case I build some myself, they don't look overly complex.
. Or did you say you had spares that I could take off your hands (and return the welder as well... I should have completed all the welding now, not expecting to find more in the engine bay).Sven
Interesting Chris...
Mine were bogged into the fender and I have been wondering how they were attached originally. Have to see whether I can buy the bracket... Worst case I build some myself, they don't look overly complex.
Sven
No spare brackets Sven, but as you say a very easy fabrication, just note one leg is longer that the other. All you need is a bit of flat bar, two folds and a hole drilled.
One of mine was missing the stud, I ground the head of an M5 screw down to about 1mm and fitted from the inside, then fitted a washer and nut to hold it in place, leaving the thread to then fit the bracket.
I am pretty sure I have spare red reflectors. . .
Really looking forward to seeing your panels painted
Cheers
Chris
Got the reflector inserts. Will fiddle the bracket and bolt somehow. Thanks is for the tip.
Sven
Sven
Last edited:
More bling...
Another weekend gone... And more bling pieces completed. The panels aren't back from the painter yet, so concentrated on the last large item I hadn't tackled yet: the front bumper.

It is generally in good condition, with the odd lot of scratches, but nothing a bit of filing and polishing can't fix. The intake parts will go off to the powder coater soon, with a whole pile of other plates and brackets that need to be black...
had a crack at getting rid of deep scratches... Always nervous attacking a reasonable shiny item with a file and sandpaper, but with a bit of trial and error it actually worked ok. The scratches are still there, but very faint.

A few hours of polishing with a sisal wheel and then a loose buff, the bumper parts came up pretty well. Ready for reassembly when the screws are plated and the powder coating is back as well in a couple of week's time.

Repainted the rear ash tray in white. Ready for when the seat backs are reupholstered in white... One day...

Now that all the add ons are done, time to start on the engine bay and A-pillar. After removing the covers, as expected a lot of grease and crap built up over time. I didn't want to remove all the hydraulics as it all works well, so it had to be "scrubbing in situ"... Yuk!

Actually worked ok using truck wash and a tooth brush... it came up well. Repainted the remaining body work and touched up the chassis behind the hydraulics, and as it is covered by a cover panel, I am ok with leaving it as is.

Quite rewarding when things scrub up ok. Will do the other side next weekend, and then attack the fans, battery holder, and possibly drain and pull out the radiator to check it out. The closer I get to the engine I am wondering whether I will leave it in place or go crazy and pull it out... Dont really want to pull it out, but it one of those things... Needs to match the rest of the car... Anyway, still time to decide.
might get distracted once the painted panels are back, which should be this week (have been saying that for two weeks).
Sven
Another weekend gone... And more bling pieces completed
. The panels aren't back from the painter yet, so concentrated on the last large item I hadn't tackled yet: the front bumper. It is generally in good condition, with the odd lot of scratches, but nothing a bit of filing and polishing can't fix. The intake parts will go off to the powder coater soon, with a whole pile of other plates and brackets that need to be black...
had a crack at getting rid of deep scratches... Always nervous attacking a reasonable shiny item with a file and sandpaper, but with a bit of trial and error it actually worked ok. The scratches are still there, but very faint.
A few hours of polishing with a sisal wheel and then a loose buff, the bumper parts came up pretty well. Ready for reassembly when the screws are plated and the powder coating is back as well in a couple of week's time.
Repainted the rear ash tray in white. Ready for when the seat backs are reupholstered in white... One day...
Now that all the add ons are done, time to start on the engine bay and A-pillar. After removing the covers, as expected a lot of grease and crap built up over time. I didn't want to remove all the hydraulics as it all works well, so it had to be "scrubbing in situ"... Yuk!
Actually worked ok using truck wash and a tooth brush... it came up well. Repainted the remaining body work and touched up the chassis behind the hydraulics, and as it is covered by a cover panel, I am ok with leaving it as is.
Quite rewarding when things scrub up ok. Will do the other side next weekend, and then attack the fans, battery holder, and possibly drain and pull out the radiator to check it out. The closer I get to the engine I am wondering whether I will leave it in place or go crazy and pull it out... Dont really want to pull it out, but it one of those things... Needs to match the rest of the car... Anyway, still time to decide.
might get distracted once the painted panels are back, which should be this week (have been saying that for two weeks).
Sven
looking great Sven, with the love and attention you are lavishing on this car its is going to run beautifully for years. I can't wait to see photos of the painted panels.
cheers Tony
cheers Tony
Just Fabulous... The panels are back!
I love the colour... The panels are back from the painter:
here the first photos of the panels still hanging at the painter - in varying lights it changes from blue to green... Very nice!


Especially the hood looks great... Sorry, photo cocked up again...

Afte a few trips in the ute, wrapped up in lots of blankets and towels... All the panels are home without a scratch - phew! :banana:


Once the car is reassembled and driveable again it still needs to be buffed to bring out the shine and flatten some of the imperfections.

Now the challenge was to store all the panels inside the car (or on top for that matter... Surfboard style). They all fit in, ready for all the add-ons to be added at some stage. Had to nick the cushion off the lounge to ensure the roof wont get scratched either...:roflmao:

Well, after all that excitement back to the "boring" stuff of cleaning and scrubbing... Can see myself shortcutting a few things from now on to get into the reassembly... :nownow:
Done the right hand side of the suspension today, so I can concentrate on the engine bay. Looking at the engine, there is a lot of work still. All the parts are dirty, scuffed and show their age. Well, that is life I guess: one step at a time... Weeks of work to go...

Also done the front chassis horns. Cleaned , degreased and a coat of POR 15 should protect it for a while...

The bleu platine with the white roof will look fantastic. Then add a blue interior and it will be a beautiful car again.
sneak preview anyone?

Love it... Cannot wait!
Sven
I love the colour... The panels are back from the painter:
here the first photos of the panels still hanging at the painter - in varying lights it changes from blue to green... Very nice!
Especially the hood looks great... Sorry, photo cocked up again...
Afte a few trips in the ute, wrapped up in lots of blankets and towels... All the panels are home without a scratch - phew! :banana:
Once the car is reassembled and driveable again it still needs to be buffed to bring out the shine and flatten some of the imperfections.
Now the challenge was to store all the panels inside the car (or on top for that matter... Surfboard style). They all fit in, ready for all the add-ons to be added at some stage. Had to nick the cushion off the lounge to ensure the roof wont get scratched either...
:roflmao:Well, after all that excitement back to the "boring" stuff of cleaning and scrubbing... Can see myself shortcutting a few things from now on to get into the reassembly... :nownow:
Done the right hand side of the suspension today, so I can concentrate on the engine bay. Looking at the engine, there is a lot of work still. All the parts are dirty, scuffed and show their age. Well, that is life I guess: one step at a time... Weeks of work to go...
Also done the front chassis horns. Cleaned , degreased and a coat of POR 15 should protect it for a while...
The bleu platine with the white roof will look fantastic. Then add a blue interior and it will be a beautiful car again.
sneak preview anyone?
Love it... Cannot wait!
Sven
Those panels are looking very nice - like new ones. It will be great to bolt those beauties back on and watch a new DS materialise before your eyes. Have fun
cheers Tony
cheers Tony
YESSSS..... Now for the return journey!!!!!
Yes, done! All the crap jobs done... All bits cleaned, scrubbed, painted, coated, plated, polished....
got the last of the plated parts back and one more pile to get back from the powder coater this week. And now I can start putting it all back together! Have I been looking forward to this point? Yes, I have... I must admit I have had enough of CT18 truck wash, degreaser and steel wool.... Time to put on the white gloves and assemble the nice bits...

Even had the bash plate zinc plated - not that anyone will see it...

After mulling over whether to take out the engine, I quickly dismissed that idea. Why remove it if there is nothing wrong with it? So, how to clean all the grot and grime off? Without the ability to wheel it onto tne drive way? Well...

I put a lot of tubs and towels under the engine bay and went for it with truck wash, degreaser and then the pressure washer... And it didnt even drown the garage! Was actually pretty good and well contained! And the engine came up well! As you can see from the tubs - a lot of crap came off... Fun!

So I didnt do all the bits and pieces. I left the engine block, steering, the exhaust and the carby bits and gearbox as it is. All other things I took off: radiator, hoses, heaters, fans, small bits came off and were again attacked with the polisher and wire brush.
All the frame and chassis parts, the fire wall and other black odds were painted with POR15 again, the steering column in off white and the steering parts and pulleys painted green...

Was keen to attack the rocker cover... Used the wire wheel and then clear coated the cover. Checked the valve gap while at it - all good!

The radiator was cleaned and the painted with high temperature black paint, new hoses attached and the rubber buffers replaced. Am a bit nervous that the radiator or hoses may leak after refilling... The crusty coolant was cleaned up, but the hoses are still in crud memory... Let's see...

Close up of the cover and cleaned up distributor and spark plug cables - I like it... NOICE! :banana:

Radiator back in, pipes and hoses in place...

You always forget what things looked like when you got the slow progress every week... Here a "before" photo to remind us of the struggle with scuffed parts...

And here the "after"... Still a few more parts to be added, but it gives you an idea! The water pump is the only part that I couldn't get to in situ, ah well, will live with it... All else looks good.

Once the engine bay is done, I can start on the panels... The two areas I am worried about are the door/glass window guides (how many spacers and where to put them? I forgot and didn't write it down...) and the panel alignment... Again, how many spacers, where to start (fenders and bonnet I would think?). And the headlight turning and levelling mechanism... Hope I took enough photos to work out what cable and gizmo goes hwere and how to adjust it afterwards... Might need some help at some stage...

Anyway, engine gets finished first, then onto the front fenders... Looking forward to it...
Sven
Yes, done! All the crap jobs done... All bits cleaned, scrubbed, painted, coated, plated, polished....
got the last of the plated parts back and one more pile to get back from the powder coater this week. And now I can start putting it all back together! Have I been looking forward to this point? Yes, I have... I must admit I have had enough of CT18 truck wash, degreaser and steel wool...
. Time to put on the white gloves and assemble the nice bits... Even had the bash plate zinc plated - not that anyone will see it...
After mulling over whether to take out the engine, I quickly dismissed that idea. Why remove it if there is nothing wrong with it? So, how to clean all the grot and grime off? Without the ability to wheel it onto tne drive way? Well...
I put a lot of tubs and towels under the engine bay and went for it with truck wash, degreaser and then the pressure washer... And it didnt even drown the garage! Was actually pretty good and well contained! And the engine came up well! As you can see from the tubs - a lot of crap came off... Fun!
So I didnt do all the bits and pieces. I left the engine block, steering, the exhaust and the carby bits and gearbox as it is. All other things I took off: radiator, hoses, heaters, fans, small bits came off and were again attacked with the polisher and wire brush.
All the frame and chassis parts, the fire wall and other black odds were painted with POR15 again, the steering column in off white and the steering parts and pulleys painted green...
Was keen to attack the rocker cover... Used the wire wheel and then clear coated the cover. Checked the valve gap while at it - all good!
The radiator was cleaned and the painted with high temperature black paint, new hoses attached and the rubber buffers replaced. Am a bit nervous that the radiator or hoses may leak after refilling... The crusty coolant was cleaned up, but the hoses are still in crud memory... Let's see...
Close up of the cover and cleaned up distributor and spark plug cables - I like it... NOICE! :banana:
Radiator back in, pipes and hoses in place...
You always forget what things looked like when you got the slow progress every week... Here a "before" photo to remind us of the struggle with scuffed parts...
And here the "after"... Still a few more parts to be added, but it gives you an idea! The water pump is the only part that I couldn't get to in situ, ah well, will live with it... All else looks good.
Once the engine bay is done, I can start on the panels... The two areas I am worried about are the door/glass window guides (how many spacers and where to put them? I forgot and didn't write it down...) and the panel alignment... Again, how many spacers, where to start (fenders and bonnet I would think?). And the headlight turning and levelling mechanism... Hope I took enough photos to work out what cable and gizmo goes hwere and how to adjust it afterwards... Might need some help at some stage...
Anyway, engine gets finished first, then onto the front fenders... Looking forward to it...
Sven
the blue danube
never tire of restos
looking beautiful another DS preserved.
never tire of restos
looking beautiful another DS preserved.
My two cents for what it's worth. Make sure the lower radiator hose and elbow clear the hydraulic pipes running across the top of the steering rack... otherwise they can rub together and you've got a leak. It all looks awesome of course. Looking forward to the panels going back on.
Matthew
Matthew
IT'S ALIVE (again)...
well, after refilling the radiator with fresh coolant and drying out the spark plug holes again (oops... ), the engine started well and to my surprise didn't even leak (yet). Matthew, you were right, the bottom radiator hose was touching, so i adjusted the clamps and hoses a little and it is now all good.
Also gave the car an oil change, new filter and seals to suit. Bit of rooting around with all the screws and little space under the car when not on a hoist, but all good now.

As always despite taking loads of photos, there is always one wire that I didnt take a shot of.... HELP please: where does this one go? It comes off fuse 4 and is called J13/14 on the diagram, but I can't work out where it is going? Anyone?

Also went to see the upholsterer last week. He did have some suitable blue velour swatches, but is still trying to get his hands on the fabric. Apparently his supplier does not stock it anymore.... Might have to search myself. Either blue in the photo would be ok. The one on the right was almost too blue and shiny, so was tending more towards the left, darker blue, with the upper right off white leather grain vinyl for the seat backs, arm rest and door cards.
Will ring him again this week, see whether he was able to find the right fabric. I will then drop the seats, backseat and arm rest off with him and get them done. The carpets can be done later when the car is back together and drivable again. Easier to fit them in his workshop.

After discussions with Chris, the front doors are first on the list to reattach and align... Will be in a couple of weeks time though as we are away next weekend...
Sven
well, after refilling the radiator with fresh coolant and drying out the spark plug holes again (oops... ), the engine started well and to my surprise didn't even leak (yet). Matthew, you were right, the bottom radiator hose was touching, so i adjusted the clamps and hoses a little and it is now all good.
Also gave the car an oil change, new filter and seals to suit. Bit of rooting around with all the screws and little space under the car when not on a hoist, but all good now.
As always despite taking loads of photos, there is always one wire that I didnt take a shot of.... HELP please: where does this one go? It comes off fuse 4 and is called J13/14 on the diagram, but I can't work out where it is going? Anyone?
Also went to see the upholsterer last week. He did have some suitable blue velour swatches, but is still trying to get his hands on the fabric. Apparently his supplier does not stock it anymore.... Might have to search myself. Either blue in the photo would be ok. The one on the right was almost too blue and shiny, so was tending more towards the left, darker blue, with the upper right off white leather grain vinyl for the seat backs, arm rest and door cards.
Will ring him again this week, see whether he was able to find the right fabric. I will then drop the seats, backseat and arm rest off with him and get them done. The carpets can be done later when the car is back together and drivable again. Easier to fit them in his workshop.
After discussions with Chris, the front doors are first on the list to reattach and align... Will be in a couple of weeks time though as we are away next weekend...
Sven
As always despite taking loads of photos, there is always one wire that I didnt take a shot of.... HELP please: where does this one go? It comes off fuse 4 and is called J13/14 on the diagram, but I can't work out where it is going? Anyone?
Sven
I'll have a look at mine in the morning but, given it's position and length my guess would be the heater/blower fan. . .
Cheers
Chris
I'll have a look at mine in the morning but, given it's position and length my guess would be the heater/blower fan. . .
Cheers
Chris
I don't think so guys, although being Aussie spec, I'm easily wrong. The heater fan is usually a mauve sleeve and comes through the harness from an ignition fed circuit. A quick check would be switch on the ignition, switch on the fan (everything else off) and check for power there with a test light. Switch the fan off, see if the light goes out. If the fan runs without testing, you can eliminate that. You can also run this check through the headlight circuit, except you won't need the ignition switch on for that. It looks like a yellow sleeve, so I'm thinking headlamps- main high beam.