Gawd, another R8 upgrade

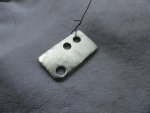
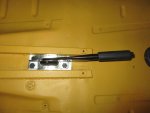
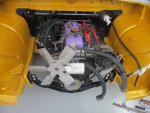
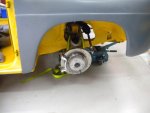
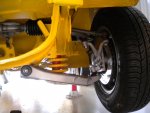
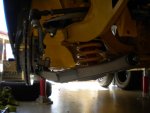
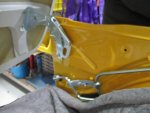
How much did you need to trim off the control arm? Clearly I didn't take that into account. I'll have to check if the adaptor can be changed before I do a production run.

Sent from my Nexus 6P using aussiefrogs mobile app
 
I just squared the high edge off with an angle grinder. The rear peak on the drivers side one. I contemplated adjusting the adapter but taking the peak off the control arm was easier and simpler. It probably needs less than 5mm. It was only just scraping beforehand but enough to move the rail a couple of mm.
 
The joys of working on your own. Spent today trying to get the front end on, then dropping the rear end down onto the gearbox. After much cursing, the rear end is done. I need to get the front springs located right, then bolt the uprights in, so the front end is only partially done. Still its off the trolley and stands and sort of sitting on its' wheels again.
 

Attachments

  • DSCN2983.jpg
    DSCN2983.jpg
    88.5 KB · Views: 377
  • DSCN2981.jpg
    DSCN2981.jpg
    94.5 KB · Views: 386
  • DSCN2984.jpg
    DSCN2984.jpg
    93.1 KB · Views: 385
Front end down. I had a few issues fitting the front springs as it was lifting off the axles stands as per the "renault special tool thread". I started to collate some scrap to try to replicate the tool, but before I did I brought home some scrap biscuit shortening - 15kg solid mass of fat in a box basically. Brought 12x15kg but only put around 8 in the boot. That did the trick!

That'll also work when the time comes to do the final suspension alignment and "tightening up". Then I'll take them back to work and throw them away.
 

Attachments

  • DSCN2989.jpg
    DSCN2989.jpg
    87.4 KB · Views: 367
  • DSCN2988.jpg
    DSCN2988.jpg
    91.6 KB · Views: 404
  • DSCN2987.jpg
    DSCN2987.jpg
    87.6 KB · Views: 358
  • DSCN2986.jpg
    DSCN2986.jpg
    83.3 KB · Views: 348
So, it hasn't progressed as quick as I would like, but there has been some pottering in the shed.
Of note is that I've had some parts sandblasted and either powder coated or zinc plated (depending on what and where). They are going on or just about to go on. I'm pretty close to putting the engine back in, even if it is just to save some space in the garage and stop having to wheel it out every time I want to do some work.

The bonnet got bolted on tonight for a trial fit (and similar to the engine stops having to lift it off and onto a panel stand all the time. I've done a bit of a mock up of the dash, and reinstalled the R10 column (until I finalise a collapsible option) so I can steer it.

I'll visit the panel beater tomorrow I hope - I have the day off to have some medical tests done in the morning. I hope to set a time to take the car back to him to fix the front panel on; finalise fitment of the fibreglass panels, and perhaps leave the doors and panels with him for prep and internal painting so I can bolt them on for good.
 

Attachments

  • IMG_0131.jpg
    IMG_0131.jpg
    91.4 KB · Views: 343
  • IMG_0130.jpg
    IMG_0130.jpg
    92 KB · Views: 372
  • IMG_0129.jpg
    IMG_0129.jpg
    90.8 KB · Views: 367
  • IMG_0133.jpg
    IMG_0133.jpg
    89.9 KB · Views: 349
  • IMG_0128.jpg
    IMG_0128.jpg
    93.8 KB · Views: 357
Mine's loaded up ready to go to the panelbeater for a day visit tomorrow. front clip will go on, and I'll leave the panels there for priming.
I'm watching the forecast intently as I don't want to get the freshly sanded fibreglass panels wet if I can avoid it.
 

Attachments

  • IMG_0154.jpg
    IMG_0154.jpg
    87.5 KB · Views: 320
  • IMG_0153.jpg
    IMG_0153.jpg
    93.7 KB · Views: 352
Front end down. I had a few issues fitting the front springs as it was lifting off the axles stands as per the "renault special tool thread". I started to collate some scrap to try to replicate the tool, but before I did I brought home some scrap biscuit shortening - 15kg solid mass of fat in a box basically. Brought 12x15kg but only put around 8 in the boot. That did the trick!

That'll also work when the time comes to do the final suspension alignment and "tightening up". Then I'll take them back to work and throw them away.

Gee, that looks nice. Brakes should be adequate....

I forgot to comment on the novel mass loading. I'd have used a few bags of cement, but then I'd not thought of 'scrap biscuit shortening' obviously.... :)

You've also reminded me, perhaps a bit uncomfortably, that I can't recall how I did the final tightening of the wishbone axle nuts back when I replaced all those bushes. I suspect I did not do it the right way, but 10-15 years later it is still fine. I'll know what to do next time....
 
I just love reading up on R8 Restorations.
BARNIE is getting there. here is a pic to wet the appetite.

My Son DSCN1634.jpg built me a web site for Christmas, when I populate it all will see what has happened with BARNIE. Stay tuned.

Cheers
Phil

DSCN1660.jpg


Mine's loaded up ready to go to the panelbeater for a day visit tomorrow. front clip will go on, and I'll leave the panels there for priming.
I'm watching the forecast intently as I don't want to get the freshly sanded fibreglass panels wet if I can avoid it.
 
Nearly 12 months and it seems like nothing has happened!

I picked the car up today from the panelbeaters. He had welded in a replacement A pillar section where his previous poor repair was preventing mounting the door and LHS Fr guard. The panel fit is not real good, but I'm not sure if thats due to the length of time the fibreglass panels were in storage before mounting to the car, so there is a fair bit of fettling to get them reasonable - I've given up on perfect!

I've been progressing on brakes, and hope to have the brakes done by the end of the month. I'm also working on the collapsible steering column at the same time. Using a Falcon column like c.lees but may do away with the rag joint and use the falcon uni joint and an intermediate splined shaft.

I can then pop the engine in and start to consider wiring etc.
 

Attachments

  • IMG_0173.jpg
    IMG_0173.jpg
    96.6 KB · Views: 283
  • IMG_0175.jpg
    IMG_0175.jpg
    92.5 KB · Views: 275
  • IMG_0176.jpg
    IMG_0176.jpg
    97.7 KB · Views: 279
  • IMG_0177.jpg
    IMG_0177.jpg
    89.3 KB · Views: 290
Good progress today. I fabricated and zinc plated a mount for the RHS booster then bolted that in alongside its' partner in crime; then fabricated, plated and installed a plate for the aftermarket handbrake (similar to c.lees). Waiting for the rain to go away so I can spray the insides of the guards and the rear chassis rails where the bumper bar bolts to - as these were where the rotisserie bolts were when the shell was painted. After they're done, I can bolt the engine in and get a bit of workshop space back.
 

Attachments

  • IMG_0178.jpg
    IMG_0178.jpg
    92.5 KB · Views: 272
  • IMG_0180.jpg
    IMG_0180.jpg
    92.4 KB · Views: 302
  • IMG_0182.jpg
    IMG_0182.jpg
    90.9 KB · Views: 274
  • IMG_0184.jpg
    IMG_0184.jpg
    103.2 KB · Views: 283
That looks like an engine mounted in there....
Also did a bit of spraying of the guards - insides.

More work continuing on the brakes; then the steering column is next.
 

Attachments

  • IMG_0185.jpg
    IMG_0185.jpg
    92.1 KB · Views: 307
That looks like an engine mounted in there....
Also did a bit of spraying of the guards - insides.

More work continuing on the brakes; then the steering column is next.

Thank goodness you have the restraining chain installed to cope with the horsepower and prevent the engine leaping from it's mounts....
 
They leap from their mounts fairly regularly, but I’m not sure it’s due to power!
 
Another piece of the puzzle assembled today.
I'd had a kangoo 1.9 diesel master cylinder for some time (since early last year) and had one of c.lees aluminium adapters to mount to the std block. Today I picked up some custom machined fluid adapters; blanking plugs and line fittings; and a custom made pushrod (all done using c.lees designs and drawings).

Just waiting on some braided AN4 hose to go from the twin remote reservoirs to the input adapters and I should be ready to bolt the master cylinder into the car.
 

Attachments

  • IMG_0186.jpg
    IMG_0186.jpg
    97.4 KB · Views: 254
Another piece of the puzzle assembled today.
I'd had a kangoo 1.9 diesel master cylinder for some time (since early last year) and had one of c.lees aluminium adapters to mount to the std block. Today I picked up some custom machined fluid adapters; blanking plugs and line fittings; and a custom made pushrod (all done using c.lees designs and drawings).

Just waiting on some braided AN4 hose to go from the twin remote reservoirs to the input adapters and I should be ready to bolt the master cylinder into the car.

I would like to hear how you go as this could also be a worthwhile upgrade to my single cylinder set up with the Gros Brakes.

Please keep us posted.
 
Yeah wait. 2 x boosters, and 1 x master cylinder. (admittedly with twin circuits)

I'm confused (not difficult I confess)

I assumed there was going to be some mad adaptability stuff going on here.
 
Yeah wait. 2 x boosters, and 1 x master cylinder. (admittedly with twin circuits)

I'm confused (not difficult I confess)

I assumed there was going to be some mad adaptability stuff going on here.

A remote booster typically has one circuit, hence one booster per circuit :wink2:
 
Top