Gawd, another R8 upgrade

I bought std bushes from Mecaparts and pressed those in. I think there was some pics on here from back in 2015.
It is not going to be a full on race car. It is a replacement for the white R10, so will be a multi purpose weekend car. It will do a few track events, supersprints etc but probably not open race meets and maybe classic rallies again that I was doing with the R10 previously.

It will be too pretty for dirt events I suspect! Fulfills an ambition/bucket list to have two R8's - one std; one hotted up in the garage.
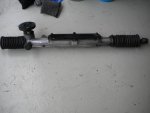
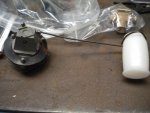
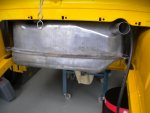
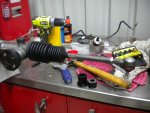
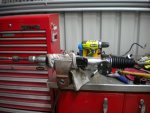
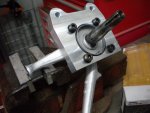
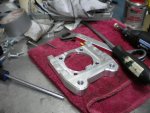
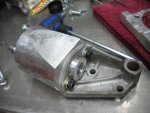
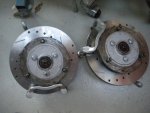
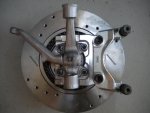
 
Good point Frans. I put the solid bushes in to get full advantage of the whole set up. I think Meca calls it a dangle kit ?! The car is not harsh on the road, even Sydney goat tracks. I run a bigger profile tyre on the road with slightly lower tyre pressures. When driven normally on the street, it feels about the same as the Alconi, which still has all the rubber joints. With the low profile race tyres the difference is like chalk and cheese.

You really have to load up the suspension on the track to notice the rubber distortion and delay on turn in. That is not something you don't actually feel on the road. If you go that quick in NSW or Vic you get locked up and the car is impounded.

Not like the good old days in modified R8's and R10's !
 
Kevin, are you going to race this car because it is going to look beautiful? Reason I'm asking is that it sounds like you have the extra holes to give you some negative camber drilled in the crossmember. Now I might be too fussy but if you are going to race it then you should actually have solid bushes in the wishbones. It is of no use to get the negative camber and under hard cornering the the upper and lower wishbone bushes compress with the additional forces and the wheels then go over to positive camber. A lot of grip will then be lost as the tyre surface changes from a full area grip to a half area grip.

If you have done then ignore my post.

Frans made up a set of solid bushes for the my wishbones few years ago. This upgrade uses material called "Nylatrol" and it is a graphite impregnated nylon that is many times better than the Phosphor Bronze bushes available at Mecaparts. It is appear entry used underwater also because there is no grease that can wash away.

i have yet to used them in anger, but not far away now. Becareful if you order a set to make sure the exact bush openings so Frans makes them to the right size as the wishbones all all slightly different I discovered.

i also purchased and fitted the steering arms from Mecaparts. They went on easy and have the benefit of being full adjustable.

I also suggest you look at drilling the offset holes to achieve the camber, as it will improve the stability and handling.

keep up the good work.
 
R8dream,
I'm not sure I want to go through the pain of pressing the bushes out and in again, maybe a future upgrade once it's back on the road.
I had a Sydney based friend come over and check the cross member out and he believes it had already been drilled out. The previous owner had a bit of suspension work done at Alpine motors in ACT.

On my R10, Dave Collier did an adjustable setup by slotting the holes, welding a right angled plate and two bolts onto the setup. Looks like it will be hard to remove too!


I wouldn't either if you have already gone down your path, just if hadn't then might be worth considering. The adjustable steering arms are a joy to have and work with.

any more pictures of your progress?

Angelo
 
No, you're pretty much up to date Angelo. It was too wet in Sydney this weekend to do much. The next bit of work is more dismantling of the R10 front end which is outside. I'll chase a sender float tomorrow, maybe start cleaning up the rack tomorrow night. I've decided to pull the bolts off the R10 and check their condition and maybe use those if they're good as I don't think I'll be able to get to the bolt shop for most of the week, and not sure they'd have that special square head anyway. I notice you used new bolts. Where did you get yours?

Hopefully I'll get the tank back in during the week, then the gearbox can follow.

All the bolts were pulled off the R8 and I had them replated (Zinc), including the square head ones. A lot of wire brushing!!
Mecaparts sells them but they come up good, so saved a bit there.

The main wishbone (long) bolts you see I had remade, as by trying to get out the original ones I damaged them.

Also I note you made up a new 'rubber' seal for the fuel tank. Just make sure you use neoprene rubber as this will resist petrol, unlike 'conventional' rubber which will break down quickly.
 
Thanks for that.

I bought new "Pin" bolts for top and bottom the long ones you refer to; new dangle adjusters and the locking tab that goes on those. I'll re-use the square head bolts and the locking tabs for the rest. Once I take them off the R10, I can decide if I re-plate; paint or just use as they are based on condition. Of course new balljoints top and bottom and the rack bits as per the previous posts.

I have no idea what type of rubber sheet it was; or even where it came from - probably Clark rubber a few years ago. I plan to smear some Stagg sealing compound underneath it before re-installing.
 
So another afternoon after work, another small step for man.
I finished cleaning up the steering rack last night in the parts washer - I felt old this morning, the back pains from leaning over the thing for ages; the fumes; the degreaser on my hands. But it came up pretty good I think.

I also had a crack at the fuel sender arm. I had bought a genuine VDO round float but found (as did Ray) that it doesn't fit through the standard hole. Thought I would carefully crush it in the vice to make it more oblong - crack! $35 in the bin. So bought the rectangular one from Mini spares in Adelaide. Ordered Monday night, despatched tues; delivered at work just after lunch today. All up was about $21 so at least its' heading in the right direction. Installed the float on the now shortened arm - just straighten out the arm they said. Yep, stress cracking and breaking when I went to re-shape it.

Once the sender was in the tank, that lead me to bolt the tank back in place. Then I thought what the heck, I'll jack up the back of the car (actually lifted it in the centre of the trolley with my trolley jack attachment) enough to slide the gearbox and it's make shift platform trolley underneath. It almost looks it's in place already. I had added the front rotisserie stand on for added security.

When the front is ready, I'll lift the whole shell up with slings and my engine stand; remove the trolley and rotisserie stand, then drop it down onto the gearbox and front wheels.

Not a bad hour or so's work.
 

Attachments

  • DSCN2951.jpg
    DSCN2951.jpg
    96.7 KB · Views: 338
  • DSCN2950.jpg
    DSCN2950.jpg
    93.6 KB · Views: 350
  • DSCN2952.jpg
    DSCN2952.jpg
    90.5 KB · Views: 334
  • DSCN2954.jpg
    DSCN2954.jpg
    84.2 KB · Views: 358
Are you going to install a front tank KB?
If so I have all the dimensions of the cradle I drew up for another member.
I think the front tank is the same as an R4 tank???

Looking good.
 
It was an R4 tank with a triangular wooden frame.
I'm going to put some sort of front tank in, but not sure what yet. I'd like to put a foam filled fuel cell. My engineer recommends a poly one rather than alloy. He claims the alloy ones weep and smell. I haven't found a nice poly one I like yet though.

It sounds like you are on the right track. In a new build, I wouldn’t be using an R4 tank. I doubt even if an engineer would sign it off on a modified car regardless of them being fitted as standard to an earlier parallel model. As fitted to an 8G they are not vented apart from the cap, so all the vapours end up in the boot, and the filler is on the opposite side to a standard R4 tank. Keep looking for a modern front tank that will likely pass scrutineering for a new build.
 
I've been searching for a front tank for a while, none of the poly ones seem to be the correct shape if you want any boot space left. I've been looking for ones around the 40 litre mark, an internal pump would be nice.
 
That's what I'm after. Internal pump maybe not, just 'cause I may start off carburetted then go injection, so would need two different pumps?

Have you looked at the RCI range from Rocket Industries?

Ps - we still need to catch up re shocks; collapsible steering columns and kangoo m/c adapters! let me know when you're likely to be free.
 
You know Kevin, I reckon a cheap airfare to Auckland and a day with Frans would be great for both of you! Just a thought, or "a lonely impulse of delight".. :)
 
After a fruitless trip at lunchtime to acquire some valve springs to cut up (to limit the steering lock on the rack) I dropped in after work to my local mechanic and provider of pink slips to the Byron household. Gave him my shpeel and he comes back with some new nolathane bushes to try. Not a bad fit. So tonight I cut them up to make 15mm spacers for each side, installed on the rack; then screw the tie rod ends on and pull the new boots on. Final task, place the rack in place and put the bolts in finger tight- to allow movement to bolt the steering column on later on.

Finished just in time for my nightly cuppa.
 

Attachments

  • DSCN2956.jpg
    DSCN2956.jpg
    90.9 KB · Views: 339
  • DSCN2957.jpg
    DSCN2957.jpg
    86.8 KB · Views: 364
Last edited:
Not much to report lately, but a couple of significant steps today.
Yesterday I went to visit a fellow restorer and picked up my custom adapter for Kangoo twin circuit master cylinder.
This afternoon, I started assembling the front hubs and brake components.
 

Attachments

  • DSCN2969.jpg
    DSCN2969.jpg
    94.8 KB · Views: 341
  • DSCN2970.jpg
    DSCN2970.jpg
    93.2 KB · Views: 342
  • DSCN2971.jpg
    DSCN2971.jpg
    95 KB · Views: 331
Front suspension this arvo. Bolted the lower control arms up (one had to be trimmed to clear the kangoo adapter), then started on the brakes. Not quite all back together yet but close.
 

Attachments

  • DSCN2974.jpg
    DSCN2974.jpg
    93.9 KB · Views: 346
  • DSCN2973.jpg
    DSCN2973.jpg
    90.1 KB · Views: 359
  • DSCN2972.jpg
    DSCN2972.jpg
    90.5 KB · Views: 379
Top