Gawd, another R8 upgrade

Just wondering if the trim is going to be replaced on the C-pillar (adding weight :)), or are the holes going to be filled?

The outside trim is going back on, and yes there will be some form of trim going on the lower internal bits.
I'm not going to Bustamif's extremes in weight saving. I haven't weighed the guards as yet.
 
So still working on the front suspension before re-installing not the least was searching through all the bits to locate it all. The demolition/rebuild of the garage in between last year didn't help. Mostly everything was bagged and tagged, it was just a case of finding which box they were in.

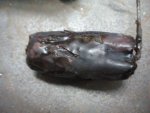
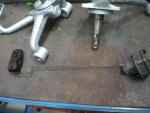
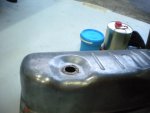
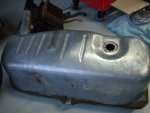
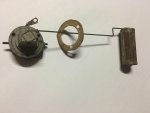
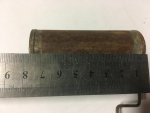
I was diverted onto the fuel tank as this needs to go back in before the gearbox. Gave it a degrease, a scrub and it hasn't come up too bad. I pulled the fuel sender out to do two things - measure the resistance; and check the seal.

I seem to recall someone documenting the rebuilding of their sender float - JohnW, geckoeng? if it was you can you post or email the details please. Also, if someone electrically minded could tell me the proper way to measure the resistance in Ohms of the sender across its' range - COL? The reason I may need to know is that I will more than likely be using an aftermarket gauge hence the need to know.
 

Attachments

  • DSCN2944.jpg
    DSCN2944.jpg
    91.4 KB · Views: 322
  • DSCN2943.jpg
    DSCN2943.jpg
    89.9 KB · Views: 359
  • DSCN2947.jpg
    DSCN2947.jpg
    94.6 KB · Views: 325
  • DSCN2945.jpg
    DSCN2945.jpg
    98 KB · Views: 328
With regard to the float on the sender, I recall I may have shown you one of my rebuilt sender floats on one of your visits to the shed. I discovered that the brass float from a spare 16TS carb was an exact replacement. Just carefully solder it onto the sender rod. Easy as.

I am in Wagga at the moment, otherwise I would go out to the shed and take a pic. By the way, I saw a very tidy 2CV parked in the side street beside the Wagga council Headquarters.
 
I seem to remember Frans (I think) soldered a small domestic light globe to the steel rod as a float, I'm sure it worked.
 
So still working on the front suspension before re-installing not the least was searching through all the bits to locate it all. The demolition/rebuild of the garage in between last year didn't help. Mostly everything was bagged and tagged, it was just a case of finding which box they were in.

I was diverted onto the fuel tank as this needs to go back in before the gearbox. Gave it a degrease, a scrub and it hasn't come up too bad. I pulled the fuel sender out to do two things - measure the resistance; and check the seal.

I seem to recall someone documenting the rebuilding of their sender float - JohnW, geckoeng? if it was you can you post or email the details please. Also, if someone electrically minded could tell me the proper way to measure the resistance in Ohms of the sender across its' range - COL? The reason I may need to know is that I will more than likely be using an aftermarket gauge hence the need to know.

Kevin i found this article, it may help you with your after market fuel gauge.

How To Adjust the Fuel Gauge Sender : How-To Library : The MG Experience
 
Thanks everyone. I just found JohnW's thread which has a fair bit of good advice.
Now I need to decide if I go the R16 float (which I don't have) or the glass bulb method of Frans.
 
KB,
I took the broken Renault stuff out and fitted VDO in the Gordini, as the Renault gauges are becoming very difficult to get and are all very old, anyway. Senders can be new now days.

Ray

http://www.aussiefrogs.com/forum/restoration-projects/121777-graemes-r8-gordini-rebuild-2.html

#35

I'd add, despite living with it, that the original fuel gauges simply aren't very good either! I guess they are adequate for ordinary use, and I've never run out of fuel, but..... All depends what you want from the car, doesn't it.
 
Renault 8&10 I have been collecting a few floats along the way to replace the cork originals that are in my cars . I have noticed that most of the newer vehicles run the electrical fuel pumps that are located in the tank > The complete unit is normally a throw away once the pump expires so I have saved several arms with the floats that I intend on tack weld onto the old arms to make them more of a permanent repair with a float that does not get gas logged . It is always nice to find a free recyclable source !

Manic GT

Thanks everyone. I just found JohnW's thread which has a fair bit of good advice.
Now I need to decide if I go the R16 float (which I don't have) or the glass bulb method of Frans.
 
Thanks everyone. I just found JohnW's thread which has a fair bit of good advice.
Now I need to decide if I go the R16 float (which I don't have) or the glass bulb method of Frans.

I did the same recently with the Matra sender unit and bought 2 globes (oblong shape/candle light shape) and when I got home I could not solder it because the bases was made out of some sort of aluminium and solder doesn't take on it. I had to go to a few other shops before I could get the ones with a brass base.

So if you go this way, take note that the silver coloured bases are useless, it has to be brass.

Frans.
 
Few small jobs done today:
I made my own sender gasket out of rubber sheet, used the thread saver to start to repair the thread on the stub axles. Pulled out all the bolts and bits to mount the lower control arms to the cross member, but realised I should buy some new bolts if I can get them.

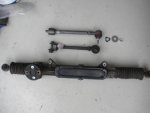
Then it started raining on and off the rest of the day, so in between showers I drove the R10 up onto ramps, disconnected the battery; then removed the undertrays, pedal Box bits and bobs, removed the steering rack and a few other bits - the R10 has officially retired! :cry:

Various bits are going to be used in the project R8.
 
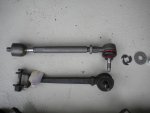
So I bought these new steering arms from Mecaparts back in about 2014 in a bunch of parts with an injection of cash at the time (goodbye Motorcycle!) and they've been in a box until now.

Has anyone used these, do they just screw into the steering rack in place of the eyelets? (Which I also bought some new ironically in the same purchase)?

It's a good feeling when reassembling to be able to reach into a box and pull out brand new items when reassembling something like this! but with these I'm not sure they are the right ones. Mecaparts advertising them on their website as being for R8/R8G. I got two arms, two boots and the washers and screws pictured as the "part" purchased. I think I bought the eyelets separate.
 

Attachments

  • DSCN2949.jpg
    DSCN2949.jpg
    89.9 KB · Views: 271
  • DSCN2948.jpg
    DSCN2948.jpg
    84.1 KB · Views: 314
I used them on the white R8G. They just screw into the rack and you use the crush washers so they don't unscrew and fall off (hopefully).

Its a couple of years ago but I think it is all pretty easy, even getting the boots on is not too hard.

The tricky and fiddly bit is making sure the rack is in the centre and the wheels are pointing straight before you do the final alignment with plenty of adjustment and enough thread engagement. Again so the bits don't unscrew and fall off.

Remember to make sure you do any mods to get your neg camber before doing the final toe alignment.
 
Thanks Bustamif.
The cross member was already modified, so I'll just be bolting it back up, but I do plan to leave a lot loose until I'm ready to tighten everything up in one final go down the track.

The main concern at present is just to get it on wheels and able to be wheeled about for now.
 
So I bought these new steering arms from Mecaparts back in about 2014 in a bunch of parts with an injection of cash at the time (goodbye Motorcycle!) and they've been in a box until now.

Has anyone used these, do they just screw into the steering rack in place of the eyelets? (Which I also bought some new ironically in the same purchase)?

It's a good feeling when reassembling to be able to reach into a box and pull out brand new items when reassembling something like this! but with these I'm not sure they are the right ones. Mecaparts advertising them on their website as being for R8/R8G. I got two arms, two boots and the washers and screws pictured as the "part" purchased. I think I bought the eyelets separate.

Gee, they look nice. Needs the big locknut for the male thread that goes into the rack, which you'll have on the eye-fitting from the old system. I really like what looks like a good quality boot on the outer joint. The arm is very slim at the inner end, where it is shiny on the photo, isn't it?

Cheers
 
The passengers side ball joint and this joint were both toast on the car when I pulled it apart. At least it explained why James couldn't bolt a wheel on without it rubbing/locking up when he was readying the car for me to pick up - on a car Trailer!
 
Gee, they look nice. Needs the big locknut for the male thread that goes into the rack, which you'll have on the eye-fitting from the old system. I really like what looks like a good quality boot on the outer joint. The arm is very slim at the inner end, where it is shiny on the photo, isn't it?

Cheers

I don't think you need that big locknut John. I have them on my race car and they look the same. Unless there is a different model, the old arm, male thread and big nut gets replaced as complete set. Those washers on the new arms fit in a "key set" and then when tightened it locks so that they never can undo.

I love them because now the alignment can be adjusted infinitely and not by 1 or 1/2 turn at a time. the other advantage they have on race cars especially is that there is no noise damping rubbers. So, if they are set the wheels remain in that position and don't alter themselves under hard braking.

Kevin, are you going to race this car because it is going to look beautiful? Reason I'm asking is that it sounds like you have the extra holes to give you some negative camber drilled in the crossmember. Now I might be too fussy but if you are going to race it then you should actually have solid bushes in the wishbones. It is of no use to get the negative camber and under hard cornering the the upper and lower wishbone bushes compress with the additional forces and the wheels then go over to positive camber. A lot of grip will then be lost as the tyre surface changes from a full area grip to a half area grip.

If you have done then ignore my post.
 
Top