Yes. VH44’s have one in and one out port. It will be as JMan suggests.

You are using an out of date browser. It may not display this or other websites correctly.
You should upgrade or use an alternative browser.
You should upgrade or use an alternative browser.
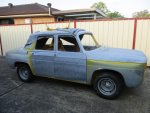
Gawd, another R8 upgrade
- Thread starter renault8&10
- Start date
Nice work, very nice.....
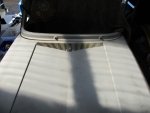
So, I've sort of decided to start at the front and work my way backwards. Today's minor success is a semi-functioning bonnet catch.
The brakes are just waiting on parts to arrive for the plumbing, so I'm doing bits and pieces while I wait.
The brakes are just waiting on parts to arrive for the plumbing, so I'm doing bits and pieces while I wait.
Attachments
Nice going KB, keep plugging away and do take more pictures.
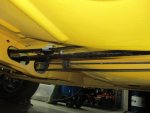
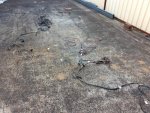
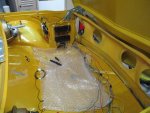
Over the last couple of nights I've made and run the brake lines at the front - left to right from a distribution block, to be served by the booster; and made and run the line(s) to the back; and installed a proportioning valve.
Work then ground to a halt. I bought some new grommets and need one for the chassis rail (the oblong one) where the rear brake line runs through the chassis rail and can't recall where i put them. I'll to mount a search then resume another night.
Work then ground to a halt. I bought some new grommets and need one for the chassis rail (the oblong one) where the rear brake line runs through the chassis rail and can't recall where i put them. I'll to mount a search then resume another night.
Attachments

Very neat and tidy KB. I never knew there was a grommet there, makes sense. You must have put it in that same "safe place" i put bits and than can't find them. It seems to happen more often as the years roll by.
The grommet is further down the front on the smallest "Chassis rail" - not actually pictured in these pics Bustamif (just in case I confused you). And yes, I am finding that location more and more often lately!
KB
KB
You're doing a superb job here however, if I may ask why are you installing a proportioning valve? Is this the same as the limiter we all talked about and all removed it as well?
Regards, Frans.
Regards, Frans.
Frans, the old limiter has been replaced with a 3 way port BUT, you need to remember this has the Williams clio brakes - ventilated, cross- drilled and slotted on the front; Fiat 132 calipers on the rear plus each circuit boosted with a VH44 so some FR bias adjustment may be necessary.
I'm looking forward to a ride..... And to experience the brakes! Nice work Kevin.
Over the last couple of nights I've made and run the brake lines at the front - left to right from a distribution block, to be served by the booster; and made and run the line(s) to the back; and installed a proportioning valve.
Work then ground to a halt. I bought some new grommets and need one for the chassis rail (the oblong one) where the rear brake line runs through the chassis rail and can't recall where i put them. I'll to mount a search then resume another night.
Very nice work there Grasshopper, points off though, that ELF drum could be rotated 60 or 70 degrees for maximum presentation. :nownow:

This is Aussiefrogs, not Instagram Graham!

Carbon Fibre is the new black!
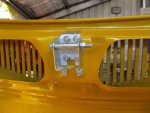
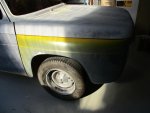
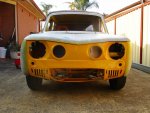
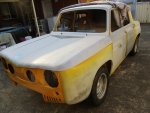
I also played around with fitting the guards and managed to get the guards a little better lined up at the front (without cutting the fibreglass yet Bustamif).
I also played around with fitting the guards and managed to get the guards a little better lined up at the front (without cutting the fibreglass yet Bustamif).
Attachments
Better fit than some coming out of the factory I'd suggest! Very nice.
Yes KB, apart from that 30 mm needed to line up the bottom of the front panel the panels are a really good fit, particularly the bonnet.
The dash looks the part and that yellow is a great choice for a sporty R8 in 2018. It is all coming together nicely.
The dash looks the part and that yellow is a great choice for a sporty R8 in 2018. It is all coming together nicely.
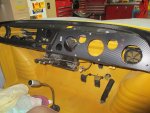
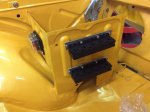
Work has stalled on the steering and brakes momentarily, so I have diverted onto the electrics. Been acquiring some parts off eBay- light switch; relay mounting blocks and relays; fuse box etc.
Made up some plates to mount the relays to the side of the battery box and zinc plated them with my home kit, then dragged out the existing and spare harnesses I had. None of them are in great shape so I may use them as I guide to make my own harness up.
Made up some plates to mount the relays to the side of the battery box and zinc plated them with my home kit, then dragged out the existing and spare harnesses I had. None of them are in great shape so I may use them as I guide to make my own harness up.
Attachments
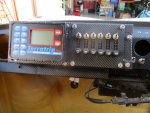
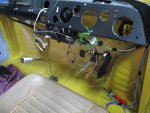
So the wiring continues. Because the old harness (and my old spares) are in such poor condition; and because a lot of the switch gear is being changed; fused and with relays, it makes more sense to start from scratch and fabricate by own harness as I go. The harness to the rear of the car is run and installed (but not the final terminations and wrapping); and I am most of the way through the front harness. Then I will need to work out how they all join at the dash area - oh what fun!
Attachments
Nice. Exactly WHAT is that red-handled tool? Do I need one? ")
This does allow you to set up fuses properly, rare in an R8...… Oops, forgot your earlier post. Fuses AND relays. Very nice.
This does allow you to set up fuses properly, rare in an R8...… Oops, forgot your earlier post. Fuses AND relays. Very nice.
Lol.
JohnW, that red handled tool is called a thingamybob.
Handy for just this type of job. It’s also known as a red-handled Phillips head screw driver sitting behind an aftermarket headlight switch since I’ll more than likely be going with a falcon steering column and switchgear.
JohnW, that red handled tool is called a thingamybob.
Handy for just this type of job. It’s also known as a red-handled Phillips head screw driver sitting behind an aftermarket headlight switch since I’ll more than likely be going with a falcon steering column and switchgear.