Gawd, another R8 upgrade

renault8&10

Well-known member
VIP Paid Subscriber
1000+ Posts
Fellow Frogger
Joined
Mar 9, 2002
Messages
4,813
Location
Sydney
I thought it is about time I put a few pics up of my latest project.
Don't expect it to move as fast, be as interesting or as informative as Brettr's posts.

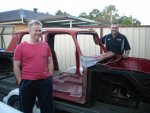
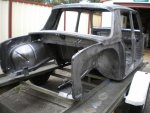
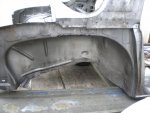
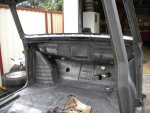
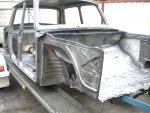
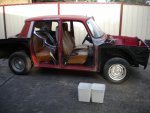
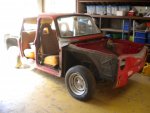
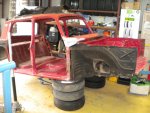
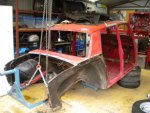
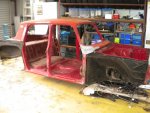
I bought this R8 from Canberra about 5 yrs ago and it has been sitting in a friends shed until a month or so ago when I decided I'd drag it home and start work on it. The plan is to rebuild it into a replacement for the white R10 classic rally car/club car that appears as my avatar.

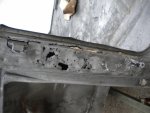
The red rocket as it is known is listed as being a '64 Major. The C pillars however place it as being more like 67, but as I am dismantling it I have formed the opinion it may have had a new roof welded on at some stage.

Canberra Trip (Red Rocket) 044.jpgDSCN2134.jpg14082010004.jpgDSCN2164.jpg
 
First step is to break it down ready for a repaint.
 

Attachments

  • DSCN2168.jpg
    DSCN2168.jpg
    93.5 KB · Views: 722
  • DSCN2169.jpg
    DSCN2169.jpg
    93 KB · Views: 703
  • DSCN2172.jpg
    DSCN2172.jpg
    85.6 KB · Views: 697
  • DSCN2255.jpg
    DSCN2255.jpg
    85.7 KB · Views: 693
  • DSCN2269.jpg
    DSCN2269.jpg
    94 KB · Views: 688
Good sense of accomplishment today. I finished removing the front suspension which was giving me grief and have completely stripped the shell ready for paint stripping.

Had to fabricate or modify a few tools including making a lever bar (19 & 21mm sockets) to loosen some of the ball joint nuts and other suspension nuts; make a drift sacrificing an old control arm pin nut, to drift out the top pin; hacksaw through a ball joint then take the steering arm to work so the fitters could press it out with a workshop press (took about 6-10T to pop it) and grind off the inner wheel bearings; grind down a cheap spanner to try to loosen the shock locking nuts on the front and finally, make a slot in a large spanner to lock the stem on the front shocks to remove said nuts.
 

Attachments

  • DSCN2344.jpg
    DSCN2344.jpg
    93.3 KB · Views: 624
  • DSCN2347.jpg
    DSCN2347.jpg
    94 KB · Views: 640
  • DSCN2348.jpg
    DSCN2348.jpg
    93.1 KB · Views: 621
  • DSCN2349.jpg
    DSCN2349.jpg
    94.7 KB · Views: 621
  • DSCN2350.jpg
    DSCN2350.jpg
    93.3 KB · Views: 618
Looks like a nice shell Kevin. Looks like my "Rouge Trinidad" too. The bumpers and maybe the pillar ornament place it late in the R8 run for Oz, certainly not 1964 unless a few things have been added. Shouldn't there be a build number stamped on the floor near the door pillar (? B)? Mine doesn't have it, being quite an early one.

Let me know if you need anything that I might have.

Is that the back corner of a white Citroen CX on the photo?

Cheers
 
Yes John, but it's not mine.
This photo was whilst it was being agisted in a friends' shed.

He's helping the owner repaint the CX as we speak.
 
Yes John, but it's not mine.
This photo was whilst it was being agisted in a friends' shed.

He's helping the owner repaint the CX as we speak.

I thought you might have joined me in "ultimate eclectic" territory..... An R8 and a CX is quite a pair - they are really chalk and cheese. I reckon the CX has about 50-100 more things to go wrong but it is quite a remarkable car to drive and has the best brake performance of anything we've owned (70% of the weight on the front wheels helps...).

Anyway, as I said, shout if you need anything, other than those stub axles. :)

Mine has also been called the red rocket since 1982!

Cheers
 
Hi Baz,
Collier worked 1.4 with twin webers and race cam. The gearbox will be the existing one - R10 box with R16 internals.
Fuel tank will probably get shifted to the front boot and be a fuel cell of some sort.

This is Jim's old car if you didn't recognise it.
 
They should make it fly. Didn't know it was Jim's old car! Shifting the fuel tank to the front should improve weight distribution.
 
Just a quick update.
Last night a few friends came around and helped to lift the shell onto my car trailer, then this morning I dropped it off to have the shell stripped back to bare metal.

Whilst the garage has an empty space, I will start cleaning up the front suspension (grinding off the original balljoints etc) ready for them to be cleaned, stripped and painted ready for reassembly. Then I have to take a deep breath and decide how far to go with cleaning up the gearbox and changing mounts etc there.
 

Attachments

  • R8 shell loading.jpg
    R8 shell loading.jpg
    65.9 KB · Views: 605
  • R8 shell dropping off.jpg
    R8 shell dropping off.jpg
    82.1 KB · Views: 618
Just a quick update.
Last night a few friends came around and helped to lift the shell onto my car trailer, then this morning I dropped it off to have the shell stripped back to bare metal.

Yes I recall when I got mine back from the blasters, some of the panels looked like Swiss cheese. Thankfully after nearly 3 years, it's all cut out and painted.

i would never do this type of Resto again without a rotisserie - simply fantastic!

looking forward to your progress

Angelo
 
How much does the blasting cost? I was quoted 1300 by a guy who comes to your home and does it with a water and crushed glass blaster. You get him for the whole day.

Sent from my D6503 using Tapatalk
 
Angelo - Yes, I am more than a little anxious as to what I might get back.

Christian - I'm actually having it chemically dipped rather than an abrasive or soda blast type treatment. It will be around $2k.
The last shell I had bead blasted and 17 yrs ago it was about $500 from memory.
 
Angelo - Yes, I am more than a little anxious as to what I might get back.
I paid $800 for shell only which was bead blasted on sensitive panels, but garnet on the u/s. All hang-ons I had chemically dipped as I did these 2 at a time as I was only working on WE's so had limited time to work on each and didn't want them left for weeks exposed. They cost me $40 each.
 
Shell still off being stripped so I launched into some suspension preparation today. Pressed out the bushes and rubbers then sandblasted them ready for paint and new bushes. The weather hasn't helped progress, it's either stinking hot, or pouring rain here at the moment sometimes both at once!
 

Attachments

  • DSCN2407.jpg
    DSCN2407.jpg
    89.5 KB · Views: 550
  • DSCN2408.jpg
    DSCN2408.jpg
    95.8 KB · Views: 556
  • DSCN2410.jpg
    DSCN2410.jpg
    97.9 KB · Views: 551
Shell is back from being stripped and let's just say, I have more work ahead of me than I first thought.
Lots of areas looking like a cheese grater. Surprisingly free of rust in some places, and rusty in places you wouldn't expect.
 

Attachments

  • DSCN2421.jpg
    DSCN2421.jpg
    91.1 KB · Views: 598
  • DSCN2422.jpg
    DSCN2422.jpg
    93.8 KB · Views: 608
  • DSCN2424.jpg
    DSCN2424.jpg
    93 KB · Views: 583
  • DSCN2425.jpg
    DSCN2425.jpg
    91.2 KB · Views: 610
  • DSCN2429.jpg
    DSCN2429.jpg
    87.6 KB · Views: 615
  • DSCN2430.jpg
    DSCN2430.jpg
    94 KB · Views: 618
That's what one of my A pillars looked like. If you can I'd get a pillar off another body and do a cut and shut job on it. You'll get good at putting the door on and taking it off again, expect to do it a few times.

Sent from my D6503 using Tapatalk
 
Wow, this is getting interesting. The stripping looks the goods, can you tell me more about the stripping process..? was it caustic and if so what neutraliser did they use and is that now bare metal of primed..? Also I'd be interested in the BMT that they used in those shells..do tell.:tongue:
 
Graham,
That is bare metal with a phosphoric acid treatment. It will need to be etch primed then primed from here. The treatment is sometimes called keyphos.

I don't know much about the process, and they keep their IP pretty close to their chest for obvious reasons, but if you go to their website - Redi Strip in Blacktown if you google it, they have a downloadable PDF that explains some of the process.

KB
 
Top