
You are using an out of date browser. It may not display this or other websites correctly.
You should upgrade or use an alternative browser.
You should upgrade or use an alternative browser.
Christian's R10S
- Thread starter c.lees
- Start date
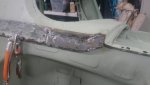
Well, it's back from stripping and it's not great. It's better then the one I scrapped but it's still going to take a lot of work. I'd like to know who the dodgy $%^&% was that thought you could just rivet a piece of plate in and bog over the top. It had so much body deadener on it you couldn't see the really bad welds, or the rest of the riveted plates. Put it this way, I could have welded it better with a cigarette lighter and a coat hanger. Almost every surface is dented, even parts that aren't on an outside surface. It going to need a complete skim coat of filler once I cut all the rust out. I'll just have to start and one end and work my way along, try not to look at the whole thing, at the moment I just want to walk away.


Ah bugger, that's gotta be disheartening...  That's a lot of sheetmetal to replace, might be better to scout for another shell?
(interesting Hillbrick I see there too. Its a shame the brand is forever tainted by association...)
That's a lot of sheetmetal to replace, might be better to scout for another shell?(interesting Hillbrick I see there too. Its a shame the brand is forever tainted by association...)
Disheartening for sure but you can do it Christian. Like you said, don't look at it all at once, just work your way through it, bit by bit and before you know it, you'll have one of the best R10's around - with no hidden dodgy repairs either! Dust yourself off and have a crack at it
Hi Christian,
I berated you for taking on the first car, and I know I am right.
But this is the car you should have bought the first time. You did such a lot of good work the first time, and you only have about 20% of the work to do this time, and with the experience you have now it will wind up being an extremely good R10. They are all similar, even the G I have just finished had some holes just like yours, and it was parked in a shed most of its life.
Keep on the project.
Ray
It is disheartening I know Christian, but look at the experience and knowledge you learnt with the first body. More importantly, at least with a blasted body you can see what you have to work on/with. No more surprises.
All the best mate.
Dano
All the best mate.
Dano
Come and look at my shell. It will make you feel better.
Hope all the encouraging comments help Christian! Best of luck with it.
I have one pop-riveted repair from about 1978 on the R8, out of sight, and at that time drenched it with fishoil. Seems no more has appeared but there are those hidden areas. Just yesterday a bit of red paint flaked off inside the spare wheel housing area and, you guessed, bare steel, shiny underneath. No primer, no undercoat. Excellent quality.
Cheers
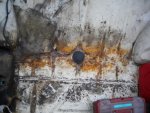
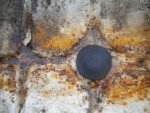
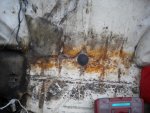
Not feeling as bad about it today. Little bit at a time. In this case, the bit is pretty small, but I've started.
I'm thinking TIGing silicone bronze may work better on the thin non structural sections. I also think I'm in the market for a swage and Jenny.
I'm thinking TIGing silicone bronze may work better on the thin non structural sections. I also think I'm in the market for a swage and Jenny.
Attachments
Work has been progressing, just haven't posted anything for a while. I am starting to see the end of the rust, but it seems to have taken so long that new parts may be rusting.
The front part of the floor needed to be replaced, so instead of just putting in lots of little patches I put in one huge one. I also had to fix two hole ridden parts under the drivers seat. Some patching around the edges.

Some rust repairs in the front rails, both sides needed to be done.

Everyone knows how much I love A pillars, what looked like a small hole turned into cutting out a largish piece.


I've now moved onto the front, there are so many spot welds in the channel cover you'd think it was structural.

Good news, the bottom of the channel isn't rusted, one side lip is, not that hard to fix. Who ever did the previous dodgy repairs on this body had just welded in a 1.5mm sheet in the front, I've cut it out. I may actually need to also cut out the part in front of it as it's pretty hole ridden.

Can some one with a good one send me a picture of what it's meant to look like? I probably won't replicate the real one as it'll be too hard to form the panel. I'll get it as close as possible with my bead roller.
The front part of the floor needed to be replaced, so instead of just putting in lots of little patches I put in one huge one. I also had to fix two hole ridden parts under the drivers seat. Some patching around the edges.
Some rust repairs in the front rails, both sides needed to be done.
Everyone knows how much I love A pillars, what looked like a small hole turned into cutting out a largish piece.
I've now moved onto the front, there are so many spot welds in the channel cover you'd think it was structural.
Good news, the bottom of the channel isn't rusted, one side lip is, not that hard to fix. Who ever did the previous dodgy repairs on this body had just welded in a 1.5mm sheet in the front, I've cut it out. I may actually need to also cut out the part in front of it as it's pretty hole ridden.
Can some one with a good one send me a picture of what it's meant to look like? I probably won't replicate the real one as it'll be too hard to form the panel. I'll get it as close as possible with my bead roller.
More.
I had to take out a badly welded panel which looked like it was in upside down, the rail within was a bit rusted.

And fixed.

Here is a front rail inside the wheel well, what looks small always ends up big. The other side wasn't as bad


I had to take out a badly welded panel which looked like it was in upside down, the rail within was a bit rusted.
And fixed.
Here is a front rail inside the wheel well, what looks small always ends up big. The other side wasn't as bad
I saw somewhere a fellow fabricate the channels by using a wooden buck and a pneumatic hammer attachment on a 4cv panel. He made the floor panel from one sheet radiating out from the drain hole.
g/day Christian iv'e been put onto a product called paint grip 253 which will seal bare steel and can be painted over, welded and works a treat
Cheers Peter.
Cheers Peter.
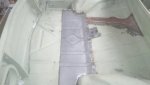
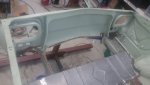
Getting there, new panel welded in. It is held at the front with a pile of vice grips underneath. It took a while to get it to fit. It's far from perfect but you're not going to see it, I'll have a carpet of some description in there.
I think I'll also make a new front piece as it's pretty holey, may be better then a hundred small patches. As I don't intend on putting the spare underneath I can get away with a less complicated pressed pattern.
I think I'll also make a new front piece as it's pretty holey, may be better then a hundred small patches. As I don't intend on putting the spare underneath I can get away with a less complicated pressed pattern.
Attachments
Now for some real pain, making this bit. Couldn't get the rusted one out in one piece.
Had to remove some of the front to get to the spot welds, one of them needs repairing anyway.
Had to remove some of the front to get to the spot welds, one of them needs repairing anyway.
Attachments

Now for some real pain, making this bit. Couldn't get the rusted one out in one piece. Had to remove some of the front to get to the spot welds, one of them needs repairing anyway.
This is very impressive. Great effort and congrats on keeping going. Way beyond my skill level, let alone perseverance...
I agree with Angelo and John! I reckon you're going to have the most solid R10 in the country when you've finished this one. I must say, it makes me appreciate the one I've got having seen how rusty they seem to get. Mine certainly has rust too but only really door corners starting; not A-pillars, boot floor/channel, sills etc. Keep up the great work Christian