I don't know what is under those panels either, mine just had rust and air. Maybe there will be something under the other side but I doubt it. There is a little raised section under the front lip which looks like a drain of some type.It's great to follow your progress Christian.I've always wondered what was under those panels too!

You are using an out of date browser. It may not display this or other websites correctly.
You should upgrade or use an alternative browser.
You should upgrade or use an alternative browser.
Christian's R10S
- Thread starter c.lees
- Start date
And R10S FAN is lightening his load of R10 stock too. Better priced than u pull it too. It's free ...
See parts section
See parts section
A little progress, been a bit time poor of late. I've made one of the little triangle panels, can't attach it until I smooth out the curve on the body, this will require some primer first and I'm yet to get any. The plan is to use Valspar direct to metal epoxy primer just have to get around to getting it. There are lots of other pieces to work on until then. I'm pretty happy with how this part has come out.


Any more progress Christian? Ready for paint yet? 
A long way off paint.... Too many other things have been getting in the way and I haven't done much in the last 6 weeks, this week end though I intend on finishing the drivers side headlight surround and bits around it. The GF is away this weekend so I should get more done.
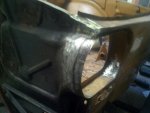
I've actually done some work. The drivers side headlight surround wasn't as bad as the other side. I has to stick part of it on by brazing as there was no way I was going to mig or tig it, just impossible to get to.
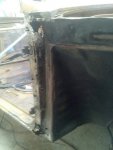
The drivers side a pillar, well it looks like its been patched before as along the sill there was a thin layer of filler under the paint. Unless they left the factory like that?
Luckily the part that holds the door hinges is intact but only really attached at the bottom which means I'll have to attached the replacement panel in two parts as I don't want to remove anymore from it just in case it comes off.
Sent from my MB865 using Tapatalk 4
Attachments
The first part of the new pillar is done. Its only one side but it will hold everything in place when I cut the back half out. I had to put the door back on to verify the position. It would have been annoying if I got it all done only to have the door not close. Adjustable hinges would have been nice.
Sent from my MB865 using Tapatalk 4
Sent from my MB865 using Tapatalk 4
Attachments
The first part of the new pillar is done. Its only one side but it will hold everything in place when I cut the back half out. I had to put the door back on to verify the position. It would have been annoying if I got it all done only to have the door not close. Adjustable hinges would have been nice. Sent from my MB865 using Tapatalk 4
Very impressive - I can only admire your dedication. This is the sort of thing they do in UK and we look at and shudder. Providing you get all the structural stuff right and the basic shell is rigid, it should be OK in the end. I guess you are now committed, rather that throwing it away and getting another with a less ant-eaten shell. Wow.....
I can only wish you well, as I can't offer constructive advice. But moral support aplenty.
Cheers
If there is two ways to do something I tend to do it the hard way, not sure why..... Once I had started I figured I'd keep going. Luckily the shell of the car is pretty good, I did notice one of the channels under the front boot floor was rusted yesterday, but its only a small section so very repairable, it'll just have to wait until the car is on its side.
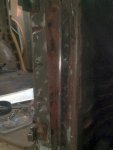
Who ever did the last repair on the drivers side sill bogged up the drain hole, which I'm informed by my father happens all the time, it looks that this has caused a lot of the damage to the sill. I don't intend on removing all of it as it will be difficult to get the shape right and you'll be able to see that part. Instead I'll cut out section of it and use the dunlop patch method to weld the patch panels in.
Today I may be trying to track down a better MIG, my cheap multiprocess welder is giving me the @#$@#. It turns out good multiprocess welders exist, for about $4000, which is four times what I paid for mine.
Keep up the good work Christian, progressing nicely 
[QUOTE
Instead I'll cut out section of it and use the dunlop patch method to weld the patch panels in.
QUOTE]
I am interested in learning more about what is the Dunlop patch method? Angelo
Instead I'll cut out section of it and use the dunlop patch method to weld the patch panels in.
QUOTE]
I am interested in learning more about what is the Dunlop patch method? Angelo
[QUOTE
Instead I'll cut out section of it and use the dunlop patch method to weld the patch panels in.
QUOTE]
I am interested in learning more about what is the Dunlop patch method? Angelo
A dunlop patch is one that overlaps as opposed to doing butt joints all round.
Some more progress has been made, long weekend as I screw my back (again) on the Thursday before. Grrrrrr. The back issues are mostly related to riding bikes in Sydney traffic for the last 20 years, I've been hit by more then my fair share of cars.
On to the A pillar, coming along nicely, except for having to put the door on, take the door off, put the door on, you get the idea. I'd like to be able to close the door when its finished. When I open the door at the moment it droops, could be because the hinges are only attached on the front side of the pillar for the most. There are lots of holes to patch along the way as well, like the one at the bottom and the top is going to need some work but it is no where as bad as the other side was.


On to the A pillar, coming along nicely, except for having to put the door on, take the door off, put the door on, you get the idea. I'd like to be able to close the door when its finished. When I open the door at the moment it droops, could be because the hinges are only attached on the front side of the pillar for the most. There are lots of holes to patch along the way as well, like the one at the bottom and the top is going to need some work but it is no where as bad as the other side was.
Well, on the weekend I had a "what am I doing" moment. I was ready to set the whole thing on fire and walk away. During the pillar construction I've been very careful to make sure the door lines up. I had just finished the top curved bit at the front and decided to see if the guard fitted, well, it didn't. My pillar is about 5mm too far forward at the curve. Which I still find strange because it has to clear a cable hole in the body, which mind you I had to reconstruct as half of it wasn't there. I'm pretty sure I didn't make it too large. Anyway the solution given to me by my farther was to just modify the guard to fit, which is what I am going to end up doing as it would be multiple days work to move the curved bit.
Moving on I also constructed the back part of the pillar, this is where most of the strength comes from as it has a step in it which was not fun to fold. Now the only part of the pillar left is the bottom. The door no longer droops when you open it so I think I'll be able to leave it off now. I'm getting quite fast at putting it on and taking it back off.


Moving on I also constructed the back part of the pillar, this is where most of the strength comes from as it has a step in it which was not fun to fold. Now the only part of the pillar left is the bottom. The door no longer droops when you open it so I think I'll be able to leave it off now. I'm getting quite fast at putting it on and taking it back off.
Christian,
I feel your pain....
But I guess it is the self satisfaction of knowing you have done it yourself. Every time I remove a panel in my 404 it is now done with an element of dread. The up shot is after I remove the next panel under the front windscreen, there is nothing left to remove. Just rebuild.
Keep the pic's coming it is interesting to watch your progress.Reminds me of a 10 I own some 30 years ago.
Dano
So, this pillar has taken forever, I haven't had that much time to work on it and its a good thing its done because I've really had enough of it. I can now move onto something else, I know, cutting out more rust. I know it'll all be worth it in the end, I hope.

So, this pillar has taken forever, I haven't had that much time to work on it and its a good thing its done because I've really had enough of it. I can now move onto something else, I know, cutting out more rust. I know it'll all be worth it in the end, I hope.
View attachment 49272
Chin up Christian you are doing a fantastic job. Sometimes it feels like is all this pain worth it, it will be when you are driving the car to its first show and getting the accolades from the viewing public.
What he said...
Keep going Lad, you're on a roll and I can only imagine how much effort went into that door pillar. Good Work.
Keep going Lad, you're on a roll and I can only imagine how much effort went into that door pillar. Good Work.
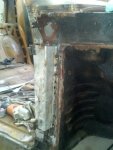
Moving right along, to the back of the car. I'm starting to think someone dipped the right hand side of this car in salt water, or maybe it was just parked on a slope for a very long time. Probably the later. I started cutting out the infected section or is that sections, which each layer in I discovered more that needed to be removed. I think I've gone deep enough now as I can see the garage floor. I made a template or two on the way so I know what shape it needs to end up, especially where the rear window goes, I think I'll be test fitting the window more then once during this process. From what I have worked out its going to be a bottom up rebuild to make sure it is all weldable and I don't end up with parts that are impossible to weld. Although a bit of oxy action rectifies some of these problems, after all parts of the car are brazed and I'm sure its for this reason. I'm quite proud of that first bit, the new TIG welder is so much better then the old one.


