Christian's R10S

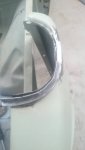
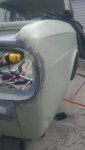
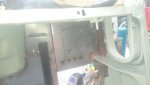
Starting to fill in the hole, first I repaired the bits it sits on on the right hand side. This part took a while to make, it's three pieces welded together to get the curved step at the front. The recess where the support for the front connects was done with a hammer and dolly. Next will be the similar part on the other side around the battery box.

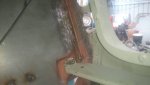
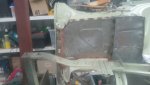
The piece on angle is temporary, there to hold it all straight while it is unsupported.
 
For some reason I could post the pictures, here they are
 

Attachments

  • 1455423335954.jpg
    1455423335954.jpg
    31.9 KB · Views: 419
  • 1455423347922.jpg
    1455423347922.jpg
    32.8 KB · Views: 425
  • 1455423357305.jpg
    1455423357305.jpg
    41.4 KB · Views: 429
Progress has been slow, busy with travel for work and work around the house. I was attempting to get it ready for paint before mid August as I have a little one on the way, not sure I'll make my deadline.

First part, missing panel under the passengers floor. The panel that was in here was not the correct one, no idea what it was from and the welds were terrible, so I made a new one.

DSC_0028.jpgDSC_0029.jpgDSC_0030.jpg

Next part, battery box, the bottom was pretty rusty and full of holes, the bottom edge of the vertical parts not much better so I trimmed it back and made a new bottom and side bits. Not the correct pattern but I would have needed to make a die to put the correct pattern back in. It's made from 1.2mm steel so it's plenty strong enough.

DSC_0031.jpgDSC_0032.jpgDSC_0033.jpg

Moving back to the front, fixed up the front lip under the drivers side blinker and made the part of the floor around the battery box. It's four pieces folded and welded to get the correct shape. Just need to grind down the welds.

DSC_0037.jpg

I can see the end of the metal work on the body, a small amount to do on the panels to follow.
 
Congratulations on both fronts.
Coming along nicely.
I still need to pop over and pick up those shocks some time too!
KB
 
And now we have a floor. Had trouble getting the oil canning to stop. Probably should have put a lot more folds in it as it feels a little flimsy. I wouldn't stand on it.
 

Attachments

  • 1460929027417.jpg
    1460929027417.jpg
    25 KB · Views: 352
And now we have a floor. Had trouble getting the oil canning to stop. Probably should have put a lot more folds in it as it feels a little flimsy. I wouldn't stand on it.
Some excellent work going on here. Enjoying following the restoration.
 
There was a little rust around the drivers side headlight, turned out to be worse then originally thought. Had to take the headlight surround out, lots of spot welds, maybe they thought it should be a structural element. I real pain in the &^@# to get out, not for the faint hearted.

DSC_0041.jpgDSC_0042.jpg


Now that it's out, fix it. Had to pretty much replace one end. I also plugged up all the spot weld holes as I was going to have to use different spots to put it back in due to drilling the spot welds out of the mating part.
DSC_0043.jpg

And back in again, I'm pretty sure it's in the correct place, checked the measurements from the other side.
DSC_0045.jpg

The passengers side didn't need to come out, I managed to repair it in place as it was no where near as bad.

Moving right along, a small rust hole in the passenger side A pillar, cut a small part out, not good underneath, cut a bit more out, rinse repeat. As you can see had to cut out a good side chunk. The underlying structure was rusted, had to weld up some holes, all good now. It's repaired now, forgot to take a photo, next time.

DSC_0046.jpg
 
Nice work Chris,
Besides the frustration that goes with this sort of repair, I m sure you also feel a great sense of achievement in what you are doing.
Your blogs/threads make interesting reading.
Keep up the good work
Dano
 
It's hard to believe but I'm at the end of the major metal work on the body.

Passengers side A pillar is done, rear of the drivers side done.

Small repair at the top of the rear windows, nothing really to see there.

Looking at putting some small panels back on the front, one looks like it was attacked with a slide hammer and then bogged, I hammered it back out. Comparing it to the other side, they are different shapes, is this normal or is it from a different car? It's the bottom edge that's different.

Almost ready to give mecaparts a whole lot of money for suspension rubbers and brake parts. Are the mecaparts big brake upgrades worth it?
 

Attachments

  • 1462684755807.jpg
    1462684755807.jpg
    35.7 KB · Views: 341
  • 1462684767385.jpg
    1462684767385.jpg
    38.1 KB · Views: 325
  • 1462684929039.jpg
    1462684929039.jpg
    28.9 KB · Views: 329
See my post #106 of 17 April!!

I've no idea whether the big brake kits are worth it - really depends what you are going to do with the car. The standard brakes are pretty good, and well up to the adhesion limits of the standard tyres!

Cheers
 
Step one, I should be able to straighten the bottom if needed
 

Attachments

  • 1462692109157.jpg
    1462692109157.jpg
    32.6 KB · Views: 305
I'm going to try to replicate BrettR's setup which uses their big rear kit, but uses different means for the front.
John, don't forget Christian is going to have the Clio engine installed, so won't be using std components or tyres.

KB
 
I have a set of gen 3 mr2 brakes I got cheap to see if I could make it work, it would increase the unsprung weight by a bit so may not be worth it. I'll have to weigh the various parts to make a comparison.
 
Hi Christian,
If you are buying a lot from Meca Parts, break down into Euro600.00 (max) quantities orders, as they are reluctant to break them down for you. It may cost more on post but it saves a wack on paper costs and import duties, as well as time.

Ray
 
Hi, Regarding your front panels, they are correct i.e. they are not symmetrical, my car was made in the later part of 1969 and is undamaged (at least in this area) and is the same as you have pictured. I have yet to restart on restoring mine, fortunately it has been garaged since I took it off the road in 1984 and does not have too many rust issues.
 
Last edited:
Hi, Regarding your front panels, they are correct i.e. they are not symmetrical, my car was made in the later part of 1969 and is undamaged (at least in this area) and is the same as you have pictured. I have yet to restart on restoring mine, fortunately it has been garaged since I took it off the road in 1984 and does not have too many rust issues.

They aren't or weren't exactly precision items then. :)

Another 10 to come out of storage it seems. Great news....
 
Hi, Regarding your front panels, they are correct i.e. they are not symmetrical, my car was made in the later part of 1969 and is undamaged (at least in this area) and is the same as you have pictured. I have yet to restart on restoring mine, fortunately it has been garaged since I took it off the road in 1984 and does not have too many rust issues.

Thanks, I was trying to work it out from pictures on the interweb. It didn't look like either one had been off the car.
 
Another 10 to come out of storage it seems. Great news....[/QUOTE]

Unfortunately John you were right on the money,it is the storage of this other stuff I am working on before starting on the car. I will become more involved and start a restoration thread then.
Phillip.DSCF1729.jpg
 
Work has continued on the passengers side front guard, this is the worst one. The part around the head light was repaired previously, not very well. The top back corner had also been repaired, not close enough to the correct shape. The front part took some effort. Had to reattach the small panels at the front to check alignment.

I think I'll be replacing all the panel bolts and u nuts to something modern. The old ones are kind of annoying.
 

Attachments

  • 1463951363904.jpg
    1463951363904.jpg
    26.3 KB · Views: 282
  • 1463951377694.jpg
    1463951377694.jpg
    26.1 KB · Views: 320
  • 1463951391945.jpg
    1463951391945.jpg
    33.6 KB · Views: 292
  • 1463951406684.jpg
    1463951406684.jpg
    35.7 KB · Views: 327
Top