Renault Floride body rebuild.

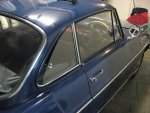
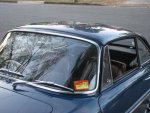
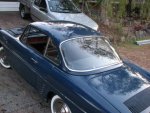
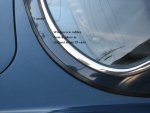
The paint is all blocked back and looks pretty good for a first attempt but still work to do, shiny paint can reveal defects that weren't apparent at the beginning, so some touching up still to be done.

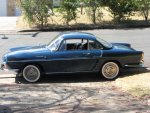
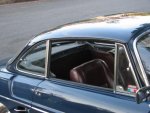
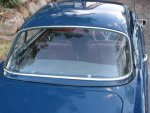
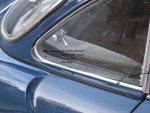
Looks bloody sensational in the pics Graham, if I achieve a finish close to that I'll be more than pleased. Hardtop is looking really nice too.

Good to see you back into it, and updating your progress :)

Cheers
Chris
 
Well done Graham, all you need know is a side draught for the 1397cc with some extractors and a sports exhausts(with no holes or it'll sound like mine).
Perhaps speak to sunroof and see if you can source some white walls, they would really sit well on the original wheels and finish the look off.
 
Well done Graham, all you need know is a side draught for the 1397cc with some extractors and a sports exhausts(with no holes or it'll sound like mine).
Perhaps speak to sunroof and see if you can source some white walls, they would really sit well on the original wheels and finish the look off.


Thanks for the feedback lads, I have installed a set of extractors that I had in my spares collection (John you have seen them) they are in excellent condition but aren't of tuned length...this bothers me...so I will be making a set of tuned length extractors in due course.

About the whitewalls...I have done a sample on an old tyre with masking tape and white etch paint and it looks pretty good, so I'll be doing the white wall treatment on my Nankangs soon..

If I like the whitewall look I'll buy a set of Continentals when they wear out.

Chris...I got that bonnet to fit proper after all...:D
 
Last edited:
The Hard top

Nearly there..

attachment.php
 

Attachments

  • 007.jpg
    007.jpg
    99.6 KB · Views: 1,081
Chris...I got that bonnet to fit proper after all...:D

Excellent, big effort Graham, do you think your painting technique improved over the project?

I've been reading and watching youtube videos in readiness for topcoats, but even my undercoats are improving with each time I paint, hopefully by the time I get to colour I'll be able to get close to your result. :wink2:

Roof looks like a bought one :headbang:

Cheers
Chris
 
Chris,

Re Painting: This much I have learnt, the final coat(s) are only as good as the panel it is applied to and preparation is the key.

I have some glancing light defects which can only be seen when you get down on one knee and look hard, but they are there and they bug me so I will be painting the bonnet, boot lid and both doors again one at a time to try and get these reflective defects out ( I still have plenty of paint).

But the journey has been fairly full on and I hate to think how many hours I have put in, it would be many hundreds. This will not be my last restoration and the next one will be even better given the new skills aquired here. Hopefully my next resto can be a DS like yours...:)
 
"...how many hours I have put in .... many hundreds..."!!

:eek:

I take my hat off to you. Lovely piece of work.


Chris,

Re Painting: This much I have learnt, the final coat(s) are only as good as the panel it is applied to and preparation is the key.

I have some glancing light defects which can only be seen when you get down on one knee and look hard, but they are there and they bug me so I will be painting the bonnet, boot lid and both doors again one at a time to try and get these reflective defects out ( I still have plenty of paint).

But the journey has been fairly full on and I hate to think how many hours I have put in, it would be many hundreds. This will not be my last restoration and the next one will be even better given the new skills aquired here. Hopefully my next resto can be a DS like yours...:)
 
Thanks JW,

Of course there have been many mechanical repairs and upgrades as well, much of it learned from this magnificent forum and the people who inhabit therein.....thanks to all...:)
 
The hard top..part1

The hard top shell has been in my possession for years but I could never use it because all the bits were missing i.e glass, rubbers, trim strips, securing latches etc. everything , and it has taken years and lots of internet searching to find all the pieces.

I still have to fit a hood lining when I get around to it, more on that later .

There will be questions asked like where did I find all the hard top rubbers, and there are a few, so that will be described in another post.


Attachments

  • 030.jpg
    030.jpg
    101.6 KB · Views: 1,470
  • 042.jpg
    042.jpg
    43.8 KB · Views: 1,055
  • 047.jpg
    047.jpg
    49.3 KB · Views: 1,071
  • 049.jpg
    049.jpg
    48.8 KB · Views: 1,091
  • 045.jpg
    045.jpg
    55 KB · Views: 1,077
  • 044.jpg
    044.jpg
    45.3 KB · Views: 1,059
  • 043.jpg
    043.jpg
    50 KB · Views: 1,043
Last edited:
How's that Buddy..?

You accusing me of having standards now...cheek.
 

Attachments

  • 004.jpg
    004.jpg
    42.4 KB · Views: 463
  • 028.jpg
    028.jpg
    99.7 KB · Views: 520
Undecided....

I thought whitewalls would be the icing on the cake for my 203. Really finish it off, and give it that certain something.From a distance they (and the car, errm, obviously) would look great.

But you will get curious types/weirdos? in Tesco's carpark who have a good close look at your handiwork and are more than happy to announce to the guy collecting the trolleys that ,"Hey, they're just painted".

Never looked into them, but if "real" whitewalls are available I couldn't afford 'em. (Having said that, I don't think I've ever seen a car with whitewall tyres?)

Put me down as a "Dunno" :rolleyes:

:cheers:

Mike.
 
The hard top..part 2-rubbers

The hardtop rubbers came from far and wide and took a while to locate but are listed as follows..

Note: Rubber no.3 you will need to fit a spring about 7mm X 75mm long inside the rubber so it hugs the tight window curve without distorting too much.

Rubber no.3 is also used under the lower edge of the roof frame to seal against the main body of the car.


Attachments

  • hardtop rubbers 2.JPG
    hardtop rubbers 2.JPG
    58.5 KB · Views: 1,207
  • 40a.jpg
    40a.jpg
    54.2 KB · Views: 469
  • 41a.jpg
    41a.jpg
    50.8 KB · Views: 536
  • 039.jpg
    039.jpg
    101.5 KB · Views: 502
  • 038a.jpg
    038a.jpg
    99.4 KB · Views: 511
Last edited:
Made up this nifty little alignment tool to get my door strikes millimeter perfect and the doors have never latched so well.

Well worth the effort.

Details attached.


Attachments

  • 002.jpg
    002.jpg
    101.5 KB · Views: 1,257
  • pp.jpg
    pp.jpg
    99.7 KB · Views: 468
  • po.jpg
    po.jpg
    72.2 KB · Views: 479
Look what I got..

:rolleyes:Look what I got on ebay...these things are as rare as a rocking horse's whinny.

Now just need a steering wheel to match.

attachment.php
 

Attachments

  • $(KGrHqJ,!n4F!F)lrBb,BQUMsOem,g~~60_3.jpg
    $(KGrHqJ,!n4F!F)lrBb,BQUMsOem,g~~60_3.jpg
    87.2 KB · Views: 1,317
Last edited:
Micro surgery..

Had to make up two new window regulator cams without a lathe....don't try this without valium.
 

Attachments

  • 045.JPG
    045.JPG
    66.1 KB · Views: 476
  • 047.JPG
    047.JPG
    65.4 KB · Views: 460
  • 048.JPG
    048.JPG
    65.1 KB · Views: 486
  • 050.JPG
    050.JPG
    80.7 KB · Views: 473
  • 052.JPG
    052.JPG
    82.5 KB · Views: 480
  • 053.JPG
    053.JPG
    83.2 KB · Views: 482
  • 067.JPG
    067.JPG
    76.3 KB · Views: 521
Top