Renault Floride body rebuild.

56 Fregate

Well-known member
VIP Paid Subscriber
Fellow Frogger
Joined
Oct 31, 2010
Messages
38,102
Location
Beautiful New England
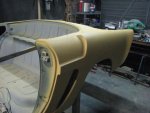
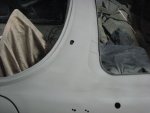
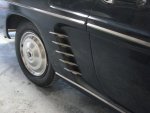
The time has come to dismantle my beloved Floride for some much needed TLC.

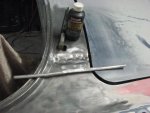
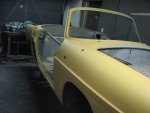
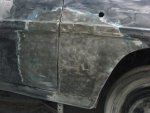
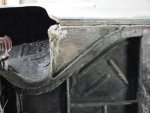
Although the car looks good at first glance it has some issues that bother me, namely crooked panels, bad door gaps and cracks in the paint here and there (bog related).

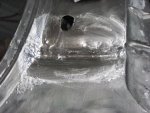
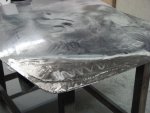
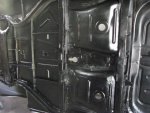
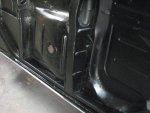
The car had a bare metal respray and rust removal done about 15 years ago by the previous tenant, and although it was done well, it wasn't great (probably done to a budget).

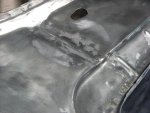
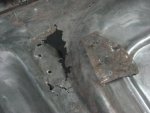
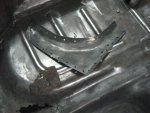
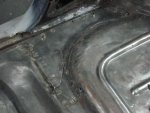
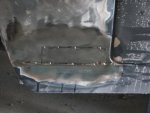
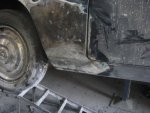
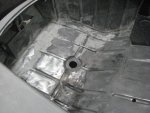
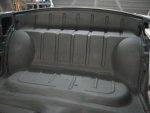
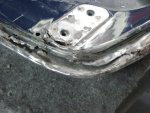
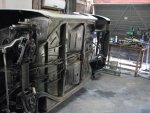
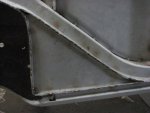
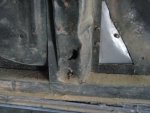
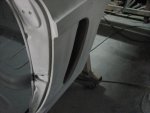
As well the underside of the car needs a lot of tidying up as it has many dents from paddock bashing and incorrectly placed jacks and a couple of rust holes in the floor cross members and some suspect rust repairs in the floor. The list goes on.

attachment.php


Work is well under way and I have many pics to share... stay tuned.
 
One of the first jobs was to open up the side cooling vents that had been welded shut by some previous repairer.

This is purely a cosmetic thing because this car has had the 'Caravelle" conversion, making the side air vents redundant hence the reason they were closed off.

But I think it looks wrong so the decision was made to open them up again. I will make a baffle to install inside these ducts so cooling won't be affected.
 

Attachments

  • IMG_2549.jpg
    IMG_2549.jpg
    43 KB · Views: 712
  • IMG_2527.jpg
    IMG_2527.jpg
    38.9 KB · Views: 679
  • IMG_3023.jpg
    IMG_3023.jpg
    88.9 KB · Views: 723
  • IMG_2985.jpg
    IMG_2985.jpg
    32.3 KB · Views: 707
Last edited:
Body cracks can often be attributed to excess body filler being used but this one was a surprise.

This must be a stress fracture where the firewall meets the outer guard, where the hole came from is beyond me..:confused:
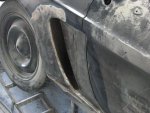
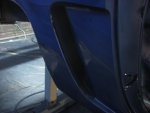
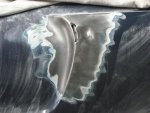
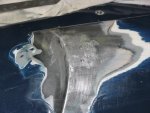
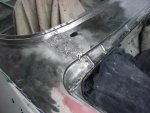
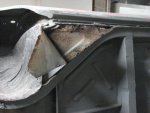
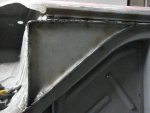
it's the same on both sides

The hole was plated over, welded and lead filled so lets hope it doesn't crack again.
 

Attachments

  • IMG_2489.jpg
    IMG_2489.jpg
    30.3 KB · Views: 685
  • IMG_2497.jpg
    IMG_2497.jpg
    42.8 KB · Views: 699
  • IMG_2502.jpg
    IMG_2502.jpg
    40.1 KB · Views: 714
  • IMG_2874.jpg
    IMG_2874.jpg
    37.7 KB · Views: 1,642
After removing what seemed like 2 gallons of bog I found the lead had been removed from the front wing joint drivers side, so it was out with the blow torch and plumbers solder to tin the joint then it was lead filled and filed off flush.
 

Attachments

  • IMG_2565.jpg
    IMG_2565.jpg
    37.9 KB · Views: 728
  • IMG_2572.jpg
    IMG_2572.jpg
    37 KB · Views: 733
  • IMG_2574.jpg
    IMG_2574.jpg
    47.4 KB · Views: 753
  • IMG_2586.jpg
    IMG_2586.jpg
    43.5 KB · Views: 726
  • IMG_2590.jpg
    IMG_2590.jpg
    37.9 KB · Views: 731
  • IMG_2600.JPG
    IMG_2600.JPG
    95 KB · Views: 731
You're certainly a handy bloke with a blowlamp, that looks great. Can I ask what flux you use?

:cheers:

Mike.


'Bakers soldering fluid' it's common as chips over here, you just have to make sure you clean off the excess really well because it is quite corrosive if left on,
 
Last edited:
My first attempt at sheet metal work since high school and first ever attempt at plug welding.

The triangle plate with the three bolts is a reinforcement for the fuel tank that hangs below, the first bit of rust found so far.

It aint pretty but for a first attempt I guess it's ok.
 

Attachments

  • IMG_2678.jpg
    IMG_2678.jpg
    38.2 KB · Views: 778
  • IMG_2685.jpg
    IMG_2685.jpg
    41.8 KB · Views: 737
  • IMG_2689.jpg
    IMG_2689.jpg
    38.1 KB · Views: 790
:nownow::nownow:


Keep the good stuff coming, also did you find the chassis stamp on yours as my two Florides I can't find on either one.


Indeed I did find such a stamp.

It is located just beside the rear right hand engine mount but is was badly stamped and only just legible but now that it has a coat of paint on it it is almost invisible.

I would be interested to know if yours is in the same place.
 
Removing more bog (8mm deep) from both front lower guards revealed more previous rust repairs and it was good to see the sills had been replaced by the last guy.


The guards had distorted from these repairs and was showing through the paint so some panel beating and more lead work was required to true things up as they should be.

Leading up on a vertical surface like a guard is definately a job for an expert, I struggled with it but did ok and only needed a thin coat of body filler to finish it off.
 

Attachments

  • IMG_2882.jpg
    IMG_2882.jpg
    34.2 KB · Views: 1,716
  • IMG_2531.jpg
    IMG_2531.jpg
    39.3 KB · Views: 744
  • IMG_2506.jpg
    IMG_2506.jpg
    34.9 KB · Views: 732
  • IMG_2508.jpg
    IMG_2508.jpg
    43.8 KB · Views: 739
The luggage compartment floor has also had rust repairs done previously and was covered in a thick layer of brush on seam sealer or some such, same as the passenger compartment, this looked unsightly and had to go, so it was back too bare metal again and a heavy coat of matt black enamel applied, from what I can gather this was the original interior finish...happy to be proven wrong though..:confused:
 

Attachments

  • IMG_2682.jpg
    IMG_2682.jpg
    37.9 KB · Views: 747
  • IMG_2982.jpg
    IMG_2982.jpg
    34.6 KB · Views: 749
  • IMG_2983.jpg
    IMG_2983.jpg
    31.9 KB · Views: 742
Also watching your progress with great interest, love these threads :cool:

We should compare notes one day, I'll show you mine if you show me yours :tongue:

Cheers
Chris
 
Thanks GB,

Iv'e also been watching your progress with great interest and inspiration...different cars, different approach but we both face the challenge of restoring a car at home with limited space.

My workshop is two single garages side by side, one full of parts and tools and the other one is just big enough to do the things I need.

Luxury :D

We have a double carport now taken up with larger parts (panels etc.), I've taken over a bedroom in the house for smaller parts and bits and pieces (without a bed the space is full to brimming with packages). There are probably not too many areas in and around the house that don't have something off the car being stored. And of course the mighty Super Cheap tent housing the hull. Remarkably there have been only a few occasions where the hull has been immobilised i.e. it still can be moved under it's own steam.

Space is a serious consideration when contemplating this kind of work... and a sympathetic family is essential.

Cheers
Chris
 
One other thing that has bugged me about this car is the bonnet has always cocked up a little despite the hinges being adjusted to the maximum.

Then I discovered why, the hinge end has had extensive rust repairs done but they forgot to fix the underside and the metal has deteriorated.

So it was welded up flipped over and lead filled to cover the patch panels on the front.(sorry forgot to take lead pics)

The bonnet looks pretty straight now so we will see if it sits down properly when it is reinstalled.

This has been the most challenging job so far.

attachment.php
 

Attachments

  • IMG_2475.jpg
    IMG_2475.jpg
    49.3 KB · Views: 693
  • IMG_2479.jpg
    IMG_2479.jpg
    39.5 KB · Views: 664
  • IMG_3069.jpg
    IMG_3069.jpg
    30.8 KB · Views: 673
Last edited:
The car was then flipped over on my home made rotisserie to show the ugly side and allow access for repairs.

attachment.php
 

Attachments

  • IMG_2765.jpg
    IMG_2765.jpg
    51.2 KB · Views: 2,840
Back tracking a bit...

Because I don't intend doing more body rebuilds anytime soon I haven't invested much expense on tools.

Apart from a MIG welder, a Makita sander/polisher and a shrinking disc, all my tools are readily available anywhere, or aren't even tools, e.g. bits of steel and pipe can be used as dollies to meld sheet steel.

Different diameter pieces of conduit are wrapped with abrasive paper to help sand along the body contours. I use large sanding belts of course grit with a piece of 90x35 pine jammed inside to use as a body file, I find it easier to use than a file and it is great for sanding lead to final shape.

The shrinking disc was purchased on ebay and is one of the greatest tools to have in the arsenal, it is used to create heat through friction and will shrink down the lumps and bumps in a panel, for more info have a look on youtube.
 

Attachments

  • IMG_3051.JPG
    IMG_3051.JPG
    92.8 KB · Views: 704
  • IMG_3053.JPG
    IMG_3053.JPG
    99.9 KB · Views: 1,264
  • IMG_3070.jpg
    IMG_3070.jpg
    31.4 KB · Views: 629
Triangle plates.

I couldn't help wondering what was hidden behind all that seam sealer.

Rust of course, which had been concealed behind a newer piece of sheet metal.

The steel I am using for repairs is 1.2 Zincanneal which was recommended by someone on this forum, and I find it quite easy to work with as it bends and shapes quite easily.

Two new triangle plates were installed and seam sealed before being sprayed with under body deadener.
 

Attachments

  • IMG_2771.jpg
    IMG_2771.jpg
    43.3 KB · Views: 738
  • IMG_2850.jpg
    IMG_2850.jpg
    38.1 KB · Views: 690
  • IMG_2851.jpg
    IMG_2851.jpg
    35 KB · Views: 730
  • IMG_2852.jpg
    IMG_2852.jpg
    31.3 KB · Views: 759
  • IMG_2862.jpg
    IMG_2862.jpg
    46.5 KB · Views: 742
Last edited:
This is a rust hole in the floor cross member which contained quite a bit of dirt and sand from days gone bye

The shiny piece of steel is the repair I made from the top previously where the fuel tank bolts up.

The rust was cut out, plated over, seam sealed and sprayed with body deadener.
 

Attachments

  • IMG_2808.jpg
    IMG_2808.jpg
    43.6 KB · Views: 717
  • IMG_2861.jpg
    IMG_2861.jpg
    41 KB · Views: 708
You are a dark horse :approve:

That is very impressive, I'd like to see better pics of the rotisserie - not that I'll be needing one.

What welder do you use, and please tell me you have been working on this for a good while, and not as quickly as your updates...

I know you are well advanced but if you are anything like me you may enjoy this thread on a UK forum. I couldn't stop looking and spent nearly 2 hours in awe of this guys work. No fancy tools mostly home made but very detailed clear illustrations of what can be achieved. Much of his work is file finish and ready for primer.

http://retrorides.proboards.com/index.cgi?board=readersrides&action=display&thread=65793&page=1

Cheers
Chris
 
Top