GreenBlood’s D(very)Special Rejuvenation 2009>

17-07-11

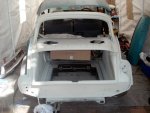
...well I had hoped to get into some panel work this weekend, Brisbane has been magnificent perfect for DIY painting, but the weekend decided showers were in order :(

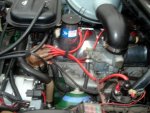
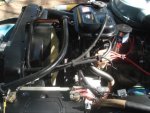
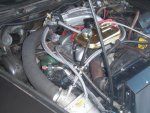
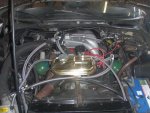
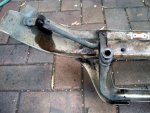
Always plenty to do, picking up from last week I picked up a few bits and pieces from DS Motors, plugs, rocker gasket, tube seals, plug insulators - also scored a new Ducellier ballast type coil on ebay. So reassembled and tidied and fixed wiring using the proper rubber straps... I need to get a clamp for the air-cleaner hose and one of those star dividers for the spark plug leads.

The motor is sweet with this TLC, starts and runs as steady as a rock. Though I am saving for a 123 ignition :wink2:

attachment.php


attachment.php


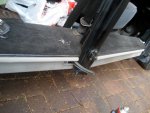
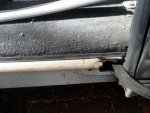
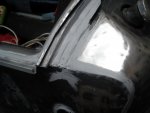
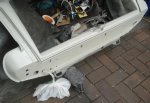
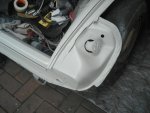
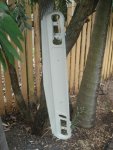
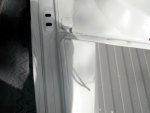
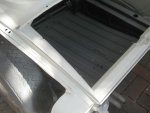
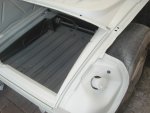
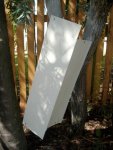
Moved on to fitting the replacement sill kiss rubbers, I can't believe how much these improve the appearance. I guess they are also practical and should help seal the closed door from dust and damp.

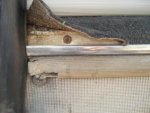
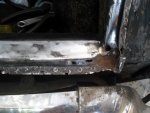
Old rubbers were shot, thin broken and brittle...

attachment.php


attachment.php


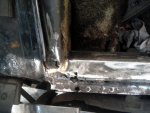
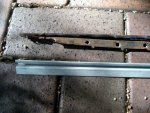
New rubbers sourced from Geert at Citroworld, these are a superb reproduction, fitted with new stainless self tappers because I wouldn't want the next custodian to go through the same dramas I had removing the rusty old fixings :wink2:

attachment.php


Maybe some paint next weekend :confused:

Cheers
Chris
 

Attachments

  • Coil.jpg
    Coil.jpg
    47.3 KB · Views: 2,281
  • Old rubber.jpg
    Old rubber.jpg
    45.3 KB · Views: 2,009
  • New rubber1.jpg
    New rubber1.jpg
    99.5 KB · Views: 1,943
  • Old rubber2.jpg
    Old rubber2.jpg
    49.4 KB · Views: 1,510
  • Engine bay1.jpg
    Engine bay1.jpg
    45.5 KB · Views: 1,520
Hi Chris,
I have one of those "Stars" I took off the DS23 if you want it.
Can I swap for an air cleaner and "Total Oil" stickers?

Colin

Done deal Colin, PM me your mailing address and I send a full set of stickers :wink2:

The Chausson 4A on the header tank is a computer cut spray mask (paint header tank, then using the mask spray white), very nice correct detail - these would have been stamped originally interested?

Cheers
Chris
 
Painting

Done deal Colin, PM me your mailing address and I send a full set of stickers :wink2:

The Chausson 4A on the header tank is a computer cut spray mask (paint header tank, then using the mask spray white), very nice correct detail - these would have been stamped originally interested?

Cheers
Chris

The painting might be a problem on my header tank.. see pictures...

P.O.Box 6270
Silverwater,
NSW 2128

Cheers
 

Attachments

  • P7150276-1.jpg
    P7150276-1.jpg
    74.4 KB · Views: 483
  • DS23-hoses4-1.jpg
    DS23-hoses4-1.jpg
    74.6 KB · Views: 482
The painting might be a problem on my header tank.. see pictures...

Cheers

Very nice Colin, there is a lot of pride in the work you have done there, I thought twice about painting my header tank once I had stripped the black off - they are so nicely made it's a shame not to show off the brass. I just can't help myself though, I really like to see everything as I remember them being at a time I could only dream of owning a decent D.

Cheers
Chris
 
Should be Shane, have you got a spare? Mine has broken on the outer, I was going to repair using heat shrink?

Cheers
Chris

I'll take a look. I have a DSpecial parts car here. Given the only two D's we are likely to do anything with are fuel injected, we have no use for choke cables :)

EDIT: looks like I have an outer cable... inner cable appears to have the end broken off though :( ... Now to dry out my shoes and socks :) Man the paddocks wet ..

I've got an earlier cable of course, but the knob is completelly different.

seeya,
Shane L.
 
Last edited:
I'll take a look. I have a DSpecial parts car here. Given the only two D's we are likely to do anything with are fuel injected, we have no use for choke cables :)

EDIT: looks like I have an outer cable... inner cable appears to have the end broken off though :( ... Now to dry out my shoes and socks :) Man the paddocks wet ..

I've got an earlier cable of course, but the knob is completelly different.

seeya,
Shane L.

Hey Shane, I've had to order a few more bits and pieces from Citroworld so have a new choke cable on it's way - thanks for going to the trouble of looking :wink2:

You could check and see if you have a good condition 'B' pillar interior light lens (only need one), exterior pull type door handles in better than average condition (all four). :cheers:

Cheers
Chris

I'll take a look tomorrow in the daylight. I don't have high hopes though (except possibly a usable interior light as it should be shaded up there near the roof).

seeya,
Shane L.
 
August 13th. Boot Rust...

Moved onto the rear of the car, more rust not serious but needs to be fixed...

Drilled out spot welds and removed the strip that runs across the bottom of the boot, I have a new replacement panel ready to weld in...

attachment.php


Bottom strip removed, the lower part of the channel left and right is rusted so I made new sections - same left and right.

attachment.php


attachment.php


All welding done, new seam seal getting ready for paint

attachment.php


Stripped the number plate panel, boot now is all masked up and ready for paint. Going with 2k here it should be tougher - if the weather holds up should be shiny black tomorrow :wink2:

attachment.php


Cheers
Chris
 

Attachments

  • Number plate panel.jpg
    Number plate panel.jpg
    47.4 KB · Views: 1,313
  • Seam seal right side.jpg
    Seam seal right side.jpg
    66 KB · Views: 1,313
  • Boot rust bottom strip removed right.jpg
    Boot rust bottom strip removed right.jpg
    94.6 KB · Views: 1,382
  • Boot rust bottom strip removed left.jpg
    Boot rust bottom strip removed left.jpg
    96.6 KB · Views: 1,350
  • Bottom boot replacement panel.jpg
    Bottom boot replacement panel.jpg
    60.9 KB · Views: 1,360
August 14th Boot in primer...

...best laid plans of mice and, well you know the rest :wink2:

The weather here looked pretty good this morning, so managed to get some hi-build 2k primer on, but things became over cast as the day got away - nice light drizzle now, incredible, we've not had rain for a month or so :(

I need to get hold of a small piece of 42mm black steel tube and weld it in for the bumper support on the left hand side, the old all but crumbled away when I removed the bumper - I've got new rubbers to fit in the holes on both sides, these will get a good blast of lanolin to help them in and stave off future rust.

Old and new :eek:

attachment.php


Kind'a like the colour of primer, everything now looks so much cleaner and nicely defined :clown:

attachment.php


attachment.php


attachment.php


Well, at least it's not left in bare metal, that primer will hold it until next week. I'll strip everything out of the boot prep/ undercoat and give the whole rear a top coat of 2k black.

Cheers
Chris
 

Attachments

  • Boot undercoat.jpg
    Boot undercoat.jpg
    90.7 KB · Views: 1,300
  • Boot undercoat1.jpg
    Boot undercoat1.jpg
    79.2 KB · Views: 1,301
  • Number plate panel undercoat.jpg
    Number plate panel undercoat.jpg
    51.7 KB · Views: 1,295
  • Bumper rubber.jpg
    Bumper rubber.jpg
    58.4 KB · Views: 1,357
28th August ...more grey trees :>)

This is a bit more of the same, but it helps me keep track of where I am...

Yesterday was just wet and miserable, heavy rain all day... I decided to do a bit more preparation, fixed the small rust at the top edge of the boot, welded the left hand tube bumper support (found a perfect fit at Midas exhaust). A small adjustment to the rust repair I did on the right hand C pillar, just needed a little more space to allow for the rear screen rubber.

...today is just the most beautiful Queensland spring day, blue skies and not a hint of yesterday, I've ripped out the boot lining installed by previous owner

attachment.php


I do plan to re-line the boot and have found a source of Hardura, this is a very heavy duty vinyl with a modern equivalent of 'Jute' backing - it's supposed to be be synthetic has fire retardant properties.

Available through Link - Classic British & German - Link

IMG_2608l.jpg


...but that's getting ahead a little.

I now have the whole rear in undercoat.

Top left and right corners, these are prone to rust all fixed...

attachment.php


attachment.php


attachment.php


attachment.php


..and of course the grey tree, I mean the rear cover.

attachment.php


Just started pulling the rear bumper apart, urm nice rusty fixings, this is going to be fun :eek:

attachment.php


I just have to be content with my rate of progress, I feel like I'm months behind where I think I should be :rolleyes:

Cheers
Chris
 

Attachments

  • Boot carpet.jpg
    Boot carpet.jpg
    49.9 KB · Views: 1,240
  • Top left corner.jpg
    Top left corner.jpg
    56 KB · Views: 1,223
  • Left rear.jpg
    Left rear.jpg
    72.4 KB · Views: 1,657
  • Right rear.jpg
    Right rear.jpg
    72.1 KB · Views: 1,259
  • Full rear.jpg
    Full rear.jpg
    86.9 KB · Views: 1,221
  • Rear cover.jpg
    Rear cover.jpg
    44.5 KB · Views: 1,188
  • Bumper 1.jpg
    Bumper 1.jpg
    53.5 KB · Views: 1,249
Nice work Chris, I enjoy reading and ogling your post, would like to check out the finished product when it's all done.
 
Go to the local hardware store and buy some new stainless bolts etc for reassembly of the bumpers. Removing the old ones can be fun with a carefully wielded angle grinder.
 
Nice work Chris, I enjoy reading and ogling your post, would like to check out the finished product when it's all done.

Thanks for the feedback, sometimes I feel like I should wait until I have something finished to show - but I guess it's the process that reveals the amount of work involved in taking on something like this. Given that this car was in daily use I can only imagine the hours required to get a non-goer back on the road...

Go to the local hardware store and buy some new stainless bolts etc for reassembly of the bumpers. Removing the old ones can be fun with a carefully wielded angle grinder.

Top tip Craig, though I've come to expect nothing less from you :wink2:
I have a decent supply of new anodised but stainless will be perfect on the bumper :cheers:

...and yes, the angle grinder got a workout, those dumb rusted philips head screws will become M5s

Cheers
Chris
 
Top