GreenBlood’s D(very)Special Rejuvenation 2009>

D(very) Special Rejuvenation

Chris,
Thanks for the obvious effort put into this thread, very inspirational. The admiration from the attractive red-head no doubt assisted. Was it really all performed in the driveway (the painting and assembly, not the admiration), and was the scuttle painted in acrylic lacquer or K&H acrylic enamel? Those spray cans certainly help amateurs like me get a good finish on those underbits, where it probably doesn't matter much anyway, except to me.

The blue is superb and very close to the colour of my (now deceased) dad's Rover 2000 way back in 1964. It is certainly a nineteen sixties colour and probably would'nt look so good on a modern car except say a Nissan Micra.

I look forward to your next project, when the starter motor fails!

The thread is as much a help to me as I hope to others :wink2:

All the work has been performed in the driveway of our home, more recently with my make shift shelter. The car has been a work in progress for nearly 2 years.

The front valance was stripped, rust repaired and spray painted with acrylic lacquer, as will the rest of the car, though I might hire a professional booth. I would never use enamel on body panels, absolute nightmare for future repairs :nownow:

The blue is original and a '70s colour on Ds of the era, French roughly tranlates to Blue Lagoon AC639C0... I hope the colour I had mixed over 12 months ago is still good it was a tricky mix.

If you read the thread through from the beginning you would know that the first job I did was to replace the starter motor with a new Valeo and engine mounts at the same time... hope not to go back there for many years to come :clown: :wink2:

Cheers
Chris
 
Love long weekends...

Just like to thank 'Liz for sharing her birthday with us, allowed me to make some progress :cheers:

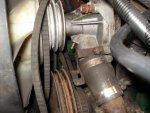
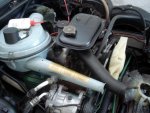
...before shot, nice to see the results of your skinned knuckles :wink2:

attachment.php


So, fitted the replacement water pump (3 pulley for aircon). Fitted steering rack, dropped in nicely, I made reference marks on the old rack to set the new in place. The angle to the steering column I have judged by eye so we will see if there needs to be any fine tuning.

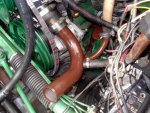
I grabbed a stainless hose from DS Motors on Friday as I suspected the old one would be on its last legs, painted brown of course, the hose at the water pump I purchased new from Maxim Motors back in the '80s knew that would come in handy one day :clown: love that fact that even on a hose the factory puts a dab of yellow...

attachment.php


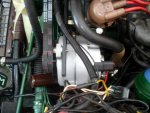
Richo's you beaut alternator in place, looks the part, not wired up, I want to tidy all the wiring and neatly tuck away anything that will no longer be needed i.e. the stuff that ran to the old regulator.

attachment.php


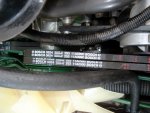
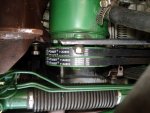
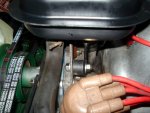
I've had to go with longer belt for the alternator, the original was just too short - original belt I believe is 11A0965, the belt I am using is 25mm longer 11A0990 this gives me nice clearance to the distributor. The bodies on the old and new are the same diametre so I'm not sure why the longer belt is required, there was no way the shorter belt was going to fit :confused:

attachment.php


...also fitted new belts to the High Pressure pump these are of course standard - 11A0800

attachment.php


Pretty happy with the progress, thanks again Liz :adrink:

attachment.php


Cheers
Chris
 

Attachments

  • Water pump before.jpg
    Water pump before.jpg
    42.5 KB · Views: 2,744
  • New Hose.jpg
    New Hose.jpg
    63.6 KB · Views: 2,536
  • Alternator in place.jpg
    Alternator in place.jpg
    99.5 KB · Views: 3,124
  • WP Belts.jpg
    WP Belts.jpg
    91.3 KB · Views: 2,102
  • HP Belts.jpg
    HP Belts.jpg
    98.9 KB · Views: 3,056
  • Assembled.jpg
    Assembled.jpg
    51.8 KB · Views: 3,092
You have been a busy little Queen's Holidayer. So too was I. An update in my starter motor thread, avec video, later.

Well done.
 
Another weekend, where did it go :confused:

Some success some frustrations...

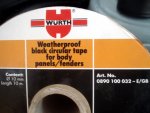
Tracked down a rep for Wurth and purchased a roll of the you beaut mastic to finish the windscreen installation. You just can't buy this stuff retail, The rep was very helpful and purchased on his account then on sold.

attachment.php


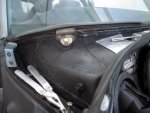
You really pack this stuff into the corners, then lay a bead across the underside of the screen support. It's really good stuff to work with no mess and no clean up. I'll wait until we have a warm day here and work it further.

attachment.php


Next, the header tank on my car had a broken front bracket and a small leak, took it to Newmarket Radiators and in 10 minutes it was fixed and good to go. Treated it to a coat of paint, I'll let it cure before fitting it's sticker.

There were no isolator mounts (silentblocs) on my car for the header tank and this is no doubt why the front mount broke away? I found that Mini radiator mounts were a good substitute. They are round and should be square, and of course have imperial threads 5/16" UFT. They will do me, they stand the header tank off a perfect distance allowing the front bracket to fix to the radiator stay.

attachment.php


attachment.php


I have spent most of the weekend going over work I did last week, most of the assembly was trial fit, satisfied every thing was correct I have now got everything behind the radiator secured. So, ready to look at the radiator...

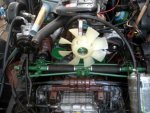
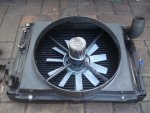
The wiring to the thermo fan was just about rotted away, pulled the motor apart and rewired, fitted to radiator with shroud ready to fit to car...

attachment.php


Not going to happen...

attachment.php


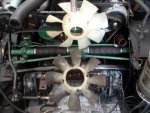
I had bought a replacement radiator fan and fitted to the car without realising there had been a modification to the old fan, the centre hole has been attacked brutally to enlarge and allow for the thermo fan motor. :eek: :cry: I guess this was common practice?

If things had of gone to plan I would have fitted the radiator... looks like it will have to be next week, I'm beat, time for nice glass of red or two :adrink: :adrink:

Cheers
Chris
 

Attachments

  • Wurth Mastic Roll.jpg
    Wurth Mastic Roll.jpg
    77.1 KB · Views: 3,204
  • Wurth Mastic.jpg
    Wurth Mastic.jpg
    78.6 KB · Views: 2,993
  • Header Tank.jpg
    Header Tank.jpg
    97 KB · Views: 2,024
  • Slientblocs.jpg
    Slientblocs.jpg
    96 KB · Views: 1,932
  • Radiator.jpg
    Radiator.jpg
    97.4 KB · Views: 4,389
  • Radiator Fan.jpg
    Radiator Fan.jpg
    45.5 KB · Views: 2,246
Chris, that's looking superb. I wish I had your patience (And I guess time and money would help as well!)

One small point. The rubber mounts you're using are known as "cotton reels" in Mini circles and they're used to mount gear selector mechanisms as well as exhausts. The radiator uses small rubber grommets.

Picky I know, but in keeping with the superb historical accuracy of your restoration I'd hate it to be compromised! :)

Keep up the good work, Cheers, Pottsy

Thanks for your kind words, yes it is a labour of love, most of the work is new to my experience and and I'm enjoying the learning curve. I can't imagine what something like this would cost if you weren't doing the work yourself.

Time and money are in very short supply in our household, I save for weeks, sometimes months to secure the more expensive parts. Time, well if you don't have the dollars you stay at home :D

Thanks too for the heads up on the islolator mounts, I purchased from Repco and on my description the sales guy said.. "ahh, that'll be Mini radiator mounts...." So, Mini gear selector mechanisms (cotton reels) good stuff :wink2:

I do intend to have a post where I pull together all the external links, and name supliers and useful reference sources. I'm keeping a spreadsheet of all costs involved which should help others that may go down the same path. It's too early to name names, but, certainly UFO, Richo, Michaelr, Silverbullet who have all been there done that have been major inspirations...

So far, all I've achieved is to hopefully make some headway in making the car sound and reliable, still to start on the cosmetic side. I'm actually really impressed that the ol' girl put up with me, she had been quite neglected. :eek:

Cheers
Chris
 
Yes but what about the car?:rolleyes::D

Thanks for the kind words too.

Are you kidding, I've just about used my monthly bandwidth checking details on your car, invaluable :approve:

:roflmao: :roflmao: trust you, but it could be said to be true on both counts :rolleyes:

Once we get the car back on the road, I'll make it up to both the car and Mrs GB :wink2:

Cheers
Chris
 
Gee's that's looking nice!!

Do you know anyone with a lathe that has a big swing to turn the center of your new fan out ( I doubt it would be expensive to get the local machine shop to do it .... if they have a lathe big enough). The fan would probably fit down into the cutout of a gap bed lathe :confused:

seeya,
Shane L.
 
Chris,
There are three different fan blade configurations.
1. Full propellor type. The original and beautiful thing.
2. This is the later version with the small diameter cutout. These were fitted to short stroke Ds21 DX engines and probably some others.
3. The full cut out version which was to accommodate the electric thermofan assembly.

BTW, your work looks fabulous.

Shane, the challenge is holding the fan to do the cut out, in a time efficient manner. Machine shops charge for time taken to set up, not just the cut.

Should have known, it is a Citroen after all :tongue:

I'm aware of the full propellor type, yes, a beautiful thing...
I have not come across the correct fan with the larger cutout, I guess these are very rare as my old fan was butchered to accomadate the thermo motor?

I think all I can do is carefully mark the correct diametre and using a jig saw cut close to the line and then carefully file? Of course with the fan removed and fixed to a solid bench..

Cheers
Chris
 
I was thinking about this and contemplated the following possible way of doing it.

If you've got an old water pump, then dismantle it to the stage of having the shaft and the front flange on which the fan bolts. This could then be mounted, with the fan on it, in a drill stand.

A drillstand vyce clamped on the base with a sharpish cutting tool projecting upwards can then be carefully set to the correct diameter.

Slow speed on the drill (to avoid creating cyclones!) and gently lower onto the cutting tool.

It could work.

Of course the (non purist) alternative would be a flat type of fan mounted on the radiator. Wouldn't need the cut out then.

Just my thoughts.

Cheers, Pottsy

All good fun until someone gets a fan blade embedded in their skull, I get visions of something going very pair shaped, the cutting tool snagging and whoohooooo :roflmao:

...and option two is not an option :blackeye:

Edit, Firstly apologies I was busy at work when I replied. I should elaborate...
I think the beauty of the original thermo fan is that it doesn't really restrict airflow through the radiator (we all know how sensitive these cars are to good airflow for cooling) the aftermarket fans I've seen are normally enclosed in a housing that would probably impede airflow when the fan is not operating? I will admit that where I can I'm trying to keep things as close to original as is practicable.


Either someone reading this will have 7 of the correct fans surplus to requirement, yeah right :rolleyes:
Or, I'm going to do a better job of butchering than the previous owner did :clown:

Cheers
Chris
 
thought you citrun blokes were tough

start the car up and use ya leatherman to carve away the bit you don't want :roflmao:

Actually ... that's not a dumb idea at all. If he can mount it on a pump and spin it, getting a file or sandpaper in there would probably work! You'd just need an electric motor to spin the pump by it's belt at low speeds.

seeya
Shane L.
 
...only a very passing thought, really!!

Actually ... that's not a dumb idea at all. If he can mount it on a pump and spin it, getting a file or sandpaper in there would probably work! You'd just need an electric motor to spin the pump by it's belt at low speeds.

seeya
Shane L.

hahaha, don't think I hadn't considered starting the motor (what with no radiator or coolant :eek: ) and rigging a jig to rest a cutting tool on :crazy: :crazy: what!!! the motor would only need to run for 38 seconds :blackeye: :roflmao:

Cheers
Chris
 
hahaha, don't think I hadn't considered starting the motor (what with no radiator or coolant :eek: ) and rigging a jig to rest a cutting tool on :crazy: :crazy: what!!! the motor would only need to run for 38 seconds :blackeye: :roflmao:

Cheers
Chris

You have a wife there right ??? put a pulley into your electric drill and get her to spin the pump using the drill & a belt while you hold a nice sharp file against the plastic part of the fan. watch your fingers through ... it's gonna sting a little if you go sticking them into the spinning fan blades :p

seeya,
Shane L.
 
actually now you have made me think about it

if you can put a drill onto an idler pulley mounted on the engine and spin that to turn the pump and you can rest a tool to lever against to cut you are laughing

i wouldn't be too inclined to hold onto a drill with a pulley in it with a belt on it as it will come off

or just hook the battery up, take the plugs out and spin the engine over on the starter :D
 
or just hook the battery up, take the plugs out and spin the engine over on the starter :D

Actually, that just might work, need to rig a jig to rest the cutting tool on, at worst it should put a deep enough true cut that I could finish by hand? I should have a V wood turning tool somewhere at home...

Cheers
Chris
 
Top