GreenBlood’s D(very)Special Rejuvenation 2009>

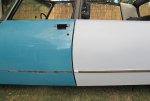
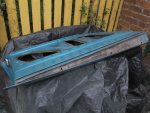
October 21st Rear door in primer

...work continues on the left side passenger rear door.

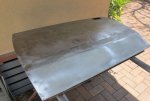
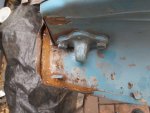
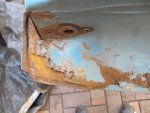
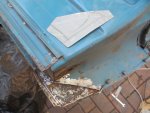
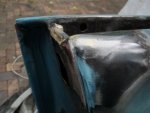
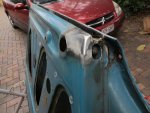
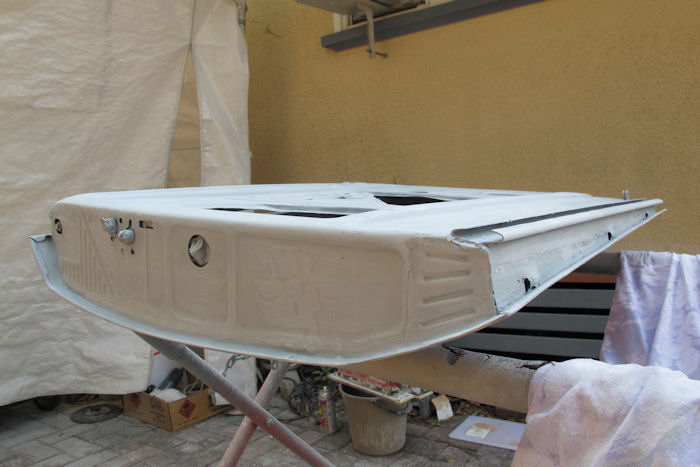
I finished stripping the door of paint, a few more small welds along the fold edges on both sides, seam sealer to all the folded edges and into the join of the skin to door frame on the inside.

attachment.php


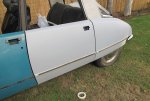
The welded join required a small amount of hammer and dolly work as you would expect, but not too bad for a first attempt.

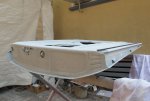
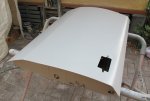
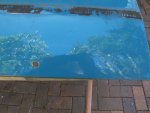
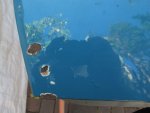
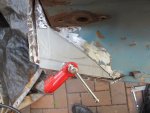
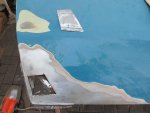
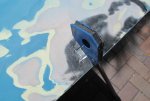
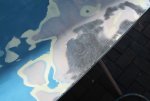
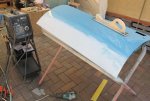
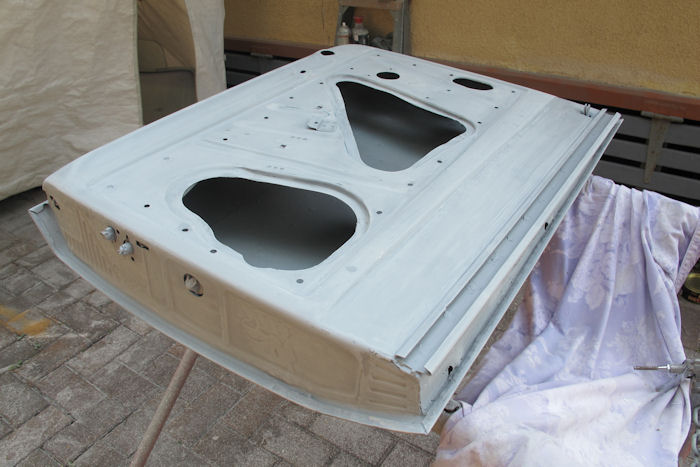
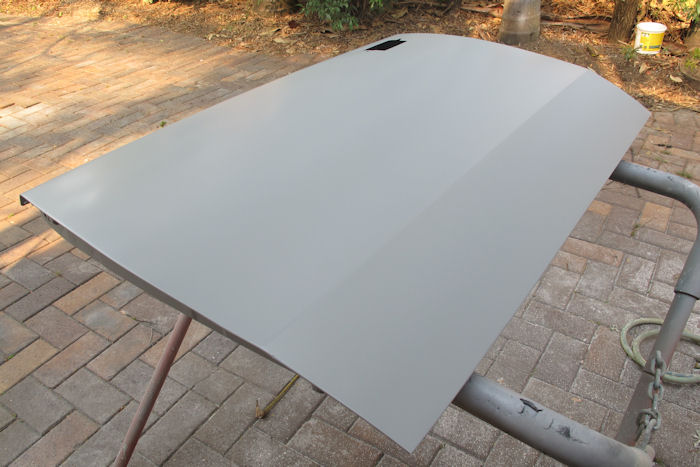
I then hit the inside and outside with a coat of primer, the outside a quick guide coat to establish where the filler would be required.

attachment.php


attachment.php


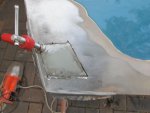
Ready for filler, a kitchen cutting block is great for mixing filler, a quick scrape and it's ready for next use.

attachment.php


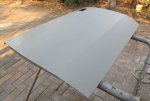
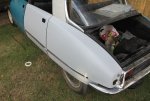
I put the camera away when I sanded/ leveled the filler and forgot to get a pic, not too much filler required though there was damage from a previous repair that needed work as well as my repair.

attachment.php


attachment.php


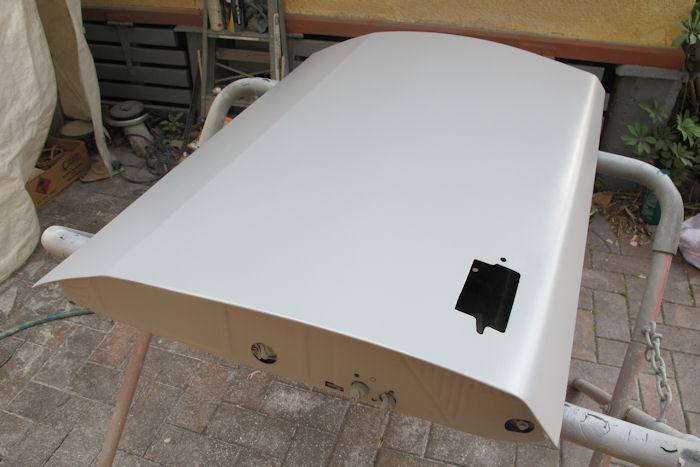
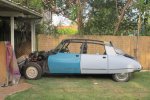
I'm pretty happy with the result so far, a door saved, a huge learning curve. The repair panels - lower inside/ two ends and the lower front skin cost around $150.00. add around $50.00 for paint filler ect. Total hours invested, I've lost count but at my work rate probably a solid 40. You can understand why panel beaters shy from this kind of work, even if they worked at twice my speed they would find it hard to justify the cost.

If you are ever offered good rust free doors snap them up :cry:

Cheers
Chris
 

Attachments

  • 1Stripped1.jpg
    1Stripped1.jpg
    69.6 KB · Views: 1,164
  • 2Primer inside.jpg
    2Primer inside.jpg
    71.5 KB · Views: 1,194
  • 3Primer side.jpg
    3Primer side.jpg
    63.8 KB · Views: 1,182
  • 3Ready for filler.jpg
    3Ready for filler.jpg
    71.5 KB · Views: 1,192
  • 5Primer over filler.jpg
    5Primer over filler.jpg
    62.7 KB · Views: 1,220
  • 6Primer over filler.jpg
    6Primer over filler.jpg
    71.3 KB · Views: 1,179
Chris
Your restoration is progressing well, and it can be a big learning curve. But the result at the end is well worth it, even it is seems distant at the moment.
Chris
 
Excellent work Chris, exceptional attention to detail.
Suggest to lightly wrap in plastic sheet. Prevents contamination by dust or moisture.
I'm sure you knew that.

cheers
r
 
Excellent work Chris, exceptional attention to detail.
Suggest to lightly wrap in plastic sheet. Prevents contamination by dust or moisture.
I'm sure you knew that.

cheers
r

...and still work to do, I've yet to sand back the primer and fill any imperfections with glazing putty before final sand and topcoat.

I've got the panels that are now at a similar stage wrapped in sheets (don't tell Mrs GB) in a spare bedroom (again don't tell the lady of the house) , my thinking being, up here in Queensland plastic may cause sweating/condensation?

It's funny, when I took to that door with the angle grinder I wrote it off in my mind. Nothing ventured and all that... only 7 more panels to go :eek:

Cheers
Chris
 
Might be worth doing them in batches Chris?
could speed it up a bit
Steven,
your posts are inspiring me to attack mine
 
Might be worth doing them in batches Chris?
could speed it up a bit
Steven,
your posts are inspiring me to attack mine

If I had the time, space and facilities Steve that would be the way to approach panel preparation for sure.

As it is working from a suburban block, working through the panels one at a time is my only option. Every panel has a need for some remedial attention and I find that if I concentrate on an individual panel I'm less likely to overlook a problem or process. I also appreciate that I have to see the collective individual panels as a whole, with all panels being hung on the car and practical adjustments made before I even think about top coats.

It's interesting to note that as the work progresses I am honing skills I never had, with much researching of processes before taking the next steps, most of this work is new to me. I had never painted a panel let alone a whole car before this project. Obviously I have been involved in this kind of work but only around the edges and mostly hack work. I have no delusions as to the finished product, it will be a backyard job, my goal is to have stopped/ slowed the rot and hopefully have a sound, reliable, drivable car at the finish.

Whatever, I'm getting a huge amount of pleasure from the experience. I've formed bonds with some great people along the way, there is far more to what I'm doing than just smartening up an old car. When I am back on the road there will be a sense of loss as well as the satisfaction in knowing that the actual physical work I did myself. In that sense I have nothing to lose, and within reason time and efficiencies are not real issues for me.

Cheers
Chris
 
I admire your patience and methodology Chris, I think I look at any work with a view to temperature tolerance! The faster I can get anything done the better, especially now our humidity is creeping into stinking hot levels.
No all credit to you for the process, and some great tips to for anyone wanting to familiarise themselves with the processes from scratch.
Cheers
Steven
 
Yes very inspiring Chris! I'm leaning towards doing the DecidedlySpecial myself.. you're making it look easy. May I ask what setup you are using gun and compressor wise?, etc..The results I achieved with spray cans on the door seemed pretty good so I'm thinking with decent equipment, patience and proper preparation I can achieve something acceptable.

Matthew :)

Where to start...?

My equipment is basic, probably just up to the job and no more. The process is as easy or as difficult as you are sensitive to or tolerant of imperfections.

Rather than learn from an amateur I recommend reading through the information on this site, invaluable tutorials on the whole process from basic repairs to fully stripping/ welding/ metal fabrication/ panel preparation/ primer coats/ blocking - sanding/ top coats. It's all here in plain English with pictorials and videos.

This should take you to Spray Painting Technique, the left menu takes you through the various stages.

http://www.mig-welding.co.uk/spray-technique.htm

There is a huge amount of information available it's worth setting aside time to go through the various tutorials, e.g. MIG welding, when I started to get serious with my project I had never touched any kind of welding equipment. The advice given along with images and videos gave me the confidence to give it a go. Now I can't see how I could have contemplated the work I have managed without a MIG in the tool kit.

Hope this helps to get you started and on the right track.

Cheers
Chris
 
Excellent.. thanks Chris... yes a picture says a thousand words. I watched some diys on youtube before I did the scratch on the door.. made it a lot easier. Like you I've no experience with welding, but would like to be skilled in all areas should the need arise. Just gotta find the time.

Matthew :)
 
Epic Chris!

I finally got around to going through the 11 pages. I feel rather embarrassed to have started a restoration thread when you said at the beginning this would be a rejuvenation! Looks like a resto to me!! I'm just messing around really but this is just first class!

I'm getting so many ideas especially that link to the MIG welding site and the Renault. He says you must etch prime over bare metal but it looks like you just got in there with the primer straight up so I was wondering how that works?

Thanks again for inspiring such fine work.
Andy

Yep just terminology, if I were undertaking a restoration I would be taking the car back to original specification in all respects. Previous owners of my car had made significant changes 23 motor/ 5 speed gearbox/ air/ sunroof/ upholstery/ carpets etc. all non original for a D Special.

The plan is to keep the look of a D Special and maintain these benefits(?) - it also allows me a little license to make changes that again are not strictly original specification but in keeping with the model era, e.g. boot lining, chrome finish on dash etc. Rejuvenation is definitely more apt for D(Very)Special :)

With regard to paint and processes, I took the advice of my paint supplier. Their recommendations for current 2K paint technology when going back to bare metal is essentially Deoxidine - High Build Primer (with a built in etch) - Polyester filler - Primer - Topcoat. Note the filler goes over the first primer coat(s) not onto bare metal.

This may be correct for the paint system I'm using, you really need to talk with your own supplier for recommendations with their paints which may also differ if you are using a single pack paint system e.g. acrylic lacquer.

Love what you are doing to help preserve the rare CX wagon, I always wanted one, such a practical vehicle - commendable :)

Cheers
Chris
 
It seems really good advice to go with what the paint supplier recommends especially if they have a good reputation in the trade. The supplier in Lismore steered me to the 2-pack spray on. I'm sure you know the deal with 2-pack needing an air-fed mask and most probably a booth with some environmental controls. I've seen videos with it applied in a garage with a respirator but I'd be reluctant. Is what you are using a less toxic form or do you need all the safety gear too? I felt I needed a respirator for the paint/glue/rust stripping and cold gal due to working on the inside of the car and the vapours. I now have a heavy cold which could be coincidence but I rarely get colds....maybe 2 a year. Could just be the crazy cross-seasonal weather lately!:crazy:

The CX wagon is ripe for a shell bare restoration. I will just nurse it along to that stage so it doesn't collapse with rust. It could mean moving away from the coast again! I have the GS in dry storage in Lismore for that reason.... exposed steel gets a layer very quickly here.

So many different paints or names for the same thing..... 2-pack, cellulose, acrylic, enamel, 1-part polyurethane, 2-part polyurethane, etch primer, hi-build primer and the different fillers, etc..... it could easily be an 8 week tafe course just to work it all out:cry:
I like the idea with the system you are using where the filler sticks to the etch primer. In the time it takes for me to get the filler down on bare metal (even if I work on a panel at a time) there will surely be time for rust to develop in the salty air. Being able to sand down and immediately apply an etch makes sense to me....the paint shop said I could do this and it depends again what sort of paint.

I really look forward to seeing what you have done Chris and I can imagine when it's ready it will be like new again. I just hope those Brissie drivers keep their distance!:wink2:

Andy

Andy,
The procedure I outlined appears to be industry standard today for a 2k finish. It's even suggested that the panels can sit in primer for an extended period before top coating, which suits my methodology. It could be six months before I get to top coat. If that is the case you 'wake up the primer' before top coats by giving a final light sand.

I have a make shift airflow mask utilising my second compressor, spraying a single panel at a time takes probably no longer than a minute tops. I am still hoping to get into a professional booth for top coats - the ideal being all panels prepped and ready to paint in one or two sittings.

D(very)Special will have lost much of her well earned patina which I will regret, but hopefully I'll own her for long enough to restore at least some of that :)

Cheers
Chris
 
October 29th. Panel adjustments

Not much to report, but tedious work that needs to be attended to before I can progress onto the passenger front door.

When I first re-hung the rear passenger door it looked like I would never get a reasonable panel fit, odd because I hadn't messed with hinges or shims it should have been a straight forward refit.

A few small adjustments had the door to rear guard looking better but when I fitted the front door I was horrified :eek:

I started again with the aim of getting the gaps better at the B pillar, front and rear doors. Swapped a lower shim from the rear door and placed it on the lower hinge on the front. Then lowered the door via the hinge pins and am now quite close with about an 8mm gap. Looks like I can lower it another millimeter or so.

Looks really close as you open and close the rear door, so I have taped the protection trims in place to ensure they were not going to snag and was surprised that I can open and close the door without a problem. :)

attachment.php


Rear door to rear guard only required a small adjustment to the pin bracket and now looks around the same with an 8mm gap.

attachment.php


I now need to fit the front guard and make adjustments as required but it looks like It'll all come together nicely. There is plenty of adjustment in all directions for all panels, just a tedious panel off/panel on/panel off process.

attachment.php


attachment.php


attachment.php


Hoping the sandblaster safety headgear arrives this week, then I'll have a go at cleaning up the underside of the front door and get stuck into any repairs and get it into primer.

Cheers
Chris
 

Attachments

  • Front Door Rear Door.jpg
    Front Door Rear Door.jpg
    68.4 KB · Views: 1,384
  • Full Side View.jpg
    Full Side View.jpg
    68.4 KB · Views: 1,368
  • Rear Door Rear Guard.jpg
    Rear Door Rear Guard.jpg
    57.4 KB · Views: 1,373
  • Rear Quarter1.jpg
    Rear Quarter1.jpg
    89.6 KB · Views: 1,370
  • Rear Quarter2.jpg
    Rear Quarter2.jpg
    90 KB · Views: 1,400
This is awesome work Chris. Inspirational!

I wish I had enough room to do this kind of work! Imagine how good she'll be when finished!

Keep it up.. I can only imagine how tough it is to keep going, mine is bad enough!
 
25th Nov 2012

This is awesome work Chris. Inspirational!

I wish I had enough room to do this kind of work! Imagine how good she'll be when finished!

Keep it up.. I can only imagine how tough it is to keep going, mine is bad enough!

Sometimes I check this thread to see how I'm going, sheesh I need to pull my finger out, when I see the rapid progress others are making I feel like a real slacker :(

Thanks Toby,
Room, apart from a double carport, and the mighty Supercheap man shed, I have now taken over my son's and daughter's bedrooms, a fair portion of the back deck, and I'd say it's a safe bet there will be a Citroen part or two in just about every room in the house :eek:

Motivation, not really a problem, my frustration is lack of serious time. I manage to start something but seldom finish to a point I'm happy with without having to pack-up and tidy my work area. I'd love a solid month to do nothing but get the car back on the road.

Work continues on the front passenger door

This shouldn't take long :clown:
The bottom is solid, a couple of rust bubble on the lower skin...

attachment.php


attachment.php


attachment.php


After poking around with a screwdriver, I could see I needed to do a small repair to the inside and outside of this corner. I opened the skin on the inside and cut the rust out, made a flanged patch to fit in under the open cut.

attachment.php


attachment.php


attachment.php


attachment.php


Before welding the inner I cut the rust from the outer skin and welded in a patch.

attachment.php


attachment.php


I did the same for the other area of rust.

attachment.php


attachment.php


The top corners of the door frame had the usual small splits, so I've just hit them with a little bronze.

attachment.php


attachment.php


...and that's about it for this weekend, I've just hit the bottom of the door with primer to hold it until next week. I'll strip the rest of the door with a strip disk and prep and prime next weekend - weather permitting.

attachment.php


Just a pic of my humble MIG, I use the disposable bottles for gas, they're around $25.00. and have a reasonable life, I think I'm on my third bottle now for this project.

attachment.php


Cheers
Chris
 

Attachments

  • 1Door bottom.jpg
    1Door bottom.jpg
    96.1 KB · Views: 1,538
  • 2aRust midddle bottom.jpg
    2aRust midddle bottom.jpg
    73.5 KB · Views: 1,429
  • 2Rust front corner.jpg
    2Rust front corner.jpg
    56.6 KB · Views: 1,444
  • 3Open skin fold.jpg
    3Open skin fold.jpg
    81.7 KB · Views: 1,431
  • 4Rust in bottom frame.jpg
    4Rust in bottom frame.jpg
    82.5 KB · Views: 1,429
  • 5Rust removed.jpg
    5Rust removed.jpg
    83 KB · Views: 1,447
  • 6Repair panel.jpg
    6Repair panel.jpg
    82.3 KB · Views: 1,470
  • 7Outer skin rust cut out.jpg
    7Outer skin rust cut out.jpg
    62.8 KB · Views: 1,443
  • 8Outer skin repair patch.jpg
    8Outer skin repair patch.jpg
    66.5 KB · Views: 1,439
  • 9aSecond Patch.jpg
    9aSecond Patch.jpg
    67.8 KB · Views: 1,412
  • 9bSecond Patch.jpg
    9bSecond Patch.jpg
    59.2 KB · Views: 1,387
  • 10aBronze corner crack.jpg
    10aBronze corner crack.jpg
    64 KB · Views: 1,385
  • 10Bronze corner crack2.jpg
    10Bronze corner crack2.jpg
    83.8 KB · Views: 1,405
  • 11first primer lower skn.jpg
    11first primer lower skn.jpg
    84.9 KB · Views: 1,372
  • NuWeld150.jpg
    NuWeld150.jpg
    83.3 KB · Views: 1,803
It is excellent progress I think all will agree Chris. I like that you are taking the time with this to get it right. Rushing to get paint on my CX is not at all ideal. It will certainly be an improvement but with flaws that would requir
e the skill or with my inexperience, the time to put right. Very satisfying if you are willing to step out and throw yourself in to get a result you are happy with. Can't wait to see it. Andy
 
Top