
You are using an out of date browser. It may not display this or other websites correctly.
You should upgrade or use an alternative browser.
You should upgrade or use an alternative browser.
2CV Chassis Replacement
- Thread starter gibgib
- Start date
you know joel, you should consider one of these..... They cost nothing to run, are very simple & easy to maintain, are virtually bullet proof, and are actually quite cool!!!
My first car when I was 17 was a Dyane, and I had a lot of fun in it!!
john s
My first car when I was 17 was a Dyane, and I had a lot of fun in it!!
john s
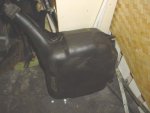
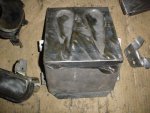
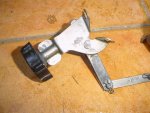
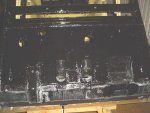
Spent an hour or so this afternoon cleaning the outside of the fuel tank (which I will paint due to unsatisfactory appearance), fitting clips the brake line & fuel pipe, & fitting rear shock absorbers.
Attachments
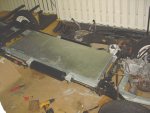
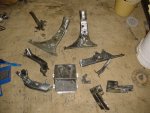
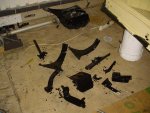
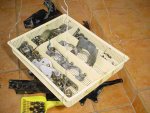
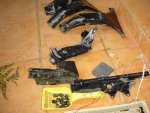
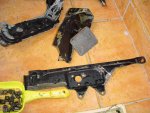
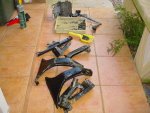
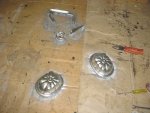
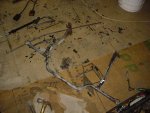
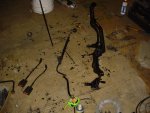
Some pictures of the metal taken from the molasses today.
As you can see there is no rust at all, however, after only 1 hour out of the mix & the rust starts again, big time.
I still needed to wire brush some of the remaining paint from the parts before painting with POR15.
The metal has a grippy & very porous feel to it after has been washed.
All the parts you see have 2 coats on the lower side & one on top. Another one in the morning & it will be time to reinstall.
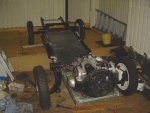
I moved the bent chassis & the AK250 van chassis around the side of the house (under cover) to give more space.
The body floors & lower firewall have had 2 coats of POR15 inside now (I did the outside last week).
Saw Peter again this morning busily working away on "doolittle", the 2CV.
You can check his progress here: http://www.2cvclubaustralia.org.au/
In the forum: "Restoration & Rebuild Jobs".
As you can see there is no rust at all, however, after only 1 hour out of the mix & the rust starts again, big time.
I still needed to wire brush some of the remaining paint from the parts before painting with POR15.
The metal has a grippy & very porous feel to it after has been washed.
All the parts you see have 2 coats on the lower side & one on top. Another one in the morning & it will be time to reinstall.
I moved the bent chassis & the AK250 van chassis around the side of the house (under cover) to give more space.
The body floors & lower firewall have had 2 coats of POR15 inside now (I did the outside last week).
Saw Peter again this morning busily working away on "doolittle", the 2CV.
You can check his progress here: http://www.2cvclubaustralia.org.au/
In the forum: "Restoration & Rebuild Jobs".
Attachments
-
 chassis377.jpg57.3 KB · Views: 305
 -
 chassis379.jpg54.1 KB · Views: 294
 -
 chassis378.jpg50.4 KB · Views: 283
 -
 chassis376.jpg63.9 KB · Views: 307
 -
 chassis375.jpg61.7 KB · Views: 297
 -
 chassis374.jpg61.8 KB · Views: 332
 -
 chassis373.jpg52.2 KB · Views: 290
 -
 chassis372.jpg78.2 KB · Views: 312
 -
 chassis371.jpg96.7 KB · Views: 314
 -
 chassis370.jpg97.2 KB · Views: 314
 -
 chassis380.jpg45.6 KB · Views: 298
 -
 chassis381.jpg55.4 KB · Views: 303
 -
 chassis382.jpg41.9 KB · Views: 302
 -
 chassis383.jpg52.1 KB · Views: 301
 -
 chassis384.jpg29.3 KB · Views: 312
Just to give you encouragement - i've been reading this thread every day with great interest. I'm not big on 2CV's but the process you've been going through has been facinating me - kinda like Shane's CX respray.
Keep it up")
Keep it up
gti138 said:Just to give you encouragement - i've been reading this thread every day with great interest. I'm not big on 2CV's but the process you've been going through has been facinating me - kinda like Shane's CX respray.
Keep it up
Will do 'til the very end
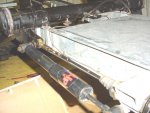
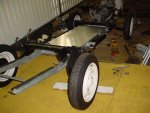
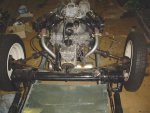
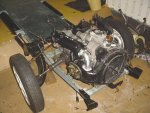
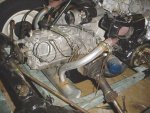
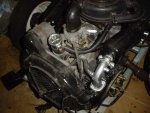
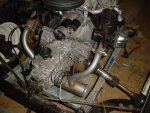
Fitted rack & pinion end caps, front shockies, fuel tank (with wiring), front muffler, disc brake ventilation, manifold to front muffler pieces, hand brake caliper & cables, front bumper support & drive shafts (gearbox end) today.
Painted silver heat bake paint to the manifold, tappet covers, oil filler & accelerator cable support.
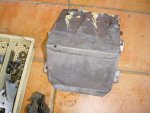
Lightly sanded the oddments tray, AKA parcel shelf & sealed the firewall end & edges, then once dry, applied some POR15 over the top.
I cut the VIN # off the old chassis & I intend to refit it to the new chassis with pop rivets. The silver bake paint looks very similar to the galvanised chassis look.
Direct link to "doolittle" thread:
http://www.2cvclubaustralia.org.au/forum/viewtopic.php?t=2
Painted silver heat bake paint to the manifold, tappet covers, oil filler & accelerator cable support.
Lightly sanded the oddments tray, AKA parcel shelf & sealed the firewall end & edges, then once dry, applied some POR15 over the top.
I cut the VIN # off the old chassis & I intend to refit it to the new chassis with pop rivets. The silver bake paint looks very similar to the galvanised chassis look.
Direct link to "doolittle" thread:
http://www.2cvclubaustralia.org.au/forum/viewtopic.php?t=2
Attachments
How to restore Citreon 2CV
This months Australian Classic Car reviews a book called "How To Restore Citreon 2CV".
The price?....$80.00!
From this thread, over the past few weeks, I learnt how to do it for free.
A magnificent effort, well done!!!
I eagerly await the next instalment.
N V
This months Australian Classic Car reviews a book called "How To Restore Citreon 2CV".
The price?....$80.00!
From this thread, over the past few weeks, I learnt how to do it for free.
A magnificent effort, well done!!!
I eagerly await the next instalment.
N V
2cv
What a fantastic epistle! Probably scared a few off 2CV's tho"! Well done.
What a fantastic epistle! Probably scared a few off 2CV's tho"! Well done.
neural revolt said:This months Australian Classic Car reviews a book called "How To Restore Citreon 2CV".
The price?....$80.00!
From this thread, over the past few weeks, I learnt how to do it for free.
A magnificent effort, well done!!!
I eagerly await the next instalment.
N V
I was going to buy that book.
The 2CV is so simple, most people could restore one with advice along the way.
kiwia110 said:What a fantastic epistle! Probably scared a few off 2CV's tho"! Well done.
I hope not!
There's about 400 on the road in Aust I am told, some (if they haven't already) will need some attention like this.
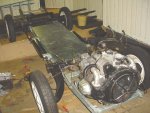
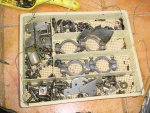
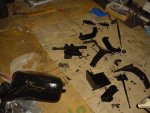
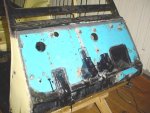
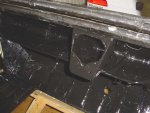
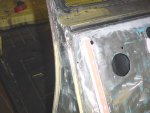
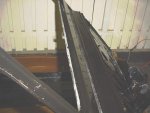
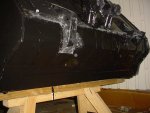
Firewall has been flappy disked back to metal.
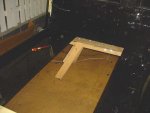
Call me crazy but I put the ribbing back on the firewall to match the old one It is purely cosmetic & does nothing but it looks the way it did before.
I used bog to create the ribs, & some of them a piece of plastic araldited on beforehand.
The whole outside windscreen panel also back to metal, as was the A panel (front sides).
There are 2 coats of POR15 on them now. The black makes everything really hard to photograph. I don't think this car will rust again as I've followed the directions as stated by PPC (POR15 people) & managed to paint it on both sides of all the metals Peter & I fitted.
All the "to be painted yellow (custard)" will need a "Tie coat", then etch (I think), or maybe just straight to undercoat
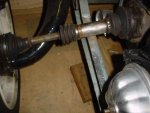
The drive shafts are in & done up as well as I can get them. I'll have to retighten when it's back together with an assistant on the foot break.
Call me crazy but I put the ribbing back on the firewall to match the old one
It is purely cosmetic & does nothing but it looks the way it did before.I used bog to create the ribs, & some of them a piece of plastic araldited on beforehand.
The whole outside windscreen panel also back to metal, as was the A panel (front sides).
There are 2 coats of POR15 on them now. The black makes everything really hard to photograph. I don't think this car will rust again as I've followed the directions as stated by PPC (POR15 people) & managed to paint it on both sides of all the metals Peter & I fitted.
All the "to be painted yellow (custard)" will need a "Tie coat", then etch (I think), or maybe just straight to undercoat
The drive shafts are in & done up as well as I can get them. I'll have to retighten when it's back together with an assistant on the foot break.
Attachments
-
 chassis391.jpg59.5 KB · Views: 544
 -
 chassis392.jpg45.5 KB · Views: 451
 -
 chassis393.jpg59.1 KB · Views: 647
 -
 chassis394.jpg44.1 KB · Views: 634
 -
 chassis395.jpg47.8 KB · Views: 465
 -
 chassis396.jpg33.5 KB · Views: 479
 -
 chassis397.jpg50.5 KB · Views: 527
 -
 chassis398.jpg57.7 KB · Views: 6,086
 -
 chassis399.jpg42.4 KB · Views: 546
No need for etch over Tie-Coat; just rub it down (dry will work) then head for the Hifill. :wink2:
Oh my god what a mamouth task and that firewall looks absolutely amazing what a good job when finished it should last for anouther 30 years +
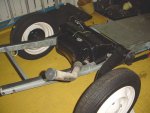
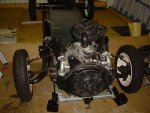
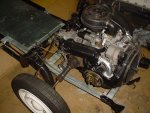
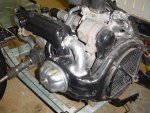
Adjusted tappet clearances & refitted the tappet covers.
Fitted new spark plugs, tightned drive shaft nuts/ bolts to the gearbox output, bent over all the lock tabs on all suspension bolts.
Forgot I had not painted the lower firewall with POR15. I had thought I'd already done it as it's black anyway.
Back to bare metal, it now has 2 coats of POR15.
Wire brushed a few odds & sods like the light bar, air cleaner prop, front seat belt anchors, gear shift arms, bonnet stay & problem area for rust in the front bumper. All bits now have 2 coats of POR15, some will require Tie Coat then top coat as they will be exposed to UV.
The VIN number has been pop rivitted back in place on the galvanised chassis. At least it's there & it may prove easier for a subsequent owner at rego time, not that I will ever sell this car. Might consider if offered $90k, but would have to think about it
The drive shafts have been cleaned (with sand paper), as has the brake line to the front calipers. I also rebent a nicer twirl into it.
Clutch cable is fitted to the gearbox however the 2 into 1 muffler is a left hand drive one so I willl need to make a bracket to keep the cable away from heat.
Attachments
gibgib said:It is purely cosmetic & does nothing but it looks the way it did before.
I used bog to create the ribs, & some of them a piece of plastic araldited on beforehand.
Just a thought as another avid reader of this thread. I know you said the new firewall was thicker gauge than the original one, I'm just wondering if over time though, that the faux pressings may shrink or otherwise part company with the firewall, say from vibration, making it look tatty under the bonnet. The flat firewall look may give the car a smoothed "Max Power" look
I was a bit worried about the plastic pieces & changed my mind after the first 2. The 2 I glued wouldn't come off plus the edges are bogged - should be jake.
The bog won't budge & having such a small engine, there is bugger all heat to effect the firewall.
I didn't like the smooth look!
The bog won't budge & having such a small engine, there is bugger all heat to effect the firewall.
I didn't like the smooth look!
NOTE: From here on, the thread was lost due to the Great Database Deletion of 2010. Re-creation was patched together with old screengrabs & pictures.
30th Mar 2006, 10:40 PM
The spring pot nuts might give you grief but the rest is fairly straight forward.
You could always give Peter a call if you get stuck for advice!
30th Mar 2006, 10:40 PM
The spring pot nuts might give you grief but the rest is fairly straight forward.
You could always give Peter a call if you get stuck for advice!
30th Mar 2006, 10:46 PM
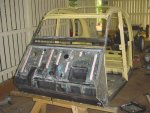
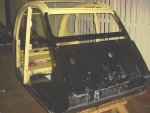
Sanded outside of the body back to metal after seeing it has been painted twice, on top of the original. As Chris said to me, it is unlikely the inside has been re-painted & it does look that way to me.
The rear windows were left in both other times for painting.
There's still some more work to really clean it up.
Peter left from Focus On Print this morning, heading towards Port Stevens for another project, a Lomax (kit car on 2CV chassis),
He was hoping to get to Coffs Harbour tonight.
31st Mar 2006, 08:45 AM
By UFO:
By UFO:
That's probably the Lomax which is coming to Cit In. I know there is one from that area heading to Dubbo.
31st Mar 2006, 09:26 AM
By raver:
By raver:
This thread has been very intriguing and informative so far,
the way the firewall skin was replaced was outstanding :wink2: ,
now if only someone would do a similar thread but on a
GS/GSA instead.........:wink2: