Working on the SM

I went looking for manual gearbox additive around the local car accessory chains and I couldn't find any Wynns product or anything else. There are some online from the USA but not in Australia. Does anyone have any suggestions?

Cheers, Ken

Nulon G70 Gearbox & Differential Treatment - 125g | eBay

Works miracles in worn gearboxes.... Highly recommended, especially for improved cold changes.

seeya
Shane L.
 
It's always 3 steps forward and 2 steps back isn't it.

I think it is time for a report on progress.

So I can confirm I have a very positive entry into reverse gear now. Lots of clicks, crunches and half selects now as I try to get into reverse just like every other manual gearbox - WIN.

So now to try to get the car back onto the street. When I was putting the battery back in through the battery door in the right hand front wheel arch, I thought that the front driveshaft boot didn't look right. So I poked my finger in between one of the concertina folds and it came out black covered in a big blob of grease. So the driveshaft has been out and rebooted. One of the problems with Rezepa CV joints is that the boot won't fit through wheel bearing so the pivot had to come off as well. I stripped one ball joint splitter but a Toledo one did the job and lives to do another.

Then I noticed and LHM drip starting under the right front suspension cylinder. It was time to replace the boot on that cylinder which had split at the bottom. And its never simple is it - a hook to hold the ball in place and getting all the bits lined up so split pin will go in and the return tube attach straight. I am not worrying about the LHM seep from in the LHM tank area after a drive as I know I have to replace all the return hoses in there sometime soon.

Then it started to run on 5 cylinders and there was no way I could prompt the sixth to fire again. So it was time to learn how to take off the plenums and change the spark plugs. But once I had the plenums off, I could see the cam covers sitting there with the dreaded timing chains grooves. I could not resist having a peek.

More to come

Cheers Ken
 
Hi Shane,

G70 already applied with a new change of oil. I think it is helping my crunchy second gear a bit so long as I don't try any racing down changes from third.

Cheers, Ken
 
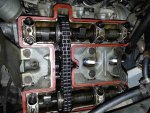
Here is what I found under the cam cover. The valve clearances on exhaust side were between 0.50 and 0.55mm which is within spec but the inlet valves were tight at 0.25mm which is lower than the minimum of 0.30mm as speced. Is this a problem? I note in the US that they often set the exhaust clearance to between 0.45 and 0.5mm.

The chain appeared to be firm in tension but not tight. I watched a video on youtube on adjusting the chain tension but I still have some questions. I have the No6 cylinder in balance in the photo between the exhaust and inlet strokes but there is still some pressure from the exhaust valve on the exhaust cam. When I release the chain tension, the exhaust cam turns slightly and when I put 15 ft lbs on the torque wrench, much of this seems to go back into depressing the exhaust valve again. So I put about 25 ft pounds of torque on the tensioner which left the the chain tension about the same as before. Is there a better way to do it?

Under Cam Cover.jpg

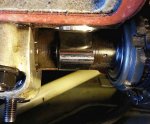
There appears to be some wear on the top of the exhaust cam lobes and they are a bit scratchy on the sides.

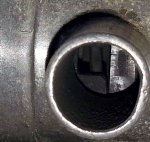
AAV Side Port.jpg

The engine has never been a good starter and does not run well just after starting. I have discovered that the engine has been idling on the airflow passing through the jammed auxiliary air valve with the normal screw adjustment closed right off. I have lashed up a BX idle control valve instead and will see how that goes while I try to source another AAV or repair this one. Also the start control was not wired in series with the starter solenoid wire so connected it in, held my breath and keyed the starter. I think it starts a little easier now.

Exhaust Cam Lobe No6.jpg

Close up of ?wear on the exhaust lobe of No 6 cylinder.

Cheers, Ken
 
Last edited:
Here is what I found under the cam cover. The valve clearances on exhaust side were between 0.50 and 0.55mm which is within spec but the inlet valves were tight at 0.25mm which is lower than the minimum of 0.30mm as speced. Is this a problem? I note in the US that they often set the exhaust clearance to between 0.45 and 0.5mm.

The chain appeared to be firm in tension but not tight. I watched a video on youtube on adjusting the chain tension but I still have some questions. I have the No6 cylinder in balance in the photo between the exhaust and inlet strokes but there is still some pressure from the exhaust valve on the exhaust cam. When I release the chain tension, the exhaust cam turns slightly and when I put 15 ft lbs on the torque wrench, much of this seems to go back into depressing the exhaust valve again. So I put about 25 ft pounds of torque on the tensioner which left the the chain tension about the same as before. Is there a better way to do it?

View attachment 100255

There appears to be some wear on the top of the exhaust cam lobes and they are a bit scratchy on the sides.

View attachment 100253

The engine has never been a good starter and does not run well just after starting. I have discovered that the engine has been idling on the airflow passing through the jammed auxiliary air valve with the normal screw adjustment closed right off. I have lashed up a BX idle control valve instead and will see how that goes while I try to source another AAV or repair this one. Also the start control.

View attachment 100254

I will complete this later

Cheers, Ken

Gee's ... are they secondary cam chains to drive the second cam on each bank :eek: Given the easy access... Can you throw some new aggressively profiled cams into it and replace that chain while your there :evil:

seeya,
Shane L.
 
Hi Shane,

It's enough of a battle to get these engines to run well after 45 years let alone putting any extra stress on the moving parts. From what I hear, the cams are pretty wild already.

Cheers, Ken
 
I get to drive it onthe road again

So after replacing the spark plugs (and the adventure of peeking under the cam covers), I now have 6 cylinders firing and most leaks managed. Time to take it for a drive on the street. Well the engine ran so badly, I only got half way down the street before I turned back. It seemed to be OK up to 2000rpm then pretty unresponsive until 4000 rpm and then it took off again. Also it had no low speed torque under say 1500 rpm. I was getting frustrated with my dim 1970 era Archer timing light that I bought from Tandy Electronics (remember them?) so I bought myself a new but not much brighter Toolpro unit from SC that had an inbuilt tacho, dwell, battery voltage and some variable advance capability. (The big question here was how the advance capability would work.) So after re-timing it, it was no better. I even went around the block stopping after every corner to give the distributor a nudge but to no avail. So I decided to investigate the dwell - 70 on one set of points and 100 on the other. So that was the problem, different timing on each bank of 3 cylinders and they were fighting each other.

So off came the distributor cap and rotor and out came the points - maybe one of the capacitor earth leads had been floating in the breeze as well - it certainly didn't need disconnecting. I looked at the plastic points cassette and couldn't even work out how to set the points gap. Perhaps you have to do it by trial and error until it's within spec - sounds like too much trouble for me. So I found the metal replacement set I had bought that had the allen key adjustment that the Youtube Distributor Service video shows - very cool. I had to bend a few bits of metal to get some of the plastic spacers to sit in their places more securely and investigated how I could drill the adjustment holes for the allen key. Well the distributor in the Youtube video doesn't have a vacuum module does it and that sits right in the path of where the allen key would go doesn't it. Back to the iterative process to set the points gap again. So I decided it must be time to try the Lumenition Kit I bought second hand from Canada.

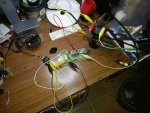
So in went the Lumenition Plate and a jury rig of wires and Lumenition modules resulted in an engine run on 3 cylinders that died very quickly. I swapped the modules around and got an even worse result. But I decided to persevere with the Lumenition system as it seemed to be the best long term option. Before the Lumenition purchase, I had bought a couple of Silicon Chip HEI kits from Altronics that would work on various input devices and had built them up. So I configured one for a Lumenition input and tried out both sensors on the distributor plate with a desk based ignition system - it worked a charm and both light path sensors seemed to work well with this module. So it was time to try it on the car.

Ignition Test Bench.jpg

So today I jury rigged both modules onto the car. Not even a hint of a fire. The module instructions said if there was no response, insert LK3 and use the inverted mode. So I tried this and there were a few engine ignitions even some sequential ones. So I thought perhaps the engine is way retarded. After three nudges on the distributor, I had a running engine and so much smoother than before. Tonight I have put the modules in their boxes and will mount them properly over the next couple of days and hopefully the engine will now run well.

Another piece of bad news is the the heater control which was working before I did the air con install has now failed so the heater is on continuously. I will have to disconnect the heater and see what can be done about repairing the heater controller.

Good news is that the headlights are fantastic.

Cheers, Ken
 
Last edited:
Typically, I have to adjust the points on a distributor machine to match the 45/75 degree spacing exactly. It is a nightmare to try to adjust the plastic cassettes on the car.

Anyway, if you continue to have problems with the ignition, I have a solution. :)

Marketplace:John Titus - Citroen SM Wiki

The Pertronix Ignition fits under the distributor cap, so you don't have to mount ignition modules anywhere under the already crowded EFI engine bay. It also comes with a new weak advance spring. You will likely find that with the Lumenition, your centrifugal advance will begin to come in too early, since you no longer have the points dragging on the cam to stabilize the advance at idle. The stronger weak advance spring compensates for the missing points.

SM heater valves usually fail permanently closed. Possibly the cable actuator for the heater valve has simply come loose?
 
Last edited:
Thanks John,

A distributor machine would be something to add to my workshop. It would be good for the SM and the CX. The car is running so much better under 4000 rpm but I think I have it a big retarded at present. When I get time I will chart all the white dots on the timing marks on the flywheel and reset the timing again. I think I will try the Lumenition system for the moment seeing I already have one but a Pertronix Distributor would give me much more room under the bonnet. What would I do with all that space after taking out one coil!

John, do you have any comments on my understanding of the method for setting the timing chain tension?

Sue and I are taking the SM on a club run over Mt Mee tomorrow so I will see how it goes. Max Temperature is predicted to be 32 degrees C so that should test the cooling system.

I would be very happy if the heater valve failed closed but this one is hot and the cable is actuating properly. More cooling system work coming up I think.

Cheers Ken
 
Hi Ken,

Since you asked my opinion, your procedure was correct in that you have to tension each bank at TDC end of exhaust for that bank (i.e. #1 or #6). If you haven't done so already, get underneath the car and add a 90 degree after top dead center mark on the flywheel (measure 229.8mm CCW from the existing PHM mark). It is really handy to have. On the other hand, I am concerned that you have over-tensioned the chains. I'm pretty sure the factory took into account the pressure of the valve springs when they specified the 14-15 ft-lb torque on the tensioner. Personally, my approach is to tighten the chain to something like 30 ft-lb, to take out any possible friction effects, then relax the torque to 15 ft-lbs. and tighten the acorn nuts that hold the tensioner. Remember, you are not trying to stretch the chain, only take out any slack.
 
So a bit off-topic, but tangentially on.
Hope you enjoy the club run in the SM, Ken.
I took the DS3 to Hervey Bay yesterday, but the load (boxes of books, and bricks) combined with the a/c being on nearly all the way resulted in the worst performance and worst long-distance fuel consumption I've seen it consume. I've been working on the Kombi dash, but didn't take it as the heater is now stuck fully on. Decided not to stay in town and do the club run as the GS needs distributor and heat-box work.
 
Hi Bruce,

Well the SM and us survived the Mt Mee run. Probably not the most suitable run for the SM as it involved following in a conga line of slow tractions and 2CVs on twisty narrow roads, but at least it was a run and allowed me to see how it went on an extended run on an hot day with the new A/C running. In the morning, the temperature gauge spent a fair bit of time in the space between the white and red but no red lights came on. When it got hot, it was missing quite a bit but never stopped. It seemed to run much better on the way home on the highway with the temp gauge back down into the white and traveling in 4th and 5th rather then 3rd and 2nd.

SWMBO was pleased with how the A/C worked and the compressor was switching in and out quite regularly about 3/4 of the way down the temp control on a hot day so I guess that is a win.

So I reckon I'm getting there slowly. Next jobs are to sort out my 4500 rpm rev limit and to get the heater tap out so I can get it repaired.

Cheers, Ken
 
Hi Ken

I found that wiring in a relay to ensure the Lumenition actually gets 12V made a definite improvement in hot conditions.

The other thing I've done is to mount the Lumenition boxes so the long side of the aluminium fins is vertical by strapping them to the LHM tank. A more significant natural convection flow will occur up the channels, compared with mounting the boxes horizontally on the wing.
 
After spending a couple of weeks trying to get the Silicon Chip HEI ignition modules to operate reliably, I have given up. I hooked up the Lumenition modules again and it runs without missing and the timing was still set correctly. Marc, I think I might follow your advice and mount the modules on the LHM tank - there seems to be lots of room around there and it is well away from the hot bits.

With all the testing I've done, I have noticed that when I get the timing right on the A bank using No1 cylinder, when I change the timing light to No 6 cylinder, it lights up the No6 PMH mark on the flywheel. So it seems that the B bank is running quite a few degrees retarded when compared to the A bank. It's looking like I will have to alter the position of one of the optocouplers on the dizzy plate to correct this. More fun to come.

Cheers, Ken
 
Ken,

FYI, several years ago, GM started making the 4-pin HEI modules in China and Singapore as opposed to the originals, which were made in USA and subsequently in Mexico. In the process, the new foundries re-designed the original GM circuitry to be cheaper to manufacture. Of course one side effect of the re-design is the Singapore/China modules do NOT support odd-fire ignition timing. After all, GM hasn't made an odd-fire engine since the late 70's, so why would they need to support odd fire timing. Indeed, the aftermarket module manufacturers had switched to the cheaper circuits years ago.

If you have a dizzy that needs an HEI module for an odd-fire application, find a Genuine GM D1906 module on eBay that is NOS USA or Mexico manufacture. If you get one of these gems, it will solve the problem and the module will probably last longer than the car.
 
Well after extending the adjustment slot for the movable optocoupler with a file, I now have the timing between bank A and B pretty right. The engine is running so much smoother and with loads more low speed torque.

Cheers, Ken
 
SM Power Window Mechanisms

Both of my window winders are slow but one is so slow it needs lifting and pushing help to get it to move up and down. There is also a bit of a catch in the mechanism at about half way up. I have taken the door card off and tried to look at the mechanism but it is pretty well hidden inside the door. I do have a new brass gear wheel that I bought on spec.

Is it possible to prop up the window and then remove some bolts to take the motor and gearbox out for a checkover and regrease/oil?

What other solutions are there for these window winders?

Cheers, Ken
 
I wonder if the SM window motor is any thing like the one for the CX. If it is then they are very poor indeed. Always slow and weak in power. My left CX window suffers as you have described. I have had it out, cleaned and greased everything I can, and still it performs slowly and sticks on the downwards motion at about half way. I am frustrated by this problem.
 
Both of my window winders are slow but one is so slow it needs lifting and pushing help to get it to move up and down. There is also a bit of a catch in the mechanism at about half way up. I have taken the door card off and tried to look at the mechanism but it is pretty well hidden inside the door. I do have a new brass gear wheel that I bought on spec.

Is it possible to prop up the window and then remove some bolts to take the motor and gearbox out for a checkover and regrease/oil?

What other solutions are there for these window winders?

Cheers, Ken

Yes, it is possible to remove the window motor without removing the window. With the window about half-way down, remove the screws holding the regulator to the door. This will give you access to the nuts holding the motor to the regulator. There are four nuts holding the gearbox to the regulator, three are threaded onto studs, the fourth is a bolt with a spacer, so you have to use two wrenches. A ratcheting spanner is really handy here. One of the four nuts is almost hidden behind the front window guide, so it is a bit fiddly.

As far as repair/replacement goes, often the magnets have come unglued from the case, which causes a lot of drag on the motor. The front bearing also goes dry. Usually you can refresh the motors to get them working at least as well as they did originally (which is still not very fast).

The Panetera folks did find an alternative using the window motor from a Ford Aerostar van (or similar).
Power Window Motor Conversion


The motor happened to have the same pitch as the sector gear in the regulator so it could be used to replace the whole motor/gearbox assembly. It did, however, require considerable surgery on the window regulator and I am not positive the Pantera approach would fit inside the SM door.
 
Also, check the condition of your window switches. Since the switch itself carries the full current of the window motor, a new set of window switches will work wonders. The switches are essentially the same as a Peugeot 504, so they are available if you don't mind the slightly different graphic on the switch.
 
Top