Working on the SM

Ken W

Well-known member
VIP Paid Subscriber
1000+ Posts
Fellow Frogger
Joined
Sep 4, 2002
Messages
3,193
Location
North Brisbane
Hi Froggers,

As many already know, I bought an SM just before last Christmas - see post below

http://www.aussiefrogs.com/forum/citro%EBn-forum/120631-another-citroen-has-arrived-family.html

Since that post, I have done a little work and enjoyed driving it to club events over Winter.

I bought 4 new tyres after one started to de-laminate and I found the spare was totally flat and useless. The previous owner put some HiFlys on the front so the car would get its safety certificate. The youngest of the remaining two XWX tyres would have been was 1989 and the XDX spare didn't even have a DOT mark on it. I saw on the SM Wiki that 205/65 R15 tyres helped to long gearing of the SM around town and I managed to get 4 x XM2 V rated tyres of that size for $346 fitted. The difference in ride, grip, lack of noise and steering was amazing.

I fitted some inertia reel seatbelts which work OK but still need some fine tuning in the medium term.

I have just put the SM up on stands to get on with some projects.

Project 1 - Re-aircondition the SM in RHD configuration.

I have fitted a SD5H14 S6626 compressor on some home made brackets and it is now belted up to the HP Pump.

I have trial fitted an evaporator unit into the LHS footwell and I am working on a ducting system to feed into the LHS of the air box. This will involve removing the heater matrix, cutting a 90mm diameter hole in the airbox, changing the config of the return pipe from the heater matrix so it takes a 45 degree route back up to the pipe to the engine and getting it all back together.

I have reconfigured the eyeball vents so I can get ducting from the evaporator to both of them.

I have fitted a plug and play series/parallel two speed radiator fan control system and have a two contact coolant temp switch ready to fit to the radiator. A trinary aircon pressure switch will parallel in with the coolant temp sensor.

I have a condenser and receiver drier ready to re-fit onto the Radiator and I am about to drain the cooling system to take the radiator out. Luckily there is a good description of how to do this in the 581-1 instructions about taking the engine out. Any extra things to be aware of here would be appreciated. However, I think my radiator and hoses are all original so I hope it all holds together OK.

Then I need to get the refrigerant piping between the compressor, condenser and evaporator fabricated and fitted. I will initially try HyChill refrigerant and see how that goes.

There are also some other projects I will do at the some time and I think it will be easiest if I take the LHS wing and the LHS injection manifold off the car. Any thoughts here would be appreciated.

Project 2 - Replace the original style oil cooler hoses.
I have some new hoses and O rings but I would like peoples ideas on whether I need to precharge the system with oil before reconnecting to the engine and if so how I would go about this.

Project 3 - Replace the membranes and recharge the hydraulic drive for my RHS directional headlight - I will follow Citrothello's slide show to attempt this with LHM rather than the original Glycerin solution.

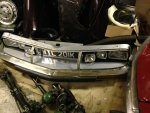
Project 4 - See if I can get some headlights re-aluminised by HyQual in Caloundra.

Project 5 - Replace the gearchange cable. There is a lot of lateral slop in my geachange and 2/3 of it seems to be in the cable. The gearbox mechanism seems to be tight.

Project 0 - Continue to try to get my clock working. I have had one go at this and some clock oil helped at first. But the bottom bearing on the balance shaft seems to have failed as it is very sloppy. I have a CX clock working like a dream on my desk at present and I think this mech will transfer onto the SM dial system when the dash comes out next.

Any comments, hints and ideas on any of these projects would be appreciated.

I will add posts to this thread as I make slow progress. Let me know if you want pics or more explanation of any of the above so far.

Cheers, Ken W
 
ttiwwp.gif
 
Hi Ken, sounds like the jewel bearing on the clock has fallen out somehow. The swap over idea is probably the simplest solution. Good luck with the air con.
 
Ken,

Re your Project 5, it's worth taking the side covers off the centre console and tightening the 11mm bolt at the gearstick end of the cable. Nipping it up a bit will reduce lateral play in the gearstick and make things feel better. But don't be tempted to tighten it up, else it won't drop into the slots nicely as you let go of the gearstick. I put a nylock nut on mine and after a couple of trials found the compromise that got rid of most of the slop.

Re Project 2, I didn't fill the new pipes with oil when I replaced mine. Have done 55,000 miles since.

Re Project 4, CF Electrique in Germany may also be worth considering. They resilvered mine and are really really good, both aesthetically and for seeing in the dark!

Cheers

Marc
 
Hi Ken,
I have owned my SM for 4 and half years and it has been very reliable. It didn't need much doing to it when I got it, though there is a long list of little things like, clock, map light, fit a euro headlight flasher stalk, new speakers, new clutch etc to be done. So there fore I can't offer you any advice for your projects. I am just envious that you have the time and inclination to attend to them so good luck with them and keep us informed.
cheers Tony
 
Ken,

Re your Project 5, it's worth taking the side covers off the centre console and tightening the 11mm bolt at the gearstick end of the cable. Nipping it up a bit will reduce lateral play in the gearstick and make things feel better. But don't be tempted to tighten it up, else it won't drop into the slots nicely as you let go of the gearstick. I put a nylock nut on mine and after a couple of trials found the compromise that got rid of most of the slop.

Marc

I'm not sure I understand this. Are you talking about the threaded portion that is formed at the end of the cable? My understanding is that this simply determines the position of the eye at the transmission end of the cable and, effectively, can be countered by working the two nuts at the transmission at least within their limits of travel. There is, of course, more adjustment at the shifter so within limits it does determine the position of the lever relative to the box (and, importantly the 5th gear stop).

FWIW I have been able to take some play out of the cable by threading a nut onto the cable before threading it into the shifter, then running it up against the shifter as a lock nut. This prevents the cable from spinning under load.

Yes I should have said the gearstick end of the shift rod rather than the cable, my mistake. At the bottom end of the gearstick there's a nut and bolt that holds it to the little shift rod that then transmits movement to the big rod that leads on to the gearbox. I found the lateral slop was due to slackness in the nut and bolt here, so fitted a nylock and tightened it up a bit which got rid of it.

Cheers

Marc
 
OK, that makes sense now. Also, for what it's worth, the rubber bushings at the ends of the big rod can be replaced with common brake caliper bushings, from a 1973 Dodge Charger (Raybestos H5219-2 or equivalent) - at least common in the states......
 
If I had the money, QED owned an SM! I reckon a BVH conversion on a SM would be le bee's knee's!
:cheers: Brendan.
 
With the gearchange play, I was not too worried about the fore aft play, only the play between the planes that is controlled by the cable. There is some play where the gear stick goes into its mount due to the lifting movement required to get into the reverse plane, there is play in the fork that takes the movement to the cable lever, there is play in the pin where the threaded rod attaches to the pin and my car does not yet have a locknut against the cable end so a tiny bit of play there too.

I sighted the gear knob against the fan speed positions on the heater console then wiggled the gear stick side to side and it moved three divisions. Then I pulled the threaded rod towards the front of the car tight against the gearbox springs, and gently wiggled the gear stick and it only moved one division of the fan speed control. The new cable feels much tighter than the existing so I am hoping to reduce the play to about half what it was with a lock nut fitted. I am thinking access to the gearbox end will be much easier with the radiator and fans removed.

I am also hoping that adjusting my gearstick to vertical in neutral position will help with some problems I am having selecting reverse gear. About half the time it works OK but at other times I get a zing as the gears don't mesh properly or I seem to miss the selector completely and nothing happens and it is then difficult to get back to neutral.

Please tell me if you think my thinking is all wrong.

Cheers, Ken
 
I've found things are quite sensitive to the position of that threaded sleeve at the gearbox end. I've lost the ability to select 5th gear a few times when driving (vaguely remember the same thing happening with reverse once) and it was because of the cable needing a bit of adjustment. Its always been trial and error for me - if pulling it a bit more towards the front causes a problem with selecting a gear then back off a shade.

Access is awkward but once one of the nuts is undone a bit then it's ok. From memory I think I just take the accessory tray out the way when I struggle with it - I'm sure John T will know the best way to approach it.

But as its a Citroen taking the the whole front end off will always aid access! :)

Cheers

Marc
 
But as its a Citroen taking the the whole front end off will always aid access! :)

Cheers

Marc

Marc,

That comment takes me right back to my Citroen GS days. Having to take the headlights and frame out and then the front bumper and valance panel to get to anything on the front of the motor was a real pain. I lost count of how many HP pump sock like return rubbers I had to replace between 1975 and 1990 on our three GSes.

Cheers Ken
 
Yep. I remember people used to laugh when they saw me whip the bonnet off the GS to do the brake pads!

Whipping the front off the SM is straightforward too.....
 

Attachments

  • image.jpg
    image.jpg
    94.3 KB · Views: 454
I have made a pair of "shorty" wrenches to do the job at the transmission end. On most of my cars, I have cheated and left the front brake ducts off (I don't rallye in the cars, so I never have an issue with the brakes overheating). With the brake ducts off, it is a snap to go in from underneath. It is probably still easier to remove the lower valance than the accessory tray. In any event since you want to test the shifting, you can drive the car without a lower valance better than without the accessory tray.

Be sure to do the adjustments with a warm engine, since this has an effect on the relative dimensions. With a warm engine it is more difficult to engage first gear if the adjustment isn't quite there.

On some cars, I have had to take a bit of metal off of the right edge of the shift mechanism, where it hits the 5th gear stop in order to get enough movement to make up for lost motion in the cable, cable adjustment, cable brackets, pin etc.

I do recommend pulling the pin at the transmission end so you can unthread the cable from the shifter, then putting a lock nut on the threaded end of the cable. (count the number of revolutions to disengage the cable, then wind it back the same amount).
 
Thanks John,

That is exactly the way I had worked out would be the best to tackle it after I looked at how inaccessible the pin and the split pin were at the gearchanger end. At least it was going to be Plan A.

One day soon. Cheers Ken
 
How to extract the headlight pods?

Hi,

I have been distracted from the main game by fitting some new loudspeakers to the rear side cards. I will post what I have done when I have some pictures ready.

We are heading up to the Sunshine Coast on Friday right past the Caloundra where the aluminium vacuum deposition shop I am going to use to redo the headlight reflectors is located. I have been down trying to take the RHS light pod out so I can extract the lamps and take the glasses off prior to handing them over to the shop. As usual they are very neatly fitted in with the directional headlight controller hanging off the bottom and they are proving very difficult to extract. It looks to me like they have to come out the front of the car so I have removed the headlight glass screen but it also looks like I have to take the directional controller off before they will come out. Is that correct? Does the battery have to come out as well?

Can anyone help me with a quick guide to get the pods out and then get the lights out of the pod?

Is the process different LHS to RHS?

Regards,

Ken
 
Progress,

I have managed to pop the lights out of the RHS pod by levering them off the ball ends of the adjusting screws. It looks as if I will be able to take the pod out backwards and to the outside if I remove the battery so I can access the direction controller to give it new membranes and a refill of LHM. I should be able to pop the lights out of the LHS side as well the same way and it looks like the pod could come out similarily if I can maneuver it past the oil cooler hoses. Am I on the right track here?

The nylon ball sockets seem to be held in place by some soft squarish material that is crumbling when I touch it. What is the recommended replacement material here?

Now to work out how to get the glass off the lights - I note there is a clue to use Selleys Quick Strip on the Citroen SM Wiki page.

Cheers, Ken
 
Hi Ken,

Yes - the headlights should just pop through the front (subsequent to the glass removal). The lights have a push-in clip that can really hang on to the retainer cage at times.

The yellow-ish rectangular synthetic block held within the cage under the clip....can crumple. (was it slightly concave on one surface?) I had some spares from other headlights - but would have just used any soft plastic, if I needed any.

My rebuilt headlights below.

Regards,
Rhys

headlights.jpg
 
I made spares of the crumbling block and the female snap rivet from a 3-D printable nylon co-polymer "bridge" filament. I have the stereo lithography files. If anyone needs the files, send me a p.m. I can also post a limited supply for the cost of shipping from the USA
 
Rhys,

Your lights do look good. I note the clear glass section is on the same side of your lights. My car has them as mirror opposites. Does anyone know if these low beam lights made differently if the car was sold into a LHD or RHD country? If so, I seem to have one of each. I suppose a gander into Manual 642 might tell us.

John, all my snap inserts seem to have survived so I have 24 of them ie 6 spare ones. But my plastic holding in blocks are now just a pile of crumbs on the bench, so I will need to remake 18 of these or find someone who can supply.

I have the glass out of all my lights now and will take them to the vacuum aluminium deposition place tomorrow to see if they can re-surface them.

Cheers, Ken
 

Attachments

  • SM Sad Lights on Bench.jpg
    SM Sad Lights on Bench.jpg
    99 KB · Views: 347
Last edited:
Top