The pheonix rises (post the thief mmmm)

Thanks mate, it was a really nice one before he worked it over, in fact he commented it would have been the best S1 in Oz, not anymore.

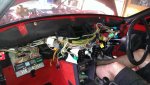
Having fun with JB weld, quite impressed so far. Will have to remove dash, damage everywhere. At least it can be boged up and hidden away good opportunity to reinforce it and fit anti squeek stuff! It will end up better than before too.

What a way to spend your weekend.
 
Now I know why the dash is in such poor condition, he has stolen mine and replaced it with this crappy one.

I know this because my glove box repairs with PVC are no where to be seen, this was something unique about my dash, I am sure it now adorns his sons car.

Another theft by magic, another police report.
 
Impressed with your determination to get this car back into some semblance of what it meant to you before this saga began, hopefully justice will prevail or that karma weaves its own strange ways to right wrongs, and good to see a good example to others, to beat the Ba@stards of the world.

Keep us update and nice to see other froggers rallying around you, those that have helped can be justly proud of the car and your determination to fix it.

Ken
 
Thanks to you and all, lots of JB weld the only issue is its fragility now, look at it the wrong way it breaks again sort of stuff.

I suspect I will go down a carbon fibre / glassed dash to strengthen it. On issue is I have to take it out to fix every thing the prick broke in doing this. To make matters worst I have a grey dash with a black bottom half. He is lucky the won't let him back.
 
This afternoons efforts!

[ Engine205gti.jpg

A few hours this afternoon and see what happened?
 
Back on its feet

New shafts, a good clean down below, oil and nulon into gearbox, inlet on and still on its original springs and shocks which seem to be fine, looking better but the dreaded clearance issue still hits with the j4r inlet which I hoped to avoid. The j4rs would be a nightmare but I will have it cut down to fit.

Pictures to follow.
 
Today, dash out to fix up the f" up magic did to it, that gutless thief / piece of turd is lurking around, he is visiting the 205 driver site.

IMAG0584.jpg

Fun and thanks to Scotty who came and instructed.
 

Attachments

  • IMAG0584.jpg
    IMAG0584.jpg
    101.8 KB · Views: 401
Nice going! I'm interested to see your dash repairs, would you be OK to post some photos as you go along?
cheers Craig
 
IMAG0587.jpgIMAG0586.jpg

Sure, here are the first couple, see the broken bit from his crappy replacement. JB weld, autobarn its good stuff.
 
I rather like the silky oak!

Why have the other forums not excluded Magic?
 
Thanks Ad, I suppose he has not crapped on them and may be laying low? BTW those brushes, was advised they are the same today so if you get some I will fix you up for them. Ideal time to do it with the plastics out.

Is he excluded here?
Matt
 
I'll get some brushes ordered up. Don't think our mate would get a word in here anymore.
 
Looks like you've got some momentum going.

I see he hasn't flogged your Casette Radio.
 
Thank god no! That and two casettes left behind, code was entered and radio came to life. Happy days for the moment until I think of him again:(
 
Next issue, how does this fit? The plastic is broken where it goes and I have no idea of how it mounts?

IMAG0570.jpg
 
Bottom part (as per picture) slides in the fuse catch thingie and should stop at some point. That is the lock.

Hang on.

PS. Went back to your picture on the last page and looks like you have a lock already for the fuse board carrier. Not sure now. Yours is an early dash, mine has been changed to a late one, hence it has the lock you're asking about.
 
Yes I suspected this, part came from ebay. There is a fixture that has broken on this replacement dash, mine was fine so now I need a picture of the first type dash to know what to do, might ask the maggot for mine back?
 
This is the broken piece,

IMAG0596.jpg

my mods sit alongside, good use for pieces of PVC

IMAG0595.jpg

Serves to strengthen it well. served for a number of years so far. Its matching parts on the lower are what gave this away as well as the glovebox closing correctly, mine never did.
 
Bye bye tachymetric relay hello a self controlled self centred ECU (unloicked GTI6), removed power and tacho wiring back through the loom, rewrapped it up and put the driving lights relay up with its friends, the fan relays. Will make a sub board to allow the remote mounting of the relays and put the dash back together.

BakerBM silicon oil pipes which are a lot better than the old dry cracking oil soaked originals.

IMAG0598.jpg
 
Will make a sub board to allow the remote mounting of the relays and put the dash back together.

If you are fitting the relays to plug-in bases (you should) most of th relay bases have provision for clipping together. So the relay array ends up as as a long strip of bases. If you get this style of base, you may well do away with a sub plate.

Stick'em together with some urethane and they don't move.

bases.jpg
 
Top