Quick paint job anyone ????

I've spent another 1.5hours sanding (gee's it's fun). Only one door to go now (remembering I'll do the new bootlid, bumpers, mirror, grill and bumpers seperatly later). Found a small crease in the bottom edge of the rear quater panel :doh: :doh: Next time I *must* get down on my hands 'n' knees and check the very bottoms of all the panels :nownow:

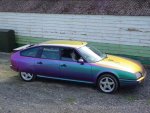
I painted the GS metalic, however could still see fine sanding scratches through the clear. I decided this was because when I use a flat colour and no clear, you can actually take out the really fine sanding marks with the top coat prior to cutting it. Though you can wet rub any orange peel out of the clear, the fine sanding scratches can still be seen in the base coat underneath. This time I will go over the whole car with some 800grit paper (I used 600grit to wet rub it). This way hopefully no fine sanding marks will be visible through the clear. 29.5hours now :eek:

seeya
Shane L.
 
Shane, would it be worth hitting the base colour with cutting paste before you clear it? Basically = very fine sanding, after all.

Chris
 
Nah,

you can't sand or touch the base coat .... That's why clear is required. Remember there is metalic fragments dispersed though it, and they will not like to be sanded.

I'm sure the car will come up extremelly well, however it is still a paintjob done in a shed for about $350bux ...... So you can't expect perfection (eg: I'm sure I'll get at least a few specs of dust/grit land in the top coat when it's being painted...... However anything will be a dramatic improvement over what it was previously). I will line the shed with some cheap tarps, and damp the floor with a fine mist of water before the top coat is applied. This should keep any dust down to neglible levels (plus the car is sitting on 1/2meter high full length ramps, so there is little risk of blowing grit/dirt up off the concrete).

seeya,
Shane L.
PS: It really annoys me that I've missed the couple of marks right at the bottom of the panels :mad: No doubt they will not be visible unless you lay on the ground and look down the side of the car..... But as I know they are there, that's all my eyes would see whenever I look at the car :rolleyes: ie: I'm going to fix them before the top coat.
 
Of course shane, you know it's also obligatory to have bugs land on your car while the paint is still wet? :D this has happened EVERY time I've ever painted anything, and it really pisses me off!
 
smiffy1071 said:
Of course shane, you know it's also obligatory to have bugs land on your car while the paint is still wet? :D this has happened EVERY time I've ever painted anything, and it really pisses me off!

Actually I don't find bugs such a problem, usually you spray grit/moisture on. The bugs would have to be caught in the spray as your applying it to get stuck in the paint. Acrylic is touch dry within a few minutes if not seconds. I think you must be using enamel.... It takes ..... ages to dry.

seeya,
Shane L.
 
Standard "rule of thumb" for W&D paper grades is 600 - solid colours, 800 metallics and basecoat colours. I should have picked up earlier on what you were doing and said something then. You really need to re-guidecoat to double rub unless the first rubdown is partial only.

As to Mr Smith's experiences with slow drying paints - it may well be the climate, and possibly also that English tendency to use nitro lacquer (much sweeter smelling).

Regards, Adam.
 
Thanks Addo,

yeah I'd guessed as much. When I've finished I'll go over each panel with a strong lite and give each panel a light rub all over with 800grit (I see no reason to re-guide coat ??? Were not rubbing back, just removing gentle scratching, in a similar way to when you wet rub the top coat and cut it .... Your intention is to only smooth, not level :confused: :confused: :confused: ).

seeya,
Shane L.
 
I just finished rubbing back the last door. I've given the whole car a good wipe down.... Lots of work yet, I put some etch primer on the edges on the edges where I'd rubbed through. Under a good light I can see there's still faint dots of guide coat everywhere... All over the car ... :doh: A quick rub down with some 800 should get rid of these final traces. I noticed I didn't wet rub one edge of the roof, and I still have around the windscreen and back window. I reckon a good weeks work there yet. Possibly next Sunday I'll get to put some shiny top coat on :party: :party: :party:

seeya,
Shane L.
 
Well, I suppose there is no overriding need to re-guidecoat but that was how I learned it. Certainly makes for easy telling where you've been. Would it be possible that the remaining dots of guidecoat resulted from microscopic droplets of water or oil vapour? Or possibly heavier spots of guidecoat to start with, and induced slightly more shrinkage in the primer as the solvent dried.

Check out the etch you spot repaired with, to see if it's compatible with base/topcoats - otherwise sandthroughs may fry up at the edges. Not cool and Murphy will do it to you right at eye level on the driver's side. Been caught like this with cheaper acrylics. Also some acid etches are hygroscopic and supposed to be overprimed within a couple of hours. If not, they will over a long time "sweat" moisture absorbed into the primer at this initial stage.

Other funny snag with (Deltron) basecoat was leaving it too long (o/night) before topcoating. It wrinkled and tesselated right up when clearcoated with 2K and my $100/litre red paint was stuffed. So if the makers say "Must be topcoated within four hours" or similar, believe them...

Not trying to throw a whole bunch of panic situations at you, but I should have spoken up before when you started with 600 and don't want to see more grief/retraced steps if possible...

Hey - ever seen those neoprene foam pads for wet sanding? One of the American companies supplies them. They're not as soft as the 3M "Softback" sanding sponges but not as hard as the rubber nikki applicators. Good for working larger areas that are already pretty well levelled out; they work with ¼ sheets though. I find people who borrow them never return!

Cheers, Adam.
 
Thanks Addo,

yeah the primer is that really good pressure pack Hi-Chem stuff... Works fantastically and can be left 3months without overcoating, will etch stainless, lead, brass...... etc..... I've used it prior to the oneshot with no issues, however the tin of Watyl primer (pressure pack) I had did crinkle up when I applied it near the Hi-Chem etch ..... I only tried that 'cos the Hi-Chem stuff run out .... Never again....

I have the 3m soft rubber colour wet sanding block (it's always worked quite well in the past). I also have (I'm guessing 3M) a couple of the harder rubber blocks for primer/filler with the 'dots' on oneside to aid sanding.

Upto 31hours now, and still not ready to put any red colour near the car. Still haven't even started to prep the bumpers, wheel spats, bootlid, grill, mirrors ........ does it even end :eek: (just as well I enjoy tinkering out there of a night :) ).

The oneshot ... I have a CX C-matic sitting outside with it applied. It been sitting for well over a year with no sign of degredation to the primer/putty. Certainy it appears to be extremelly weather proof.

seeya,
Shane L.
 
I've rubbed most of the car back using the colour sanding block and 800 paper. Everyone in the world except me seems to know of this miraculous product called 'stopper'. A few years ago my brother in law was around and helped me rub back a roof ... "where's your stopper, there's a stone chip here" ... Just blank looks from me :confused:

Anyway I spotted it today at the paint shop when I was getting the colour ... Why didn't I find this stuff years ago. I just fixed the few marks in the paint in about 5minutes, it flows and spreads so easily :doh: :doh: Oh well, you learn something new everyday.

I think It'll be ready to mask up and shoot this weekend (though it probably won't be painted until next weekend). I've spent another 1.5 hours out there.

seeya,
Shane L.
 
Thanks for this shane, I look forward to seeing a new post here everytime I'm on. Better than a soapie, which is just as well, cos our tv ist kaput!:)
 
Thanks Scatterbrain,

I'm not sure how anyone could find my contant bumblings and screwups interesting .... But anyhow :roflmao: :roflmao: :roflmao:

I do enjoy tinkering out in the shed, hopefully I'll put some shiny red paint on it next weekend so I can make it look reasonably roadworthy again (by putting things such as door handles back on :rolleyes: ), then I'll start on the bumpers, mirrors, grill, bootlid and wheel spats ... So yeah, quite a way to go yet :) I'd post some piccies, but she look much like it has for the last couple of weeks, the sudden change is when you blow the shiny colour over the top :D

seeya,
Shane L.
 
Another couple of hours this weekend.

I've finally got the wheelspats to fit without touching:

wheelspat.jpg


This required cutting a new notch in the bumper:

bumpermod.jpg


The wheelspats needed the usual 'mod' to :

wheelspatmod.jpg


The main part of the car is getting close now:

leftside.jpg


rightside.jpg


Hopefully next weekend we'll see some red paint on it :dance: :dance: :dance:

seeya,
Shane L.
 
Last edited:
Looking good there, very glad to see those spats on the car, CX's just look odd without them! I think work will have to start on mine in the next couple of weeks! john s
 
Hi Smiffy,

it should be fun painting yours, I couldn't imagine trying to paint a car 100miles ?? away from where I live (you can't spend that hour each night out there :) ).

I also found out today why the car stinks of petrol whenever I go around a corner:

fuelfiller.jpg


When I unbolted the filler to move it out the way for priming I pried the metal ring out ..... It's bloody cracked !! Look at the big crack in the lower edge :eek:

metalring.jpg


I wirebrushed the metal insert up (checking to ensure the 'O'ring was in place), then smeared a nice coat of epoxy reson around the metal ring and pressed it back home. Hopefully this will stop it leaking.

seeya,
Shane L.
 
Last edited:
Looking very good there Shane, excited yet??

Paint job should be ready for the french car festival next month!

I should be able to make it down next weekend, 16 is with David C this week, next week the 25s turn.

Spent this weekend with the fishoil and a boot full of parts cleaning and sorting.
Now covered in dirt and grime, smelling like a fish market. Perfect Sunday.

Your Ginger beer and Apple Cider is pretty potent! I have enjoyed a bottle of the GB already which is good going for me.

David.
 
Hi David,

yeah the hardest bit is not rushing it ... I really do still need to give each panel a really good going over (otherwise you see any problems as the shiny top coat comes out the gun ..... As soon as that shiny paint hits, you see anything you missed).

Not sure about the French Car Festival, I thought that was in April ?? I'll try to get there, we'll see (car probably won't be finished though).

Glad you enjoyed the Ginger beer and cider, I'm more of a beer person myself, so it's just taking up cupboard space without Ang consuming it :)

Smiffy, the very first thing I noticed with the wheel spats on .......................................... The spat doesn't pass through the center of the wheel :doh: :doh: I'll check to see if intermittant height is there, if it is I'll adjust the back of the car to the correct height, if it's not I guess I'm about to learn how the electric height corrector settings work on these cars :disappr: ... Um ... The Series II cars still should have the wheel centre sitting level with the spat shouldn't they ??? Series I CX's and GS's do.

EDIT: Oh yeah, I forgot to mention, I just plugged the fuel cap back onto the car. If felt to screw down tightly in a way I've never felt before (given the number of CX's we have had). You know every CX we have owned has had fuel smells --including the diesel that also slopped oil up 'n' over the side). Gee's isn't that fix simple, I just hope the epoxy sealed up the big crack.

seeya,
Shane L.
 
Last edited:
DoubleChevron said:
Smiffy, the very first thing I noticed with the wheel spats on .......................................... The spat doesn't pass through the center of the wheel :doh: :doh: I'll check to see if intermittant height is there, if it is I'll adjust the back of the car to the correct height, if it's not I guess I'm about to learn how the electric height corrector settings work on these cars :disappr: ... Um ... The Series II cars still should have the wheel centre sitting level with the spat shouldn't they ??? Series I CX's and GS's do.

Shane L.
Yes, the series 2 still has the centre line through the middle of the hub, as you can see on CGAT!!!
 

Attachments

  • ahhhhmmmmmm.jpg
    ahhhhmmmmmm.jpg
    72.6 KB · Views: 335
I was just doing some tinkering and slowly checking each panel ....... Bloody moisture was sprayed into the bonnet (remember I sprayed the bonnet and front guards with oneshot a few weekends ago, that really warm and *humid* weekend :doh: :doh: ). For anyone that hasn't seen moisture sprayed in with paint before, it comes up as a million little 'dots'. It looks almost like someone has stabbed it with a pin thousands of times. Yep, 1hour sanding the moisture out of the bonnet tonight :disappr:

seeya,
Shane L.
PS: Just as well I love sanding :mad: :disappr:
 
Top