Quick paint job anyone ????

Thanks Guys,

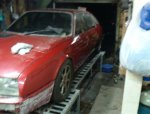
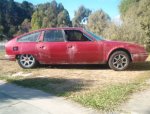
However far from finished :disappr: Infact gone backwards quite a bit as the roof and bonnet will need respraying :disappr:

Still to go

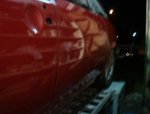
--back and top of bonnet (no biggies, zero preparation needed other than a quick wet rub to knock the shine off the bonnet)
--Roof respray, same as above, only I'll have to rub out the paint drops :rolleyes:
--bootlid ... Need to modify new bootlid and spray
--wheelspats, just a quick wet rub and spray
--window trims and strips on doors... etched and ready for topcoat
--grill and mirror backs ... again quickies, only a quick prime and paint with no real preparation reqired.

I think I'll put some time into the bumpers.... I'm not sure if I should just spray them, or try to sand the texture out of them prior to topcoat :confused: (I'll probably go the lazy route).

seeya,
Shane L.
 
Regarding the solvent issue - it depends on film thickness, solvent grade (volatility), temperature and what's under the paint.

Solvent borne paints skin over quite fast. This slows the migration of volatile solvents from the finish. Breaking the skin by sanding, some will say, allows more deep curing to happen faster. Temperature works both ways. In Shane's case, it's blighted some of his best efforts but also that 34° would have driven out a lot of the most volatile solvents between coats.

Solvents migrate inwards, as far as permeable substrates are there, as well as leaving by evaporation. Of course, all the solvent that goes "the wrong way" then has to turn around and come back out... As an acrylic refin over 2K probably has less acrylic (and therefore solvent permeable) primer than a full bare-metaller, it won't hold as much solvent inside its layers. You can see where film thickness relates to this issue.

There is always some tertiary shrinkage - even with 2K but modern acrylics are pretty stable. The "Premium Clearcoat" Shane used is one of the best 1K clears on the market, and excellent value. Old school nitro lacquer shrinks like you wouldn't believe. And when it's done shrinking, it starts cracking. Can't win using it in a hostile climate - I think many of the concerns over finish behaviour stem from when it was the norm.

Regards, Adam.

Oh, and the grin didn't go unnoticed!
 
Thanks for that addo (apologies for calling you Simon earlier) all makes good sense, and of course back in the good ol' days we would have been using nitro lacquer, the 'norm' even for solid colours was to leave buffing for as long as possible. 2k was just being released onto the market, from memory Acran?

I'm noticeing that the current etch primer we are using is much tougher once fully dry, than the primers that were available, (back then we used an etch on bare metal, limey transparent green - then a grey primer undercoat).

Cheers
Chris
 
As for Shanes quick er 'paintjob', although it has not been quick, by his smile it must have been a good.

Those buffed panels look awesome Shane, makes me realise how faded the paint was before you painted it.

Has been very informative.

David.
 
My mate chris and I were chatting in the pub last night about my CX.
We reckon there is about a day and a half of work (welding, tyres, replace lower windscreen frame) to get the car MOT'd, and if we cheated a bit by just spraying the front end of the car, I could have it on the road in about 4 weeks time!!
Now as I'm sure you would realise this is very tempting, but I want my car to look the bizness, just like shanes!!
Well done mate!!! john s
 
Gee's,

my arms and shoulders are getting a good workout :)

I managed to spend a couple of hours out there tonight. The left side of the car is ready to put back together. :)

seeya,
Shane L.
 

Attachments

  • side1.jpg
    side1.jpg
    44.5 KB · Views: 326
  • side2.jpg
    side2.jpg
    19.1 KB · Views: 326
  • side3.jpg
    side3.jpg
    28.9 KB · Views: 359
Now that's starting to look real nice, you're making me quite jealous!!
I think the work might commence on my car a bit sooner than I thought!
john s
 
Another hour tonight (are we getting close to 50hours yet ??).

I refitted the door handles, indicator and sill trims to the left hand side of the car ....... Um ....... Why the hell didn't I mark what height the bump strips get applied to the door :disappr: :nownow: I'm now not sure where to refit them !!! Any ideas out there how to get them back on straight along the entire car, and not up 'n' down :confused:

Also dismantled mirror so they can be painted :

http://www.aussiefrogs.com/shane/cx2500/mirrors/mirrors.htm

seeya,
Shane L.
 
Straight lines for strips? Hmm... Got a chalk line?:eek:

Quite often the line is not straight. Then you need to measure your offset distances from a swage or some other detail that follows the styling through. Apply little tabs of masking with a flat edge down, that just meets the top edge of the strips.

If they're proprietary strips, make sure of the direction and side. Little bevels and lead-ins can vary quite a bit. Assuming they're bonded on with 3M or similar P.S. Tape clean all the old residue thoroughly then wipe the mould's fixing surface once with a rag wet in thinners. This will slightly soften the plastic so the tape adhesive really bites on. Your bodywork paint will be fresh enough to get a good grip as-is.

A stressful job, I find it. If you drink, Dutch courage might be an asset!

Cheers, Adam.
 
Thanks Adam,

hmmm, chalk line may not work with this car ... I'll try ... You see these cars are quite curved down the side, and the back is far narower than the front :confused: Certainly I'll give it a try.

Another bit that worries me is if I don't quite lay the strip on in the 'perfect position' with the first attempt, the bloody horedously strong tape is going to grab tightly and refuse to met me move the strip :eek:

I'll have to ask on the CX list what height to put the bloody strips at .... Trust me not to measure the height along the panels the strips were at ... I'll see if the photo's give any clues.

seeya,
Shane L.
 
I'd hazard a guess they should line up with the top of the spats, and maybe the bottom edge of the strip would line up with the top edge of the bumper or something silly like that?

The GS workshop manuals have instructions (with measurements) for sticking that kind of stuff on, is there such a thing in the CX collection? I mean the Citroen manuals, not Haynes.

Chris
 
I dont know if series 1 and 2 are the same but I got this from a Citroen Manual I downloaded.
I just used masking tape, attach at one end, then pull tight along the length of the car, just stand back and see if it looks right. Then use one edge of the tape as a guide to put the strips on.
 

Attachments

  • Citroen CX Manual Series 1 volume 1_Page_038_Image_0001.jpg
    Citroen CX Manual Series 1 volume 1_Page_038_Image_0001.jpg
    82.9 KB · Views: 321
Pffft, copyright from a company that no longer exists, of materials pertaining to a model they no longer make or support? Sue me :party:
 
Thanks guys,

would you believe I was thinking of trying that with masking tape myself... Didn't want to mention it incase I just ended up with huge lengths of buggered masking tape laying on the ground beside the car :roflmao: :roflmao:

Looking at the photos of my car posted in the first page of this thread, it appears the trims meet with the rear bump, then cut up and around the wheels spats finishing mid point of the front guard ... Hmm, I'm bloody glad I took those photos !!

seeya,
Shane L.
 
When I painted my CX 10 months ago, I used metallic dulon with dulon 2k clear, and I also had trouble with the roof and bonnet. I had painted cars before, but like 25 years ago, and not metallic. Everywhere I read, and what people told me was once the clear went on, that should be it.
Well my bonnet and roof didnt come out that great, and with buffing is still only fair. It is better than before I painted it, but not real smooth or glossy like it should be.
I thought about giving it a light wet rub, but wasnt sure if i should, and didnt want to go through to the colour coat.
Now reading Shane's efforts, I'm wondering if I should give it a wet rub, or have I left it too late?
 
I've always found that unless you have a spray booth, you need to wet rub the horizontal panels :confused: Infact we have wetrubbed the colour/clear of every car we have (attempted :rolleyes: ) to paint. As you can see from the photo's above it's the difference between shiny and mirror like.

I'm guessing you put plenty of paint on, so wet rubbing at this stage shouldn't be an issue (at all :) ). Just follow Adams advice about the sharpness of your paper.

seeya,
Shane L.
 
Hi Terry,

your in luck... I haven't wet rubbed one side of my car. (NOTE: I managed to get a dry coat on, so it's not as shiny as it should be straight from the gun).

The drivers side looks shiny'ish .... Wet rubbing removes the orange peal in the finish and any overspray.

The passenger side I've wet rubbed and put some cutters on ... NOTE: NO POLISH... there is no polish on this car yet (none of that stuff is going anywhere near the car until it's finished for fear of having problems with paint adhesion).

Note: with the wet rubbed back door you can still see me crouching down taking the photo even though I'm quite a distance from the car :D

seeya,
Shane L.
 

Attachments

  • side1.jpg
    side1.jpg
    66.8 KB · Views: 328
  • side2.jpg
    side2.jpg
    69 KB · Views: 354
I agree great job Shane, you have got me all interested in getting into the 204.

Only problem is it's been a waste of time on one of those cars without proper spring suspension :roflmao: :roflmao: :roflmao:


nate said:
once again the hat goes off...!
Nice work Shane
 
Top