My new challenge - 1964 ID19F Safari

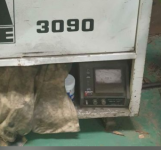
Well folks - another one of those meters turned up on Facebook marketplace… different look, but similar functions. Good luck getting your hands on it.

https://www.facebook.com/marketplace/item/644288880258754/
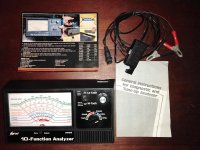
Jealousy got the better of me so I went out and found myself a vintage analyser! Near mint condition with original instruction boot and cables.

IMG_20211216_210736.jpg
 
These sort of things come up quite often. Usually quite cheap as they take up a bit of real-estate in your shed.

1639697519272.png
 
Wow. What a beast.

Is that a scope screen there? Totally awesome.
They are quite common. They are useless to industry and way to big to fit in most garages. They are more "shed art" I guess than something useful I guess.

I think the one above it $500 on facebook marketplace.
 
500$ is not exactly pocket change. But that can be a very useful tool especially if that is a scope and you know how to use it. Our friend here could have diagnosed their ignition problems in a jiffy with that machine. I see it also tests cranking volts, very useful test for battery and starter issues.

And it has a vacuum tester too!

Looking around, I found one that had an exhaust gas analyser too (air/fuel ratio, CO and CO2). How good is that?
 
Last edited:
500$ is not exactly pocket change. But that can be a very useful tool especially if that is a scope and you know how to use it. Our friend here could have diagnosed their ignition problems in a jiffy with that machine. I see it also tests cranking volts, very useful test for battery and starter issues.

And it has a vacuum tester too!

Looking around, I found one that had an exhaust gas analyser too (air/fuel ratio, CO and CO2). How good is that?

They will be from the 70's and 80's. I really don't think there is much they can do that you can do yourself with simple tools. A very cool piece of machinery to play with though :) Give the one above a few months and it'll get down to a couple of hundred. Anyone that is old enough to know how to use it .... knows they don't need it. And anyone young enough is scared away as they look complex (and really have no use on a modern car).
 
If the 'scope works and the machine still has the probes it can be rather useful. You can investigate the spark and see what it looks like, which will tell you how the coil, points and condenser work together. You can also use the scope to tune the ignition rather than guessing and driving. Of course you can do that with a normal scope but you would need a high voltage probe, which is expensive, or you could make one, which is not hard, but a bit of a faff. Needless to say, this kind of ignition analysis would be useful for a modern FI car too. Find one with the exhaust gas analiser function and you're set!
 
Possibly the dome light. The wiring runs up the B post on your passenger side into the roof rail, then around the back of the lift gate, and on towards the driver's courtesy lamp. If at any point circuit 7 got pinched, there will be a short. That was why, when I mentioned disconnecting 7 from the switches to check, that one will the most difficult. Sven will need to disconnect the wire marked in black at the junction for the main-to-rear harness, which is behind the glovebox. The reason I'm wondering this is the door and dash switches switch ground, not power. All 3 lamps have 12V unswitched going to them.
Well Bill - you were on the right track! After sorting out a few other issues and leaks on the car I wanted to work on the electrical fault… but the car started without blowing fuses… so, went for a run around the block: a kilometre down the road it stops again. Restart via the jumper cable and drove home. Fuse blown of course.

Ok, glovebox out and… FARK! The rear loom was melted for about 150mm and the black wire that feeds the interior lights was the main victim… but what is the cause?

I checked all the wiring in the roof rail and found two spots squashed by the roof tabs. Undid the tab screws and pried out the wires. None looked broken or compromised, just squashed. Undid all the lamps and found no obvious fault or pinch point…. Yet…

There are two wires going to each light… both are showing continuity on the meter…? Once I removed all the fittings and had bare wire ends, they still all showed continuity… shouldn’t only one wire now ‘beep’? As the loop is broken?!

BFCB8128-B002-4141-AD8D-EAC8A463EE76.jpeg
0187E2BF-0EB5-42F4-9FFC-413174E85A1F.jpeg
744F7003-DC6B-4BF9-9A88-FDA846C0F6BE.jpeg


Sorry Bill for damaging your beautiful Loom… I feel terrible.

Also tried to fix some of the remaining leaks:

First one was the front cover gasket of the gearbox. After cutting a new gasket it should be fixed.


39D39182-D797-4934-BFA1-F100ADABB9E4.jpeg
C51BA0B5-A038-484F-BD3D-1291DFE093A8.jpeg


The hydraulic pump was a bit more of an exercise. After wrangling it out of its place, I had to pull the whole pump apart again to check the seals and o-rings. But I am not sure I fixed the problem: it appears that the LHM leaks through the cage of the bearing. Pushing out all the grease on the way.

2D8D8FB4-D96C-45C4-B7E6-4B38FEBC1BBC.jpeg

8C482AA2-B121-4E50-B0F2-7DBAD578ACC3.jpeg


There is an o-ring on the outer of the brass bush, which seals the bush to the housing - good! But the shaft is 17.5mm diameter and the inner of the bush 18.2mm (spec says 18.0mm, so I have some wear) - but whether the gap is 0.5 or 0.7mm… LHM can get past. Then only the sealed (?) rear face of the cage of the bearing stops oil to get past and it is then free to leak out… so question: should the cage of the bearing seal properly, i.e. is mine worn? Happy to buy a new 12x50x16 bearing if need be.

For now, I added an extra o-ring between the brass bush and the back of the bearing. With a bit of luck this may slow the flow down at least, but as the bearing rotates, the o-ring is under rotational friction… it may not last long.

BCFE3D40-E26B-4D18-BE34-F14AE6CFB334.jpeg


The last easy job was the installation of the rear seat belts. I made up a couple of plates that support the inertia reels but have sufficient strength to do their job. And they don’t foul on the dicky seats in the boot.

5AB0C1B3-2EBA-42B8-87DD-C0111CCA8938.jpeg
071DAA40-DBB6-4F3B-95F9-7731AC4B63CD.jpeg


The weekend finished with another round of fluid changes at the 500klm mark. New engine and gearbox oil and green coolant as well - all set now for the the next 5000klm at least… just got to fix the electrical issue.

Sven
 
Is it not possible to get rid of the bush and replace it with a proper oil seal? The pump shaft seems to be supported by the bearing, so the bush is doing exactly what?

If for some reason that is not an option, you can have a groove machined inside the ID of the bush to take an O-ring that would seal on the shaft. It may need to be a Viton (high temp rubber) but it would not mind the spinning shaft inside. You might wonder why not machine two grooves and have two O-rings (space permitting). Well, the O ring further from the oily side would not be lubricated so it wouldn't last long.
 
Ummmmmm..... No!
20211219_221950.jpg

Re the pump seal.....
The brass seal ring is supposed to not rotate, it's outside O-Ring is static, but slides when pushed by the spring.
The face of the brass ring on the bearing inner race is supposed to form a rotating seal like the ceramic seal in a water pump.
The brass is lubricated by the LHM, but sealed by the spring pressure.

The inner race of the bearing is sealed at its outside face by the smaller O-Ring squished behind the pulley spacer.

If the O-Ring on the od of the brass seal ring is too tight, it stops the spring getting enough contact force on the seal face. During assembly you need to lubricate that O-Ring to make sure it can slide easily when pushed by the spring.
 
The inside of the pump body is running slightly below atmospheric pressure, ie suction. As a result, a shaft leak shows as air in the system during running, but as an LHM leak when standing.
The suction of running tends to lift the seal off, so spring pressure is important.
Also the face of the brass ring needs to be true, flat and finely finished.
 
Thanks for the explanation Bob and the drawing… makes sense now. Adding my extra o-ring at #15 might now make it worse as the brass might not touch the bearing surface any more… but I also realised I had the brass bush upside down (ie the wide face towards the bearing) - that might also not have helped to put the right pressure / seal forces on the bearing…

Well, it is back in the car. Let’s see how much LHM gets past over the next few runs. Might have to come out again.
 
Well Bill - you were on the right track! After sorting out a few other issues and leaks on the car I wanted to work on the electrical fault… but the car started without blowing fuses… so, went for a run around the block: a kilometre down the road it stops again. Restart via the jumper cable and drove home. Fuse blown of course.

Ok, glovebox out and… FARK! The rear loom was melted for about 150mm and the black wire that feeds the interior lights was the main victim… but what is the cause?

I checked all the wiring in the roof rail and found two spots squashed by the roof tabs. Undid the tab screws and pried out the wires. None looked broken or compromised, just squashed. Undid all the lamps and found no obvious fault or pinch point…. Yet…

There are two wires going to each light… both are showing continuity on the meter…? Once I removed all the fittings and had bare wire ends, they still all showed continuity… shouldn’t only one wire now ‘beep’? As the loop is broken?!

View attachment 139226View attachment 139225View attachment 139224

Sorry Bill for damaging your beautiful Loom… I feel terrible.
Sven, are you are saying the 2 wires in each light fitting have continuity to each other? If so that means the live circuit is grounded somewhere.
 
Thanks for the explanation Bob and the drawing… makes sense now. Adding my extra o-ring at #15 might now make it worse as the brass might not touch the bearing surface any more… but I also realised I had the brass bush upside down (ie the wide face towards the bearing) - that might also not have helped to put the right pressure / seal forces on the bearing…

Well, it is back in the car. Let’s see how much LHM gets past over the next few runs. Might have to come out again.
To fit the O-Ring, did you just sit it on the step?
So you can (at the next disassembly) remove the O-Ring ?

I was worried that you had machined a groove for the O-Ring, in which case I would post a replacement ring to you.
 
Last edited:
Do you have a fire extinguisher within easy reach of the driver as well as the one next to the strapontin? When you need one, you need it fast.
 
Top