Last edited:

You are using an out of date browser. It may not display this or other websites correctly.
You should upgrade or use an alternative browser.
You should upgrade or use an alternative browser.
My 404C resto begins!
- Thread starter Mike Tippett
- Start date
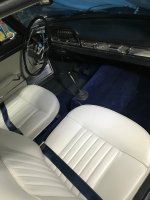
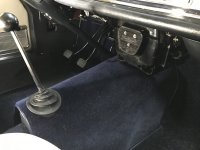
Today I installed the Nardi shifter. It's tight getting in there to tighten the bolts. Shifts nicely. A Michelin inner tube was cut up to make a weatherproof seal between the bodyshell and Nardi, as per the original (but mine is better!).
Next I have to cut up some insulation to fit both under and over the fibreglass Nardi covers, which will take some trial and error, and finally fit the tunnel carpet over all that.

Next I have to cut up some insulation to fit both under and over the fibreglass Nardi covers, which will take some trial and error, and finally fit the tunnel carpet over all that.

I mounted the carpet on the transmission tunnel after the removable insulation and fibreglass shells were installed.
I think this will be a provisional job because I realize now that the original carpet piece that the new one was modelled on was not the optimal shape for the area behind the shifter. You see the drop-off after the shifter boot, well that is about 7 cm shy of the end of the rear tunnel carpeted section. I guess the original carpet had a separate strip for that area.
So I made one up from the dark blue original tunnel carpet and it looks presentable, but the rigorous solution would be to have it all in one piece, with the lower section being part of the main tunnel carpet but shortened so it fits the radius of the lower tunnel ideally.
So when the car is on the road again and Covid-19 is under control I will visit the guy who made it and have him custom make another one in one piece.
Attachments
Last edited:
Mike,
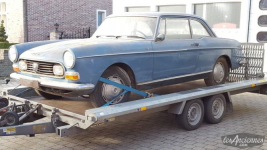
Your next resto awaits. Two cars for the price of one. What could possibly go wrong? Colours perfect!
https://www.lesanciennes.com/annonce/peugeot-404-coupe-1967-a391053?ftype=vo&q=Peugeot 404

Your next resto awaits. Two cars for the price of one. What could possibly go wrong? Colours perfect!
https://www.lesanciennes.com/annonce/peugeot-404-coupe-1967-a391053?ftype=vo&q=Peugeot 404
Attachments
I can promise you that the 1966 model I am finishing up now will be the last car I will ever do an integral restoration on. The bodywork alone is witheringly expensive! And that's with lots of unobtanium NOS panels which have not been available for decades now. So: no.
I last spoke with Anderson's Precision Engines last Wednesday when dropping off some hardware and I hope to have the long block back in my hands sometime in mid-to-late January.
I last spoke with Anderson's Precision Engines last Wednesday when dropping off some hardware and I hope to have the long block back in my hands sometime in mid-to-late January.
I can promise you that the 1966 model I am finishing up now will be the last car I will ever do an integral restoration on. The bodywork alone is witheringly expensive! And that's with lots of unobtanium NOS panels which have not been available for decades now. So: no.
Spare parts??

I have a few but all the best 'uns were used on the car.
A year later and before installing the engine, something had been bugging me. The fuel return line I had installed a year ago was too short and ended under the clamp you see on the left side of the photo. So I had installed a rubber injection-rated fuel line with clamp and clamped the whole mess under the holder. But it seems not rigorous and liable to cause leaks or some other problem over time. So yesterday I bought another 16 feet of 5/16 inch Cunifer line and made that line over again. Now it reaches to right under the fuel decanter filter, which is what it's supposed to do, with no hose clamp under a clamp that would be nearly impossible to access with the engine installed. Much better! I still don't know which is the fuel supply line and the return line, but if it's not the one I've connected to I can easily switch them. The rubber fuel line you see on one Cunifer line is going to be cut again for an inline fuel filter.
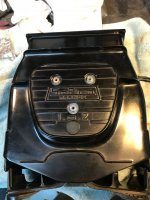
I also started tidying up the blower units and hope to be able to get the best one working and cleaned up


I also started tidying up the blower units and hope to be able to get the best one working and cleaned up
Update: thanks to Daniel Goron in southern France for positively identifying the two fuel tank connections - I did it correctly in the first place!
Today I did some work on the SOFICA blower unit. I have two. One had a noisy motor with lots of end play on the shaft, but much better brushes than the other one, which was quiet and had very little shaft play. So I swapped brush holders, which meant a little bit of soldering. Came out very well.
Then I extended the wires so the two speed switch that I have relocated from the blower unit to the dashboard can be fed, and found a good blocking plate for the switch hole.
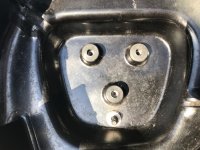
The thing I should have got before now is a set of new rubber mounting washers for the motor, which is bolted through the front of the SOFICA housing. So, before putting the motor into the housing and putting it into the car I will see if I can get a new set of those.


Then I extended the wires so the two speed switch that I have relocated from the blower unit to the dashboard can be fed, and found a good blocking plate for the switch hole.
The thing I should have got before now is a set of new rubber mounting washers for the motor, which is bolted through the front of the SOFICA housing. So, before putting the motor into the housing and putting it into the car I will see if I can get a new set of those.

Here is a shot of the brushes - top is part of the set that were on the good motor - bottom is part of the set that were added to the good motor.

The next step was to find rubber mounts for the blower fan motor. The originals were gone and scrap anyway. I thought I'd have to make some but Duncan Auto Parts has a chest of grommets that are surprisingly useful and they had three that fit. The originals were split in half when new and inserted from either side. I decided to see if I could squeeze these new ones through in one piece. Yes is the answer.
So I did.
I had to make special provision for the wire extenders for the switch because they run near the blower now that they have to exit the housing instead of just going to the switch on the bottom of the housing. So I taped them down with aluminium duct tape to keep them away from the impeller and had a lot of fun getting the nuts threaded but in the end it's all good!
Attachments
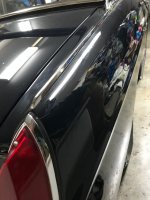
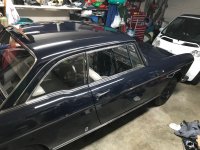
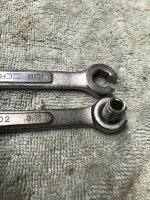
Got the SOFICA unit installed with the remote switch wired up nicely. It's worth mentioning that despite being a metric car, the brake pipe unions I used are 3/8 inch on the nuts and not 10 mm as were the originals, even though the threads themselves are imperial. A 10 mm wrench will not get them tight enough. Most of you will know that! Couple of shots from the side, now that the car's off jack stands and on its own wheels again.
Attachments
Last edited:
The Jaeger aluminium plate for the sports instrument panel - made by Le Club 404 - arrived today and I installed the instruments provisionally at the lunch break. The instruments other than the oil pressure gauge are used and need to be cleaned and tested. I may also look for a better voltmeter and possibly an 8 Gordini tachometer after all, as the Renault 8S tachometer has a different style of chrome trim. Still it's a good start.....


Last edited:
Horns from the 404 of this era are possible to disassemble, de-rust, clean up inside, adjust and reuse!
Both of them were not working beforehand but I cleaned the points inside and got them both working again!
These both live behind the front grille.


Both of them were not working beforehand but I cleaned the points inside and got them both working again!
These both live behind the front grille.
Brilliant! There is that real sense of self achievement when you get them to work again. Taking the soft option is not a choice when restoring cars.
Interesting to see the cut outs for the screws on the diaphragm. Mine simply had larger holes then the screws and if the body shells were too tight, the horn wouldn't work. Took some fine tuning. No pun intended
Interesting to see the cut outs for the screws on the diaphragm. Mine simply had larger holes then the screws and if the body shells were too tight, the horn wouldn't work. Took some fine tuning. No pun intended
Installed the horns today - a bit difficult for access even with the engine out, and added a lengthener to the front gearbox support tool's bolt, but it's still a bit bendy so I may have to use a floor jack after all when installing the engine.


The town horn I think is the one in the engine compartment and the road horns behind the grille....anyway I bought a new SANOR brand rebuilt town horn because mine was beyond repair and the plastic had spalled off the edges. Got it on eBay, not cheap but it was redone and works well. The form is identical to the original though the sound is likely a bit different because this one is a "TR" and the original was a "TV3".


