FAB

You are using an out of date browser. It may not display this or other websites correctly.
You should upgrade or use an alternative browser.
You should upgrade or use an alternative browser.
My 404C resto begins!
- Thread starter Mike Tippett
- Start date
Have you kept a separate costing sheet for freight?
I've got all the bills right down to cans of paint, special tools like the brake pipe flaring tool and of course freight. I haven't totalled it all up line by line but I will one day. The estimates given above include the freight.
The body restoration for example had a 12% VAT component included. I count myself lucky that it was "only" 66 Grand because their hourly rate has gone up to $140 from the $95 I paid. That's because they sold the operation to the local Mercedes/Porsche importer and stayed on as employees. I could not have afforded that same shop today, only three years later.
Towing the shell from home to Victoria (90 km) cost $500 and the same to get it home. Ouch.
66,000 for the body and paint is an incredible amount
700 hours!
Yeah, the metal work was about 350 hours and the paint preparation and paint about 310. So the actual billable hours was more like 660. The estimate before starting was $56,000 including tax but the premise at the time was the front fenders (guards) would not be coming off. But more work on the front end than expected at the time of the estimate was required. I was 100% OK with it because I want this baby to last!
I dropped these bits and a little more off at Anderson's Precision Engines on Monday. Also, they will set the ring gaps for quick street use (not racing!) and I may also get them to build up at least the bottom end. Sent them the workshop manuals in PDF.
They also have the cast iron exhaust manifold and will rectify the plane where it contacts the head and fine tune the stainless steel header pipe which is pretty good but requires a small adjustment to one of the three bolt holes.

They also have the cast iron exhaust manifold and will rectify the plane where it contacts the head and fine tune the stainless steel header pipe which is pretty good but requires a small adjustment to one of the three bolt holes.

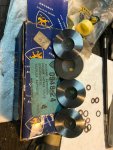
Yesterday I got the last batch of plating work back from Victoria. The job was good on what they returned but somehow they managed to lose the crankshaft pulley (I have a spare) and a small clamp for the injection system piping (I likely have a spare and if not it'd be easy to fabricate).
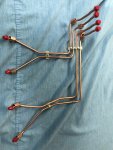
Anyway, I have two complete sets of steel fuel lines and both were plated in copper. The fittings are copper so I thought it would be the best way to protect the steel and would help the fittings too. One set was used on a running engine as little as 14 years ago (the car's) and the other from one that was last run in 1990 (our former 404 sedan's). As it turned out, I should have pigged them out before plating because when I got them back I realized 6 of the 8 were blocked - I could not blow air through them. So one by one I rammed a very stiff wire up each tube and some rusty gasoline sludge and varnish came out when I squirted some Varsol through them. I'll do it one more time just to get the last bits out and then choose the best 4 for the car. I also have one NOS tube, which is like a very dark patina copper colour. I would not want to have the beautifully cleaned injectors fouled up by whatever might have been in these tubes! Even though I have 18 injectors.....
I got the sump washers and bolts plated, valve cover bolts, timing cover bolts, some other bolts for the throttle body etc. Also the trunk latch loop. And the welded heater tube was redone in zinc too.
Not a lot new to report other than the wait continues for the new intake valves (slow mail from UK!) but today I took the C3 gearbox into Victoria Transmission for the long-overdue bearing replacement and internal inspection. The older fellow who will be rebuilding it did the same job for my friend Tim Bowles' 404 Coupé Injection about 20 or 25 years ago. I have one special tool for it (depth gauge) and dropped off the reprint of the gearbox chapter of the workshop manual. I have two potential donor boxes should any part inside be hors service as the French say.


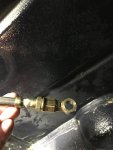
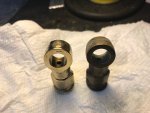
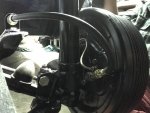
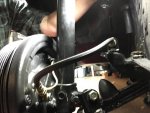
I finally put the front brake hose fittings that Jean-Marc Faivre sent me from Cheminot France a while back on the car after a good cleaning.
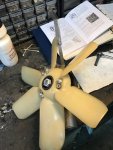
Then I assembled the water pump with a pulley from a 504 and a later type nylon 6 bladed can in place of the 3 bladed original. Set the air gap provisionally too.
Then I checked the oil pump/distributor drive shaft and damn it, it's worn near the bottom. So I'm going to buy a new old stock one from Dean Hunter in England. I'm also getting a couple of springs for the carbon brush of the electromagnetic fan.
I also found the new intake valves I meant to bring to the engine shop originally. Only three are original and one is probably aftermarket so that is why I ordered another set....
Attachments
I an a crappy project manager - this job has proven it time and again!
I an a crappy project manager - this job has proven it time and again!
You are not Robinson Crusoe there...
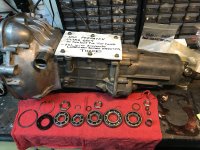
Eldest daughter Jennifer brought the rebuilt gearbox home. Personalized note on the top cover!
If you're wondering, the Nardi shifter can only be bolted on from inside the cabin, once the gearbox is in position below the car. There is no other way to install it. So I leave the corrugated plastic in place until I'm ready to install the shifter.
The bearing near the centre of the closeup photo is the main input shaft bearing, SKF 6207N. This is the one that generally gets noisy in the 404 C3 gearbox as it ages, with the engine idling and clutch pedal released (input shaft spinning). Even loose in my hand it made a significant noise, which none of the others did.
I'll see about installing it tomorrow after I fashion some sort of front support out of a steel strap I bought, to simulate the factory tool, and then put the shifter on....
Attachments
Last edited:
What was supposed to be a quick removal and cleaning of the clutch release bearing shaft and the installation of new bushings and carbon bearing ended up being a 5 hour nightmare.
The clutch release shaft is usually easy to remove with the steps being to remove the bolt from the fork (the head is behind, facing the gearbox), push the release bearing fork along the shaft against the spring, release the circlip that holds the fork in a precise location on the shaft, take the circlip off the small end of the shaft and gently tap until it slides off the (splined) fork and then you're done.
Well, the forged aluminum fork was seized to the shaft at a certain point - just would not budge. I decided to drill it full of holes along the shaft to hopefully make it release (destroying it in the process of course) and even full of continuous holes it still was a bear to drive out. In the process, the boss on the bell housing that supports one of the bushings broke a chunk off.
So I went out to the shed to retrieve a spare gearbox, brought it up to the garage, took its bell housing off, removed the cutch shaft without the slightest problem (GRRRR at the first one!), whipped the bell housing off the rebuilt gearbox and cleaned the other one up. That took a while. Then I selected the best clutch release bearing shaft I have and prepared it.
The rest of the job was easy but painstaking, removing the Permatex Grey from the rebuilt gearbox sealing faces and the other bell housing, cleaning them with acetone and then resealing. A brief moment of almost panic ensued when the input shaft would not turn but I figured the shifter forks had just gone into an implausible position (remember, the shifter is not on the gearbox yet) and yes, that was it.
So I was unable to make the tool to support the front of the gearbox, much less, install it!
The little tube on the upper part of the release fork is for oiling the carbon bearing from above. Regular maintenance....
Murphy's law strikes a gain. This wont take long...What was supposed to be a quick removal and cleaning of the clutch release bearing shaft and the installation of new bushings and carbon bearing ended up being a 5 hour nightmare.
And our wives wonder why we keep so many old spares.
The new intake valves arrived today, SASIC brand but they look pretty much the same as the 3 OE ones I have. I'll run them down to the engine shop later this week or next Monday.
Yes. Rule 1 - if you plan on restoing a car, be very selective in what you throw out. Sometimes unexpected things need replacing.Murphy's law strikes a gain. This wont take long...
And our wives wonder why we keep so many old spares.
Last edited: