You are using an out of date browser. It may not display this or other websites correctly.
You should upgrade or use an alternative browser.
You should upgrade or use an alternative browser.
My 404C resto begins!
- Thread starter Mike Tippett
- Start date
It's the correct part number for the KF2 however it was made in the seventies so who knows.
- Joined
- Aug 2, 2000
- Messages
- 11,441
Maybe a run of spare parts then. I had a 403 head with 1967 date on it.
Yeah it was new old stock parts.
Looks like you have injection pump on the motor already so maybe not too long till the motor is in the car and running
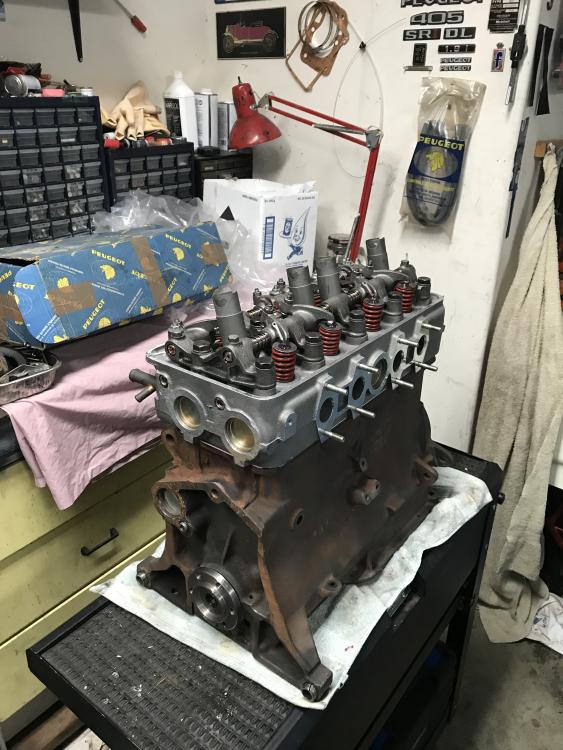
It's basically ready to go in the car. I will not put the intake manifold on now because the chains from the factory hoist bar chafe it so I'll put them on once it's in the car. The distributor/oil pump drive has to be properly oriented before assembly (and retained by the distributor collar or it will fall out when the engine's upside down).


Purflux L172, yes. I have about 22 of them.
- Joined
- Aug 2, 2000
- Messages
- 11,441
You can bolt the later oil filter/alternator assembly on to use the screw on filters. Trouble is that these are hard to get, the cartridge type is probably easier these days. EAI make do with an Audi filter. I bought a heap of late 404/504 filters from Repco, $2-80 each! They wanted $50 or so for the probably inferior Ryco ones. The cheap ones had the proper indentations for the Purflux tool.
With the cartridge ones it's important to use OE if at all possible. I understand that several "pattern parts" made in Asia look at a glance right but the length of the insert is about 5 mm too short, which of course means nothing is filtered. The only solution would be to add another longer spring inside the shell but if the thing is too short, it probably won't actually filter anything even if the oil does flow through it.
I like these cartridges better than spin-ons. They look better too.
I like these cartridges better than spin-ons. They look better too.
In between a major bathroom renovation and other home plumbing tasks, I managed to install the new distributor (M50 curve, KF2 spec of course), plug wires, water pump and its famous 1280.01 unadjustable Ventiflex belt.

Dan we can be thankful that that there is not also a Renault reno to deal with.
The hood has been removed in anticipation of the upcoming engine installation. Ready to go except for me moving the unlicensed smart out of the garage, moving the engine from its stand to the hydraulic crane, mounting the clutch driven disc and pressure plate, then mounting it. I'l have to wait for a day when my eldest daughter is available. Maybe the next couple of days, maybe a bit later. The green tape and padding are some of the precautions I have employed to protect the paint from damage when removing the hood and installing the engine.

Tonight I made room in the garage by moving the smart out and transferred the engine from the stand to the hoist. The clutch assembly was then added - the closeup photo of the pressure plate shows it before it was tightened and with the centring tool in position. The Peugeot factory hooks work on the KF2 engine with the injection manifold off so I was able to not use chains as I did when removing it with the manifold in position back in December 2016. Monday it goes in the car - that is the plan! Should be quick, but you never know...


nice job mike, those inlet ports would be begging for coverage to keep out intruders... jimTonight I made room in the garage by moving the smart out and transferred the engine from the stand to the hoist. The clutch assembly was then added - the closeup photo of the pressure plate shows it before it was tightened and with the centring tool in position. The Peugeot factory hooks work on the KF2 engine with the injection manifold off so I was able to not use chains as I did when removing it with the manifold in position back in December 2016. Monday it goes in the car - that is the plan! Should be quick, but you never know...View attachment 132026View attachment 132027View attachment 132028View attachment 132029
Right, that's why they're stuffed with paper towels.
The engine went in today just after noon, very smoothly. The long part of the grey Peugeot-Fenwick lifting bar was reversed before final installation, because it would have tagged the firewall! Since the last photo, the starter motor and its sheet metal plate and intake support rod and the two other metal plates that seal the bell housing, fuel lift pump and fuel filter assembly plus a few other bits and pieces have been added.


Last edited:


