I'm going to be horrible, but from memory the injection cam doesn't have the fuel pump eccentric ground - it was 'as cast' on all the fuely cams I saw, so it might be a good idea to check the profile and see if it's a carby cam.The second day of Christmas, though I had to pay $82 to bail this "present" out of the post office:
Coated in the usual preservative, looking good.


You are using an out of date browser. It may not display this or other websites correctly.
You should upgrade or use an alternative browser.
You should upgrade or use an alternative browser.
My 404C resto begins!
- Thread starter Mike Tippett
- Start date

I'm going to be horrible, but from memory the injection cam doesn't have the fuel pump eccentric ground - it was 'as cast' on all the fuely cams I saw, so it might be a good idea to check the profile and see if it's a carby cam.
Your memory is faulty, Bruce! Ray Bell thought the same thing and told me so on another forum, but then went into his shed and saw his 504 TI cams, all of which had the fuel pump eccentric lobe, machined but obviously unused.
Quite apart from that, there is the little matter of the original KF2 cam that came out of my unopened 1966 engine having the machined lobe too.
Ah, bummer.They only say sold out when you try to pay
If anyone has tips for how to non-destructively clean cast aluminium - specifically, the throttle body, and two parts of the huge intake manifold - I'm all ears. They're a little stained and dirty-looking. It's raw cast aluminium. I suppose silver paint could help but I'm not sure I want to go there.
Apart from cleaning, the throttle body needs to be disassembled and cleaned out, just as a precaution. I have new bearings for the throttle plate axle, if needed. I probably want to plate some of the associated hardware as well.
But I'm going on holiday for two weeks so not much is going to happen, I expect, but if it does, I'll post it here.
https://www.aussiefrogs.com/forum/index.php?threads/need-to-clean-an-aluminium-block.140441/If anyone has tips for how to non-destructively clean cast aluminium - specifically, the throttle body, and two parts of the huge intake manifold - I'm all ears. They're a little stained and dirty-looking. It's raw cast aluminium. I suppose silver paint could help but I'm not sure I want to go there.
Apart from cleaning, the throttle body needs to be disassembled and cleaned out, just as a precaution. I have new bearings for the throttle plate axle, if needed. I probably want to plate some of the associated hardware as well.
But I'm going on holiday for two weeks so not much is going to happen, I expect, but if it does, I'll post it here.
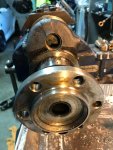
I don't know if having removable brass sludge traps in a forged steel crankshaft is a common thing, but Peugeots had that for a long time, from the 1940s through the 1980s. It's tempting not to remove the hex-headed brass plugs because they are staked in place and unstaking (reversing the damage to the thread is difficult and it's easy to damage the brass, in which case the plug will have to be drilled out. I am using a Dremel to do the unstaking. The first one I tried before the Dremel is now stuck. This one worked better.

You can see inside the trap, there is a medium grey deposit that looks as though it might be part of the casting is sludge, the consistency of slightly moist clay. There is not a lot of oil passage left clear and a couple of the oiling points on the front centre and rear mains were partially blocked too. Ao, if restoring a Peugeot engine if the XC or XM/XN series, don't skip this step!
I also got from Jean-Marc Faivre in France a free pair of the banjo fittings that my car has likely been missing for three years! Very generous!
Yes, it's pretty much essential to remove those plugs and clean out the galleries. The fist time I did this I was stunned at how much gunk was trapped.
I'll second Mike and Peter's comments. The guys at machine shop, that removed mine and ground the crank were amazed at the crud build up.
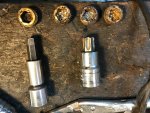
As most of you already know, the Peugeot 404 crankshaft sludge trap plugs are brass and have a large hex keyway. The threading into which they're screwed is staked, which damages the threads in one spot and so reversing that damage is required before they'll come out. I used a Dremel power tool with a dentist drill sized head to take the ridges off the threads by the staking.
The hex tool will work sometimes, allowing you to turn the thing all the way out, though it likely will be stiff as hell. In my case, this tool worked one in four times. The other three were immediately rounded.
So I took a different approach for those. I used a larger Dremel drill head to carve a small channel at each of the 6 corners of the hex depressions and then hammered a Torx-60 socket into place. Rammed it home!
Using this approach on the three jammed ones made removal easy.
I got a similar amount of sludge/paste out of all 4.
I find it interesting that the 2nd and 4th main bearings appear not to be pressure lubricated at all!
Attachments

I was wrong about the main bearings 2 and 4...it seems as though they were an afterthought following the 3 main bearing engine but they do indeed have pressured oiling from the block, just not internal canals inside the crankshaft. Serves me right for spending too much time staring at the crankshaft yesterday!
Last edited:
Got some teaser photos from the vapour blasting shop. I'll take more photos when I get the parts back. Looks good to me!

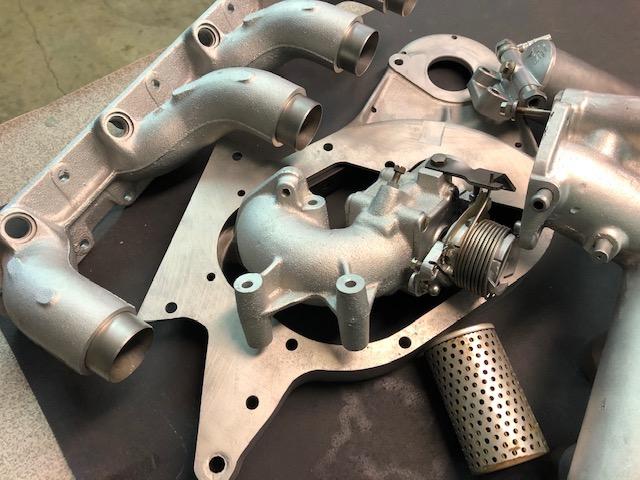
I picked up the vapour blasted parts this afternoon and took a few more photos. Very clean; the throttle body was disassembled by me for internal cleaning as well as the installation of new bearings.
Driving the old ones out was easy - remove two circlips on the shaft end, remove the throttle spring holder from the shaft after marking its position, unscrew the 4 staked screws on either side that hold the bearings, tap the shaft out with brass drift, tap the bearings out with a perfectly sized brass drift (there is the smallest of shoulders available to do that).
After it's cleaned up I will reassemble it with the new bearings that you see in one of the photos. The old ones were shot, damaged by road salt I presume.


Last edited:
Throttle body is reassembled. The screws were staked at the factory because the distance between the two plates determines the clearance between the throttle body and the throttle plate. The large round inserts assure the air seal. I didn't stake the screws but I did put blue Loctite on them. The plates are snug to the throttle body but the screws are not "tight" but just touching the chamfered recesses in the two plates. Now that it is all together, the throttle action is magnificently smooth!
I also took the wrong fuel filter for blasting so the vapour blaster guy will do the "correct" one for free on Wednesday! The inside of the filter bowl that he blasted has severe rust pitting and the "correct" one does not.


I also took the wrong fuel filter for blasting so the vapour blaster guy will do the "correct" one for free on Wednesday! The inside of the filter bowl that he blasted has severe rust pitting and the "correct" one does not.


The first Purflux fuel filter assembly I had vapour blasted was the wrong one (from a wreck that had a lot of undrained water inside it) and it had very deep pitting cavities inside the bowl as a result. So the blasting shop offered to do another better one. This happened today and the result is much better mainly because the inside of the canister was far less affected by corrosion. You can see both here, with the better canister on the far right.


Last edited:
Hi Mike
That looks mint.
Having the odd spare lying around helps when things don't go to plan.
Love the attention to detail you place on everything you have done.
Cheers
Dano
That looks mint.
Having the odd spare lying around helps when things don't go to plan.
Love the attention to detail you place on everything you have done.
Cheers
Dano
Thanks! I am making so little progress, all you get to see are the tiny details! Haha!
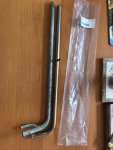
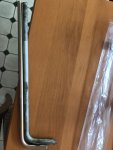
My 404's original heater tube, which takes hot coolant from the water pump to the heater core is beyond repair. It's severely corroded inside. The carbureted engines have a similar tube but its secondary water outlet is in a totally different location. However, the only new one available is for the carbureted engine, so I bought one of them at DEPANOTO, which I received today, and will have it modified in a local welding shop to adapt to the Injection engine format.
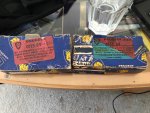
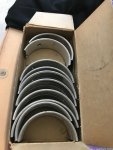
I also got my 0.5 mm oversized main bearing set from Israel yesterday - thankfully in much better condition than the ones I got from Peugeot Classic (inside the box with the two coloured label).
I also got my 0.5 mm oversized main bearing set from Israel yesterday - thankfully in much better condition than the ones I got from Peugeot Classic (inside the box with the two coloured label).