GreenBlood’s D(very)Special Rejuvenation 2009>

DIY Plating

I mentioned I have been DIY plating of parts in Steven's D Special renewal thread, Scotfrog was after a little more info . . .

better posted here rather than hijack Stevens thread.

Plating kit? There's a bell ringing in my ears that this has been covered before but danged if I can find it. :cry:Where did you buy your plating kit Chris and what sort of dollars are we talking about? It could be a good bedfella to my baby sand blaster.

SF

Possibly a post by the Grand Master :headbang:

http://www.aussiefrogs.com/forum/restoration-projects/94487-nickel-plating-home.html

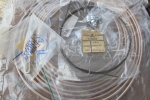
I bought my kit from a forum member, it included a power supply and immersible heaters (fishtank style) for around $200.00 from memory.

Jane Kits : home page : nickel plating kits, zinc plating kits, copper plating kits, gold plating kits

You are looking at 'nickel plating' gold passivated (goldbtrite from Jane kits site) for the D.

Not cheap but the chemicals once mixed will last around 12 months, as Graham points out cleanliness is paramount, correct stable temperature will assist with a polished finish. Unfortunately my fish tank heater not being fully immersed cracked at the liquid level and I had to resort to heating the nickel bath in the microwave oven - not very scientific :eek:

I've achieved my objective though, parts being rust free and protected and I can plate at my convenience. :wink2:

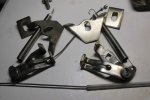
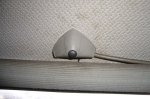
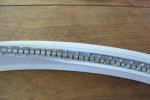
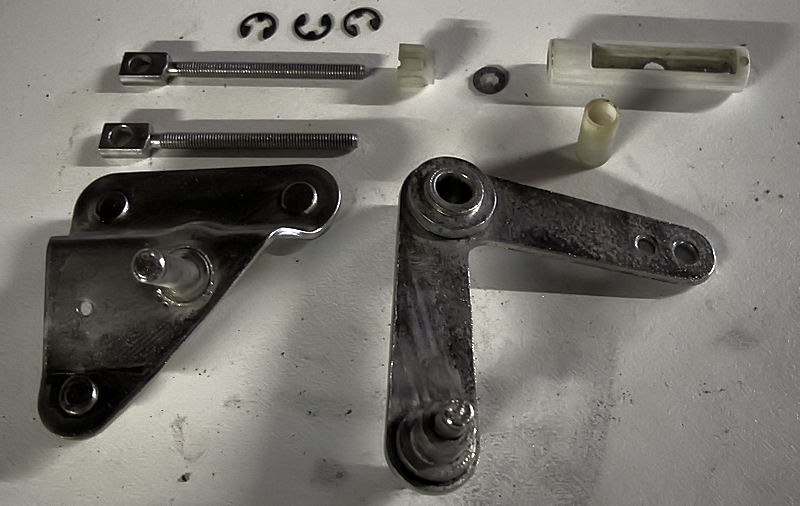
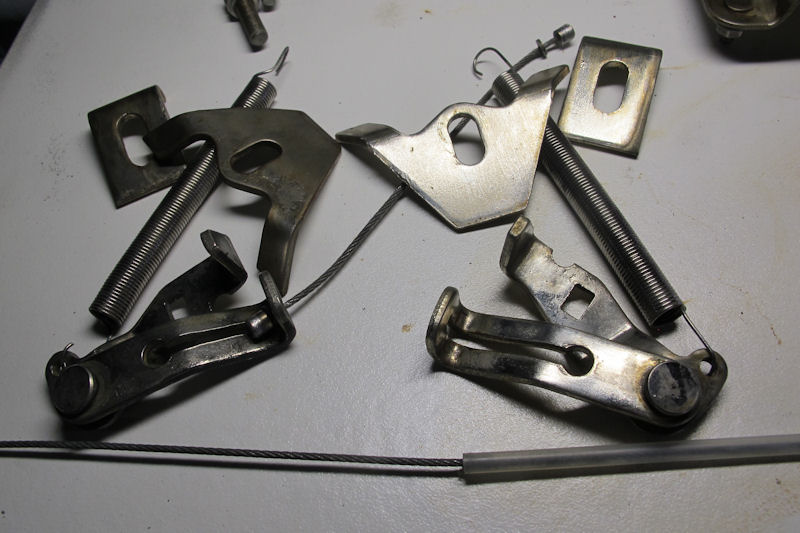
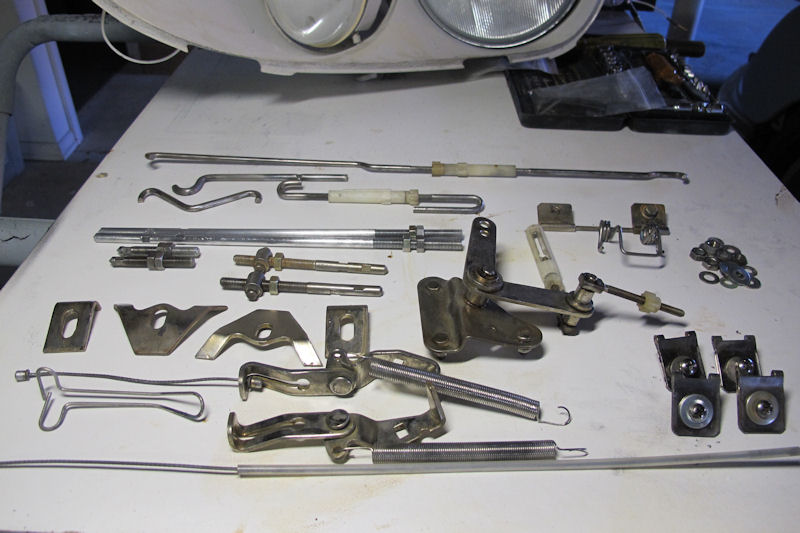
A few before and after shots. . .

attachment.php


Dismantled and nickel plated, ready for the gold dip. . .

attachment.php


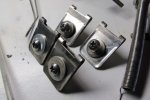
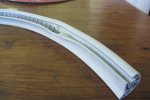
A few parts after gold dipping. . .

attachment.php


attachment.php


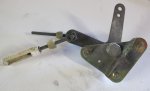
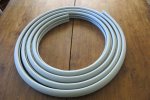
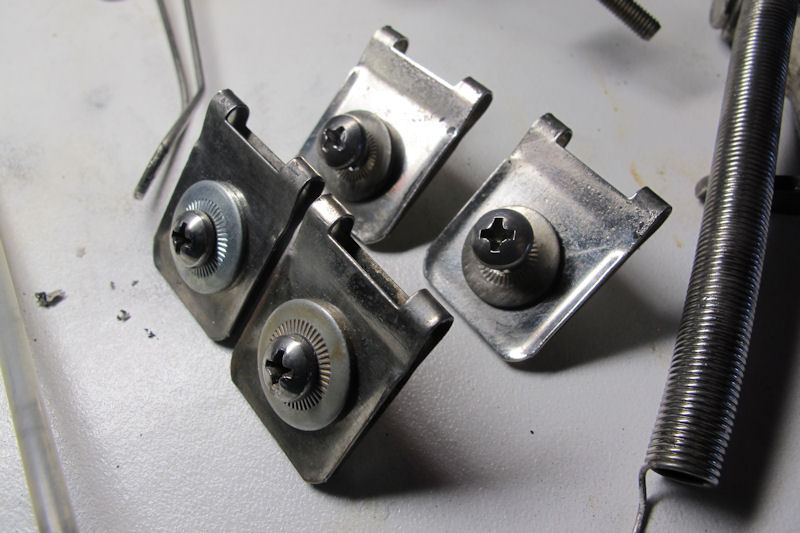
These are the clips on the alluminium radiator shroud, without gold dipping. . .
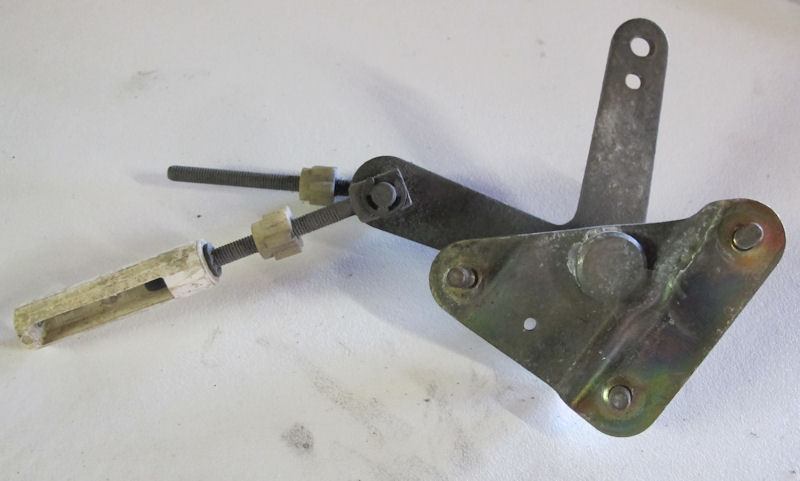
They were very rusty before processing as you can see by the pitting, your result will only be as good as your preparation.

attachment.php


When plating is so cheap is it worth doing your own?? For the amount of preparation time probably not, unless like me you would be hopeless handing over a bucket of parts (hoping everything came back) and identifying them and reassembling after a few weeks had passed - for me DIY works, I can work through individual bits and pieces bag and tag ready to refit to the car :wink2:

Cheers
Chris
 

Attachments

  • 1st batch.jpg
    1st batch.jpg
    87.3 KB · Views: 1,107
  • 1st batch2.jpg
    1st batch2.jpg
    83.3 KB · Views: 1,103
  • 1st batch3.jpg
    1st batch3.jpg
    85 KB · Views: 1,086
  • 4Plating nickel.jpg
    4Plating nickel.jpg
    75.8 KB · Views: 1,127
  • 5Plating before.jpg
    5Plating before.jpg
    56.6 KB · Views: 1,125
Nice !! The interesting bit will be seeing how long the plating lasts. We don't have the horrendously toxic cleaning chemicals that a business would use!

seeya,
Shane L.
 
Nice !! The interesting bit will be seeing how long the plating lasts. We don't have the horrendously toxic cleaning chemicals that a business would use!

seeya,
Shane L.

I am pretty confident Shane, the old plating was very easy to strip with a fine wire brush, where I was not happy with my own plating removal for re-plating was much more difficult. I think too, with DIY you are more inclined to go a little overboard with coating,.

Only time will tell, certainly not for everyone but with a memory like mine :rolleyes: stripping individual parts, plating and re-assembling is very convenient :wink2:

Cheers
Chris
 
Jane Kits do sell a product to strip the old plating away and it is probably included in your kit. They also caution about allowing Zinc in the Nickel plating solution if you have that. You can't completely remove 100% of the oxidises old coating with a wire brush alone, so you really do need to prepare it chemically.

A possible problem you may find with steel, especially those with more carbon, is that removing the rust leaves a black film on the parts that can interfere with the subsequent plating.

You can achieve some excellent results with a little care and practice. Electroless Nickel is particularly interesting and potentially useful for plating odd shapes evenly, especially internally, where you would have trouble with electroplating.

Yes the kit does include a chemical stripper, I wirebrush first, then chemical strip, then supplied degreaser, then very mild detergent water wash and then plate :eek:

Temperature is quite critical with Nickel, heating the solution in the microwave is just not accurate so results are hit and miss at the moment. . .

I'd like to try the 'electroless' plating :wink2:

Cheers
Chris
 
I think I have found a 'self priming' washer pump that will mount on the guard for $19.00 delivered.

12V Windscreen Washer Pump (Self Priming)

Purchase through this ebay seller (looks like a Chinese clone of the above but for $19.00 worth the risk).
Windscreen Washer Motor Windshield Washer KIT Motor 12V With Tubing Cable | eBay

Cheers
Chris

Grabbed one of these from the ebay seller above, perfect fit, my wiring already in place is also perfect length and position with the same spade connectors - so plug and play :wink2:

The package claims the pump will work in any position but I have a totally flat battery so can't check to see if it pumps from above the reservoir water line. Optimistic!!

attachment.php


Cheers
Chris
 

Attachments

  • D washer pump.jpg
    D washer pump.jpg
    78.5 KB · Views: 1,247
I have been dunking plastic bits in boiling water for 60 seconds Chris and that cheers up tired plastic, softens them up but don't leave in too long and completely submerge.
 
The pump and reservoir moved around a little and some later models had an extension harness to allow it to sit inside the left guard. The screen wash pump is a rather silly system with the pump trying to draw via a tube from above when any centrifugal pump, which is what the washer pump is, was not really designed to give much suction head. After much frustration, I ended up fitting a small nipple to the lower side of the reservoir to ensure the pump is easily supplied. Stupidly, my placement in the centre of one reservoir face, which appealed aesthetically with the reservoir on the bench, neglected to consider the location of the support strap on the holder. Drilling a hole in that fixed the problem though and no more dribbles.
 
January 2015 - A few treasures. . .

Another year upon us, not a great deal to update but the enthusiasm to get this car back on the road is as strong as ever.

Sometimes the delays can work in your favour, little details attended to, and parts have become available. . .

Ever since I found a pic of this little gem I've been on the lookout for one. . .

attachment.php


These must have been a period accessory, I've never seen one in real life but one recently appeared on Ebay USA :eek: In real life the roof mount antenna on the non Pallas models and Safari leave an exposed mount bolt - not pretty but probably in keeping with the utilitarian approach of the lesser models? The cover is a nice touch :wink2:

attachment.php


The other reproduction part that has recently become available is the 'Inner cant rail rubber trim' after 40 years these can look shabby even on the better preserved cars.

attachment.php


The profile is pretty well perfect, it is supplied without the metal crimp but this is easily removed from the old rubber and fitted to the new.

I've also had success in getting NOS parts for the self leveling headlights, another part of my car that has never worked in my ownership. Most of the parts were lost, and the leveling disabled. I'll be using 6.5mm copper nickel hydraulic line for the tubing to replace the crushed tubing to the rear.

attachment.php


Big callout for Marco at Citro' Services, who supplied the NOS parts for the leveling lights and the repro cant rail rubber. Marco writes in perfect English and was a pleasure to deal with. After a few emails, parts were ordered on Thursday last week and delivered to my door this morning (Monday) - outstanding!! :headbang: :approve:

I'll fit the tubing and cables for the lights and do a trial fit to see that I have everything to get that working as it should. Then hopefully when it cools here, get some paint on the roof, finish the lining into the sunroof, fit the roof and start replacing the external trim etc.

Cheers
Chris
 

Attachments

  • 1Antenna Cover.jpg
    1Antenna Cover.jpg
    87.1 KB · Views: 846
  • 2Antenna Cover.jpg
    2Antenna Cover.jpg
    93.7 KB · Views: 880
  • 3Inner Roof Cant Rail Trim.jpg
    3Inner Roof Cant Rail Trim.jpg
    85.6 KB · Views: 1,892
  • Self leveling Lights.jpg
    Self leveling Lights.jpg
    61.6 KB · Views: 976
Hey Chris

that repro can't rail strip looks the part. Mine's in great nic but I'd be very excited at getting that in the post if I needed it. :)

Matthew
 
Hey Chris

that repro can't rail strip looks the part. Mine's in great nic but I'd be very excited at getting that in the post if I needed it. :)

Matthew

Queensland hadn't been kind to mine (Cant rail rubber), and with the replacement roof lining it was going to look even more tatty. I was looking at ways of rejuvenating when I came across the repro - I'd not seen these available anywhere else so jumped at it.

Time will tell if it falls into the crap repro rubber catagory. . .

On the lookout for a replacement rubber wind deflector for the sunroof, this needs to be fitted before the roof lining as it bolts from inside. The one I need (Britax) appears to be NLA and I may have to do a job on my original. . .

attachment.php


attachment.php


attachment.php

D(v)Special with gibgib's Berlingo setting up for All French Car Day Qld Uni 2006

Cheers
Chris
 

Attachments

  • 20140920_124341.jpg
    20140920_124341.jpg
    45.2 KB · Views: 828
  • 20140920_134631.jpg
    20140920_134631.jpg
    45.2 KB · Views: 798
  • DSCF1076.jpg
    DSCF1076.jpg
    101.8 KB · Views: 807
Your car must be just about finished right :confused: We haven't seen any piccies of it in a while :) Let me guess, she's at the paint shop :)
 
Your car must be just about finished right :confused: We haven't seen any piccies of it in a while :) Let me guess, she's at the paint shop :)

. . .and your lovely Pink car? :D :roflmao: :D

Ran out of $$ for paint, she sits in grey primer now until the weather cools and drys. Plenty of time for me to prepare a makeshift booth - no way I can afford a professional paint job so it's down to me, won't be pretty but like everything else on this project I'll be able to say "all my own work" for what that's worth :clown: :rolleyes:

Cheers
Chris

Sounds good too me ... paying someone else to paint your car is way over-rated iMO. Paint the ugly pink car ... :eek: No way, I'm having to much fun driving it. If I paint it, it'll then look all pretty like most of the other DS's on the road so be boring rather than interesting and different right :p

You going to love the 2pack paints if you try them :)

seeya,
Shane L.
 
Another year upon us, not a great deal to update but the enthusiasm to get this car back on the road is as strong as ever.

Sometimes the delays can work in your favour, little details attended to, and parts have become available. . .

Ever since I found a pic of this little gem I've been on the lookout for one. . .

attachment.php


These must have been a period accessory, I've never seen one in real life but one recently appeared on Ebay USA :eek: In real life the roof mount antenna on the non Pallas models and Safari leave an exposed mount bolt - not pretty but probably in keeping with the utilitarian approach of the lesser models? The cover is a nice touch :wink2:

attachment.php

Dirk Sassen sells these antenna mount covers for 19.75 Euro. However, the plastic draws more to beige than grey as depicted. And you do not get the wire to ground the antenna, but this can be manfactured quite easily.
Dirk Sassen - ID-DS Import (ordering is at steam engine level, but they speak English)
 
Why do I never get the linking as I want?! Anyway, the article is found under the Radio section with art no 4731 Antennenabdeckung Non-Pallas.
 
Dirk Sassen sells these antenna mount covers for 19.75 Euro. However, the plastic draws more to beige than grey as depicted. And you do not get the wire to ground the antenna, but this can be manfactured quite easily.
Dirk Sassen - ID-DS Import (ordering is at steam engine level, but they speak English)

Thanks Tim, good to know for those that might seek one, happy to know I paid half that including delivery and it came complete with the earth. . . it's just a little bit of bling that is exclusive to our humble DSpecials, DSuper and Safari.

Cheers
Chris
 
1st February 2015

The other reproduction part that has recently become available is the 'Inner cant rail rubber trim' after 40 years these can look shabby even on the better preserved cars.

attachment.php


The profile is pretty well perfect, it is supplied without the metal crimp but this is easily removed from the old rubber and fitted to the new.


Cheers
Chris

Nice Sunday afternoon job whilst watching the cricket - 30+ degrees outdoors :eek: :adrink:

Retrieved the metal crimp from the old rubber, wire brush on the angle grinder to remove the rust, deoxidine , prime and painted. . .

Getting the crimp back in place on the new rubber is a huge amount of fun, 4+ metres of sprung steel and soft rubber - you gotta' try this :roflmao:

attachment.php


attachment.php


. . .and ready to fit to the car (once the roof is painted, have repaired the sunroof wind deflector, have relined the roof and fitted back on the car :rolleyes: ).

attachment.php


Cheers
Chris
 

Attachments

  • 1Cant Rail Rubber Crimp.jpg
    1Cant Rail Rubber Crimp.jpg
    79.6 KB · Views: 764
  • 2Cant Rail Rubber Crimp.jpg
    2Cant Rail Rubber Crimp.jpg
    77.6 KB · Views: 1,824
  • 3Cant Rail Rubber Crimp.jpg
    3Cant Rail Rubber Crimp.jpg
    64.8 KB · Views: 760
that looks like fun. Not. groan. But now you have a brand new one, excellent. I'm disposing of my radio cable if you want it, I don't plan on ever fitting a radio.
 
that looks like fun. Not. groan. But now you have a brand new one, excellent. I'm disposing of my radio cable if you want it, I don't plan on ever fitting a radio.

Got that covered thanks Steven :wink2:

Cheers
Chris
 
Top