If the tool carries a Centring dot on the end of the bolt it would still be possible to use a thrust plate between the nut and spindle face. Just drill a corresponding depression in the centre of the plate.

You are using an out of date browser. It may not display this or other websites correctly.
You should upgrade or use an alternative browser.
You should upgrade or use an alternative browser.
brake cylinder bleed nipples
- Thread starter DoubleChevron
- Start date
Yes, Dennis he made a number of the various special tools . All probably totally 'over engineered' and beautifully made. I got on well with him and he also had a great turn of phrase.Would that person be Dennis Walton? I know that he made some seriously good stuff.
PS Gerry amongst all my collection I have some collets for the spigot pin and cup which you are welcome to.( not made by Dennis !)
Thanks for the offer! I have the collets for the Spigot pin, but I lack the collets for the Ball pin. I will need to get some made at some stage. I have two acceptable shafts with really good stub axles (L&R) on them that Shane can use. That should get him out of trouble and maybe they could be rebuilt if necessary later on if he can find some crosses.
Thanks for the offer! I have the collets for the Spigot pin, but I lack the collets for the Ball pin. I will need to get some made at some stage. I have two acceptable shafts with really good stub axles (L&R) on them that Shane can use. That should get him out of trouble and maybe they could be rebuilt if necessary later on if he can find some crosses.
I have the usable stub axle/taper here for the passenger front. I may not be able to dissemble fully the joint on the car, but I do have a lot of driveshaft parts here that are already dismantled that I can re-assemble the driveshaft from by not re-using the outer joint on the car (at least I think that works without pulling one apart so I understand how the joints need to be assembled/dissembled
") ).
).Shane, I can only see one cross for the cardan shaft joint. What are you going to do for usable outer crosses?I have the usable stub axle/taper here for the passenger front. I may not be able to dissemble fully the joint on the car, but I do have a lot of driveshaft parts here that are already dismantled that I can re-assemble the driveshaft from by not re-using the outer joint on the car (at least I think that works without pulling one apart so I understand how the joints need to be assembled/dissembled
View attachment 138602
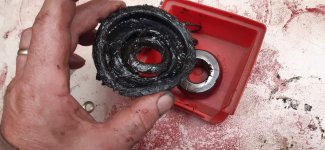
Oh, if I empty the tins ... This however doesn't mean it isn't all junk! I guess I just clean and inspect the cross for out of roundness and pitting
Ridging of the journals and cup surfaces is most likely. Like CX trailing arms the needles rarely make a full rotation as they roll.View attachment 138603
Oh, if I empty the tins ... This however doesn't mean it isn't all junk! I guess I just clean and inspect the cross for out of roundness and pitting
S
Stickyfinger
Guest
another good reason to carry out a daily session of Citrobics............same in XM Xantia etc.Ridging of the journals and cup surfaces is most likely. Like CX trailing arms the needles rarely make a full rotation as they roll.
They will still never do a full circle. bearings like to roll. On the CX rear arms they move through a small arc of movement there entire service livesanother good reason to carry out a daily session of Citrobics............same in XM Xantia etc.
Last edited:
Same with needles in the cups of TA and D universal crosses.They will still never do a full circle. bearings like to roll. On the CX rear arms they move through a small arc of movement there entire service lives
Well with the tool.... There was no simple way of getting it repaired. The next larger bolt (with fine thread count) I could buy was considerably larger. I ended up cutting the entire section out of the puller and replacing it. I welded its nut on as well so there is high tensile steel working against high tensile steel. I had to turn down the bottom of the bolts to make them flat .... then add the "blob" to engage depression in the ball joint.
I think the tool may have just been running out of adjustment. with the longer bolt I fiddled around for a while and managed to get it tighten down, and with a whack from a heavy hammer there was a gentle "crack" .... and it was apart. I'm betting there is a spacer or something missing in the joint, that is why I was having so much trouble (I'll find the parts diagram and check).
Looking at the damaged threads.... There has been many unsuccessful attempts to get this apart over the last 70years. Those keyways look smooth .... I can't see how they would possibly work? Is the key supposed to be proud?
Interestingly I was just googling boots, and it appears they are supposed to be leather!
Attachments
That ball has obviously not been fitted to the key properly and has been tightened so much that it has flattened the key. Might explain why you had so much trouble!
What is that item in the pic titled ta5.jpg ?
What is that item in the pic titled ta5.jpg ?
Oh ... smart. Whoever last assembled this .... probably 5 decades ago, didn't fit the ball to the keyway, and just tightened it up. So the ball wasn't seated all the way down ... which means the tool didn't have the reach to pop pop the joint. Ok, I'll need to add a ball joint key (if it exists for sale anywhere) to my shopping list I guess I better see if I can extract that key first, it maybe cold welded into place.
I guess I better see if I can extract that key first, it maybe cold welded into place.I bought new keys from CTA but should be available from CAS as well. Are you going to buy new ball joints as well? Probably best to put in an order for all the new parts you need for this job and combine the postage!
A tri point (diamond) chisel to remove.OK, I'll need to add a ball joint key (if it exists for sale anywhere) to my shopping list
Get key material stock from your local bolt shop & file to fit correctly or get a sheet metal shop to shave off the edge of a piece of stainless the correct gauge to fit the slot & cut to length, is what I did. JG.
Thanks Guys,
more stuff to investigate. Just as well I'm not in a hurry The car has only been in bits since the 1980's by the sounds of it .... so another month or ten won't hurt (I'll aim for spring this year to have it driving around town a bit). There is just something fascinating about these old cars.
If you like watching "old car" type stuff. Have a watch of the last vice grip garage episode. I reckon this is the equivalent of me buying the cheapest traction I can find site unseen .............. In perth .... and trying to drive it back to Ballarat.
seeya,
Shane L.
more stuff to investigate. Just as well I'm not in a hurry
The car has only been in bits since the 1980's by the sounds of it .... so another month or ten won't hurt (I'll aim for spring this year to have it driving around town a bit). There is just something fascinating about these old cars.If you like watching "old car" type stuff. Have a watch of the last vice grip garage episode. I reckon this is the equivalent of me buying the cheapest traction I can find site unseen .............. In perth .... and trying to drive it back to Ballarat.
seeya,
Shane L.
Ok, So I've I have finally got the front disassembled (gee's these cars would be utterly impossible without the special tools!). Anyway, so finally the driveshafts are out. I was getting quite confused as the bits here are mostly junk ... or should be.
so using the same driveshaft ( G1 )


Ok, so all of the drums appear to be equally good (or is the bad ..... ).
).
Now the confusing part. Using drum 1 for comparison consistency (not because its better/worse than the others)


Gerrys good driveshafts.


So now I'm scratching my head wondering why on earth I removed these driveshafts from the car Maybe I need to tighten the drums down onto the tapers and remove the nuts .... so we get a true "depth" once the drum is fully seated.
How did I get this so wrong when this was all checked on the car.
- So I have lots of driveshaft parts (we will ignore them for now)
- The two driveshafts I have removed from the car
- Gerrys two driveshafts
- 5 brake drums. Two of which are obviously junk and put aside. I was still getting *really* confused.
so using the same driveshaft ( G1 )
Ok, so all of the drums appear to be equally good (or is the bad .....
).Now the confusing part. Using drum 1 for comparison consistency (not because its better/worse than the others)
Gerrys good driveshafts.
So now I'm scratching my head wondering why on earth I removed these driveshafts from the car
Maybe I need to tighten the drums down onto the tapers and remove the nuts .... so we get a true "depth" once the drum is fully seated.How did I get this so wrong when this was all checked on the car.
That's why mine has disc brakes all round now!
.JPG")
that is interesting. How does the wheel bearing and driveshaft connect now .... as it looks like the hub is still the TA hub!
I'm happy with the original setup. Its not like the car will ever wear out another set of driveshafts
I'm happy with the original setup. Its not like the car will ever wear out another set of driveshafts
Well back to this, I have waited long enough I have completely forgotten how the balljoints are assembled, so that is perfect. I need to move this car deeper into the shed and drag the ramps outside. boss women wants her poogoe parked where this car currently sits.
You can buy the ball joint key at the local bolts and bearings store. So I grabbed a length of that. Now back to these driveshafts that I'm so bloody hopeless that I pulled out for no real reason. I clearly remember Gerry being in my shed saying "you are using a good drum to check the driveshaft tapers ?"........ Sigh ..... I obviously used the drum with the chewed out taper inside it to check the driveshafts in the car.

The driveshafts feel really tight ... With no sign of slop in the joints at all (I don't trust myself really though after the effort of removing these damn things for no reason). One of the driveshafts, if I push the joint down the shaft as far is it will go, there is noticeable wear in the splines. If you slide it out a bit to where it would probably sit in normal use, there is little to no wear.
The other driveshaft the inner joint I found the caps were rocking inside the housing. This I could get off without special tools.

Gerry suggested a couple of ways to tighten these up. I chucked some worn caps

I chucked some worn caps in there, and gave it a few blows with a heavy hammer .... and was amazed to find it tighten right up. They are a press fit again. I wonder how long that lasts?
Oh well I'll re-assemble tonight and get the car moved. I've decided I will just make some new ball joint boots out of leather once its assembled.
You can buy the ball joint key at the local bolts and bearings store. So I grabbed a length of that. Now back to these driveshafts that I'm so bloody hopeless that I pulled out for no real reason. I clearly remember Gerry being in my shed saying "you are using a good drum to check the driveshaft tapers ?"........ Sigh ..... I obviously used the drum with the chewed out taper inside it to check the driveshafts in the car.
The driveshafts feel really tight ... With no sign of slop in the joints at all (I don't trust myself really though after the effort of removing these damn things for no reason). One of the driveshafts, if I push the joint down the shaft as far is it will go, there is noticeable wear in the splines. If you slide it out a bit to where it would probably sit in normal use, there is little to no wear.
The other driveshaft the inner joint I found the caps were rocking inside the housing. This I could get off without special tools.
Gerry suggested a couple of ways to tighten these up. I chucked some worn caps
I chucked some worn caps in there, and gave it a few blows with a heavy hammer .... and was amazed to find it tighten right up. They are a press fit again. I wonder how long that lasts?
Oh well I'll re-assemble tonight and get the car moved. I've decided I will just make some new ball joint boots out of leather once its assembled.