They only tightened up as you pushed the cups in further than their normal operating position. They tightened onto the unworn diameter at the inner edge of the bore. The outer diameter above the circlip will also be unworn.

You are using an out of date browser. It may not display this or other websites correctly.
You should upgrade or use an alternative browser.
You should upgrade or use an alternative browser.
brake cylinder bleed nipples
- Thread starter DoubleChevron
- Start date
They only tightened up as you pushed the cups in further than their normal operating position. They tightened onto the unworn diameter at the inner edge of the bore. The outer diameter above the circlip will also be unworn.
I'll check, they may have moved to the unworn spot. I did have them sitting where they were loose and they tightened up considerably. Failing that, I'll try to shrink the area by running a bead of weld over the outside of it possibly.

Can peen them in a bit. Welding over the top can cause all kinds of stress in the joint
View attachment 211418
Oh, I see what you have done
")
A better solution is to ream the bore out and then with an old cup inserted heat the yoke ring to red heat and tap the yoke as though you are doing a panel shrink with oxy. The bore will shrink down making a tight fit. Then run the reamer through again to check concentricity and alignment with the other side. I have done this many times and always have been successful in producing a tight joint. Use a good grade of Loctite when fitting the new cups.
This procedure may have to be done a few times to get the required result.
Consider buying new crosses and cups from overseas!
This procedure may have to be done a few times to get the required result.
Consider buying new crosses and cups from overseas!
So I went through all the junk here and actually found a yoke that is tight.... So I pick up all the needle bearings I can find .... and I notice the one on the floor floor has a flat spot ..... Wow .... these joints felt really smooth.
Ok, start from scratch again, now I need to scrutinise and clean every needle..... and its immediately obvious I have two different sizes mixed up here ..... How ?? How in the do I have two different sizes. So I measure the stars and find two different size stars from where I've been checking the yokes..... Arrrhhh.... well at least there obvious, I put the larger needles aside.
Ok, start again, cleaning and checking each needle..... and I found one that felt different ?? Looked the same but felt different. So I grabbed the calipers .... it measures 2.3mm .... all the others are 1.9 ..... ARRRRRhhhhhhh.
OK, pour them all back into a jar and check and measure every single needle ... where on earth has a 2.3mm needle come from ???
So I assemble one cup .... assemble the star into the yoke, assemble the second cup to find I'm 3 needle bearings short (that would be about right, one had a flat spot, and I dropped at least two .... "gone forever" ). So I grab the jar of spare needles from the junk pile. Your not going to believe this..... They appear to all be 2.3mm. The size of the odd one out I found when cleaning and checking.
So I measured the cups in the junk pile. We have different different sized cups .... really ? I can fit the slightly larger cup and use the 2.3mm needles on one side right ?? I'm probably 3 needles short of using the 1.9s
So here I have:
2 sizes of stars
3 different sizes of needles
2 different sizes of cups
seeya
Shane L.
Last edited:
| cup | triax | difference | needle |
| 20.4mm (original) | 16.5 | 3.9 | 1.9 ( 1.9 x 2 needles = 3.8mm) |
| 21.4mm (from junk pile) | 16.5 | 4.9 | 2.4 ( 2.4 x 2 needles = 4.8mm) |
So I can just use the other cup and sized needles on the same triax. they both have 0.1mm clearance. This saves me trying to find some replacement 1.9mm needle bearings.
Well that's great. I slowly assembled the cups pressing them in with the vice ... shining a torch down around the make sure the needles haven't moved ... or fallen in .... All looks good. only to find they don't go in far enough to insert the clip..... which means, no doubt a needle has fallen into the bottom of the cup. You know, they are then almost impossible to get back off (if you try to drive them out, the needle breaks through the button of the cup --Guess how I know this ? ).
Is there a trick to re-assembling these things and keeping the needles in place?
I thought I'd have htis driveshaft back together last night, and the car together today. Instead I'm actually more backwards than I was a months ago when I pulled it apart.
Oh, the other cups that were tight (didn't wiggle when I checked the joint). I've noticed they are rotating in there seats while I'm stuggling to get this back apart.
Wow ... these driveshafts are fun. And I'm only touching the one joint you don't need special tools for.
Excellent, yes I can't get that joint back apart at all. One cup broke as I pushed it through, no I can't push the other one back, as it also obviously has a needle laying in the botom. Which means it pushes from one side and tilts the cup over so it wedges.
Is it about now you think "Why the hell did i try to improve this .... I should have just left it alone! "
Is it about now you think "Why the hell did i try to improve this .... I should have just left it alone! "
Well I have got it back apart. I'm down two cups now and a bunch of broken needle bearings. i'm not going to try again until I know how to keep the needles in place. There must be a trick to it. Obviously you can't drive the cups in (as hitting them will cause the needles to fall out). and pressing them in while checking with a torch didn't work for me. They are almost impossible ot get back apart if the needles fall out of position on assembly.
i've decided the GS driveshafts with there 3 billion needle bearings are quite simple things .... and are to be appreciated (I used to hate going near them).
i've decided the GS driveshafts with there 3 billion needle bearings are quite simple things .... and are to be appreciated (I used to hate going near them).
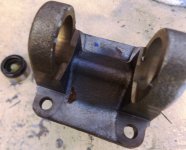
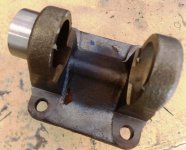
Easy to keep the needles in place! Grease the cup and insert the needles. Use the cross to seat the needles into place by rotating the cup several times on the trunion of the cross. Remove the cup and inspect. If the needles appear to lay over then you need to fit another needle. Do this for all four cups and needles. From memory, there are 25 needles per cup???? Fit one cup and its needles into the cross, but not all the way. Leave clearance in the yoke so that you can slide in the cross and the seal. Using a rotating action, work the cross into the cup. Press the first cup home and fit the circlip. Now press the opposite cup in, keeping it square. Fit the circlip. It should click straight into place. If it won't you have knocked over a needle and all will need re-doing.
Use the same procedure to do cup three and cup four! Be very careful with the alignment when inserting the cross into the third cup.
Use the same procedure to do cup three and cup four! Be very careful with the alignment when inserting the cross into the third cup.
Easy to keep the needles in place! Grease the cup and insert the needles. Use the cross to seat the needles into place by rotating the cup several times on the trunion of the cross. Remove the cup and inspect. If the needles appear to lay over then you need to fit another needle. Do this for all four cups and needles. From memory, there are 25 needles per cup???? Fit one cup and its needles into the cross, but not all the way. Leave clearance in the yoke so that you can slide in the cross and the seal. Using a rotating action, work the cross into the cup. Press the first cup home and fit the circlip. Now press the opposite cup in, keeping it square. Fit the circlip. It should click straight into place. If it won't you have knocked over a needle and all will need re-doing.
Use the same procedure to do cup three and cup four! Be very careful with the alignment when inserting the cross into the third cup.
That's exactly what I tried to do! I think what happend is I pulled the cross out to far as I was pushing the second cap in and displaced some needles. Then didn't get the 2nd cup to sit even enough as it pushed in. Maybe using the press will be safer (I need to fix it first, I broke it the last time I did a CX balljoint). Its almost impossible to tell if any of hte needles have moved.
I wouldn't be suprised if I distorted the yoke trying to get it back apart. Its incredibly hard to dismantle if you can't push evenly due to needles in the base of the cup (infact I'd say impossible).
There is no urgent hurry for any of this .... I just need to get it down off the ramps and park it in the back of the shed.... It'll get its turn when I have the time. I need to drag the ramps out of the shed (so get this car off them) as the boss women wants to park her new "family" car in the shed.

Yes that is a C2 there as well. we have four fully registered cars here now ( my poor melting wallet .... ). 2 "L" platers and 2 licensed drivers ....
Yes that is a C2 there as well. we have four fully registered cars here now ( my poor melting wallet .... ). 2 "L" platers and 2 licensed drivers ....
All I have ever used is a 100mm vice and some carefully selected sockets. Leave the cross fully inserted in the first cup while you press in the second. Helps to align things a bit better. Do you have cork and tin seals or the more modern rubber seals?That's exactly what I tried to do! I think what happend is I pulled the cross out to far as I was pushing the second cap in and displaced some needles. Then didn't get the 2nd cup to sit even enough as it pushed in. Maybe using the press will be safer (I need to fix it first, I broke it the last time I did a CX balljoint). Its almost impossible to tell if any of hte needles have moved.
I wouldn't be suprised if I distorted the yoke trying to get it back apart. Its incredibly hard to dismantle if you can't push evenly due to needles in the base of the cup (infact I'd say impossible).
My vice handle is now not straight anymore as I use a piece of one-inch square tube as a leverage extension.
excellent. They are soft supple rubber seals on all the crosses hereAll I have ever used is a 100mm vice and some carefully selected sockets. Leave the cross fully inserted in the first cup while you press in the second. Helps to align things a bit better. Do you have cork and tin seals or the more modern rubber seals?
My vice handle is now not straight anymore as I use a piece of one-inch square tube as a leverage extension.
Pity! The old tin cups were better at centralising the cross as it is inserted. I used to cut new rubber-impregnated cork to fit in the tin cups!excellent. They are soft supple rubber seals on all the crosses here
Yes one shouldn't use hammers just the same as std. universal joints plus support things properly when doing the job.
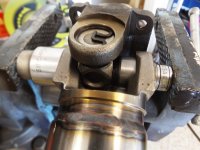
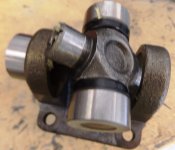
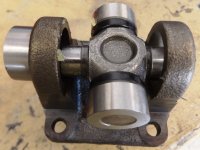
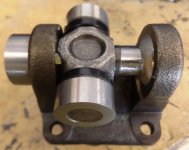
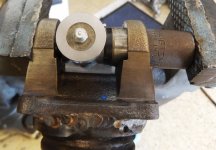
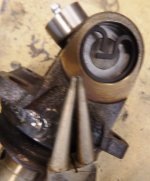
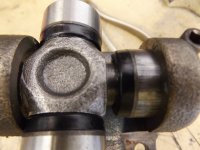
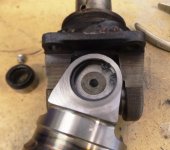
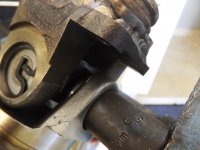
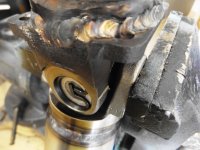
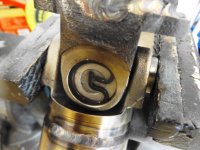
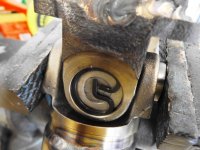
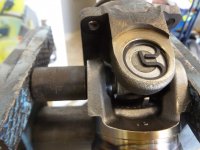
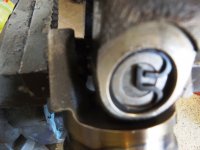
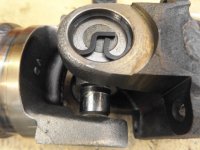
The idea with a U joint is to mount the cross in one side of the cap ~ using a suitably sized socket & vice.
Push that cap & the joint through further than necessary so the cross is just protruding on the other side. Fit the circlip to the side that was pushed further than necessary.
Now fit the other cap, on the slightly protruding cross [this means all the needles are started on the cross].
Now using the vice push thiscap home so it is level, then with the socket keep pushing so the groove is exposed & fit the other circlip.
This is the only time one even looks @ a hammer.
Supporting the drive shaft one good whack on both sides to seat the caps against the circlips & centre the cross. The fitted joint should now be 'tightish' when turning in all directions with equal resistance.
Attachments
-
 Universal fitting (1).JPG232.6 KB · Views: 62
 -
 Universal fitting (2).JPG231.3 KB · Views: 71
 -
 Universal fitting (3).JPG193.6 KB · Views: 63
 -
 Universal fitting (4).JPG263.4 KB · Views: 67
 -
 Universal fitting (5).JPG168.9 KB · Views: 63
 -
 Universal fitting (10).JPG270.8 KB · Views: 62
 -
 Universal fitting (11).JPG156 KB · Views: 65
 -
 Universal fitting (12).JPG86.5 KB · Views: 58
 -
 Universal fitting (13).JPG239.6 KB · Views: 64
Some more pics
.JPG")
.JPG")
.JPG")
.JPG")
.JPG")
.JPG")
.JPG")
.JPG")
.JPG")
And more you sort the order ~
Attachments
-
 Universal fitting (27).JPG208.6 KB · Views: 64
 -
 Universal fitting (33).JPG274.9 KB · Views: 67
 -
 Universal fitting (32).JPG274.9 KB · Views: 64
 -
 Universal fitting (31).JPG266.6 KB · Views: 59
 -
 Universal fitting (30).JPG303.8 KB · Views: 62
 -
 Universal fitting (29).JPG303.4 KB · Views: 57
 -
 Universal fitting (28).JPG299.1 KB · Views: 58
 -
 Universal fitting (26).JPG241.3 KB · Views: 60
 -
 Universal fitting (24).JPG242.5 KB · Views: 63
 -
 Universal fitting (23).JPG292.8 KB · Views: 54