brake cylinder bleed nipples

Is it as simple as just putting a washer under the nut?

I looked at the parts manual and there was no washer, though I have considered that. I removed the other drum as it was scraping against the driveshaft assembly (so pulling down to deeply into the taper). This one obviously doesn't scrape as it's not torquing down at all (the taper needs to carry the drive forces, not the keyway, otherwise you will strip it all out). I'm pretty sure I'll need to buy a new drum for it :) ..... There is no hurry, the car has been sitting for what ..... 25 years now in our sheds, and probably another 20years in other peoples shed before that :rolleyes: .... You can't rush these things :D

I just like tinkering with the old thing, the tech from this period is fascinating .... though it would be nice to drive the damn thing around for a bit :D ... I wonder how Gerry fits in his, I feel like a giant when I'm trying to fit inside it. I sit a bit to high in the seat and are squished up a bit ( a bit like the 2cv). And I'm only 6foot tall. Gerry is a lot taller and bigger than me! In the 2cv I get used to trying to duck down to see under the top of the windscreen. its a shame 2cvs are worth so much, they be hilarious fun to have parked beside the fleet of dodgy old cars in my shed.
 
Maybe a shim in the taper....... a conical shim, obviously with a gap for the keyway, curved from a bit of tinplate from a soup can, or olive oil can or similar.
You wouldn't need much thickness to gain axial length, and tinplate steel would probably grip to both surfaces pretty well.

I'd be trying that before buying new bits.
 
Hi Mate! I have only just caught up with the developments in this saga! I have several drums here you can choose from It is obvious that the drum you have has worn out the taper. Shimming is not a good idea.
 
Oh man I'm good at this stuff. Gerry stopped by with some good drums.... "I'd just like to check the taper first" .... I obviously insisted it looked fine :clown: .... So we whip the drum off and sure enough, the taper is undersized (its quite clean, so I'm guessing its been turned down in a lathe). So what we are doing here is comparing all the various bits to any spares here ... and are comparing junk to junk. As soon as a known good part is fitted/compared to what we have, its obvious we need to throw away what is there and start again.

Fortunately Gerry also noticed there was no springs or clips holding the brake shoes in place. I asked my father and he said 'I just copied what was there".... So the car has probably been driven around with the brake shoes floating around everywhere for the last 1/2 century or so.

IMG_0523.jpg


That's amazing, we don't have any of those clips. I'll need to see if they are available at CTA. Now that I've been prompted to look closely, shouldn't drum brakes have an expanding adjuster between the two shoes to take up the wear as well ? This is scary, I think I'm actually going to have to read the manual :eek: :eek:
 
Last edited:
Oh, this is going to be fun... I'm going to try and pull the front end down over the next few months. My father could never get the lower balljoints apart in the past. So I'll get all this apart (hopefully) and get everything is serviceable... not perfect, but usable condition :dance: 
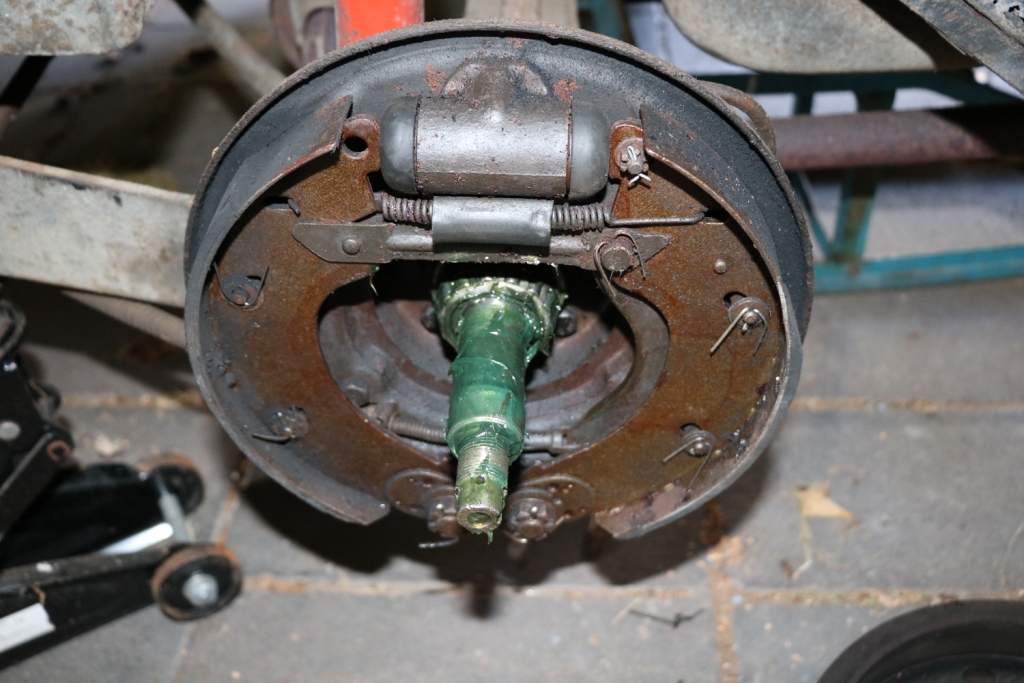
I think I'll try and fabricate some driveshaft tools and do this. I'd prefer to keep the original "taper" type driveshafts in there. As lets be honest, the car is never going to do enough mileage to wear out another set of driveshaft in the next 70years :)
 
Oh, this is going to be fun... I'm going to try and pull the front end down over the next few months. My father could never get the lower balljoints apart in the past. So I'll get all this apart (hopefully) and get everything is serviceable...
Extracting the lower ball joint requires a special tool 1851-T (shown in the illustration on plate 44 of the repair manual). It has a heavy pin that wraps around the suspension arm to hold the extractor in place at the correct angle. I don't think an ordinary puller will work there...
 
Extracting the lower ball joint requires a special tool 1851-T (shown in the illustration on plate 44 of the repair manual). It has a heavy pin that wraps around the suspension arm to hold the extractor in place at the correct angle. I don't think an ordinary puller will work there...
John, I loaned Shane the tools he needs to do the dismantling. The fun will start when he tries to replace the stub axle of the RH drive shaft. I have all of the gear to extract the ball and spigot pins with the exception of the collets for the ball cup pin. That item was not returned by a former borrower. So I guess I will have to have a set made!
 
Wow ... that front suspension will NEVER fall apart.... that is for sure. The pre-rounded "everything" is just spectacular. I don't know where I got a pre-ground 26mm single hex socket from for the top ball joint.... I can only assume tried to pull the top joints apart in the past (with no success).

This is the only car I've ever had that you absolutely are completely stuck without the special tools. You wouldn't even get past the starting point of removing the drum. I'm sure Gerry saw my eyes glaze over when he explained what each special tools was for ..... The diagrams in the factory manual are blury from photocopying and don't give much of a hint what is going on. However as soon as you pull it apart its all obvious and simple but quite amazing in construction.

Anyway, the nut that I assume holds the inner wheel bearing race.... Does anyone know if its also left hand thread (on the right hand side of the car). Its quite, er, "snug" and not ready to fall off too..... I really don't wish to tighten the hell out of it if it isn't left hand thread like the drum taper.

I did try checking the "spare", hopefully good taper here .... and realised its the wrong one. Its a right hand thread so is for the other side of the car ....

I have no idea how my father got driveshafts into this car without all these tools, it would be impossible.
 
Last edited:
Wow ... that front suspension will NEVER for apart.... that is for sure. The pre-rounded "everything" is just spectacular. I don't know where I got a pre-ground 26mm single hex socket from for the top ball joint.... I can only assume tried to pull the top joints apart in the past (with no success).

This is the only car I've ever had that you absolutely are completely stuck without the special tools. You wouldn't even get past the starting point of removing the drum. I'm sure Gerry saw my eyes glaze over when he explained what each special tools was for ..... The diagrams in the factory manual are blury from photocopying and don't give much of a hint what is going on. However as soon as you pull it apart its all obvious and simple but quite amazing in construction.

Anyway, the nut that I assume holds the inner wheel bearing race.... Does anyone know if its also left hand thread (on the right hand side of the car). Its quite, er, "snug" and not ready to fall off too..... I really don't wish to tighten the hell out of it if it isn't left hand thread like the drum taper.

I did try checking the "spare", hopefully good taper here .... and realised its the wrong one. Its a right hand thread so is for the other side of the car ....

I have no idea how my father got driveshafts into this car without all these tools, it would be impossible.

Well that was easy ... it all just came apart. The lower ball joint just slid down the shaft and off easily. I'll do the other side this afternoon and take plenty of photos.... a few photos will make everything make sense if you read the manual and see the tools.
 
Inner stub nut is the same direction as the outer hub nut! Rhs = LH thread. Easier to undo before undoing the ball joints. A large screw drive poked through the open spaces between the uni cross and the centre yoke from down between the V of the upper wishbone link stops the stub shaft from turning while you use the inner nut tube spanner! Simples!
BTW there is a tabbed lock washer behind the inner nut. You must bend back the tabs before undoing the nut!
 
And another dumb question.... Don't trucks and old mopars have left hand threads on the left hand side of the car ? This one has a left hand thread on the right side, and rh thread on the left side ..... I reckon the driveshafts are fitted backwards ??
 
pictures .... pictures galore so hopefully I can remember how this goes back together .... hopefully :eek: ....

20211120_155334.jpg


This is what I mean by needing the special tools for these cars.... About all I can do is remove and refit wheel without them. CX owners will know what driveshaft nuts torqued to "as tight as the last person could get them with a 3 meter cheater bar" means.... See big recess cast into the end of the drum ( Yes, know I understand what to look for, I know that driveshaft taper is also junk .... I have a spare hear for that though).

20211120_155339.jpg
20211120_155428.jpg


Look at the size of the puller .... I think you'd damage most two or 3 legged pullers if you tried them as the taper is pulled down super tight.
 
And another dumb question.... Don't trucks and old mopars have left hand threads on the left hand side of the car ? This one has a left hand thread on the right side, and rh thread on the left side ..... I reckon the driveshafts are fitted backwards ??
I read this somewhere..
Just to set your mind at rest, a quick guide is to spin the hub/wheel in its normal forward direction and make sure the nut spins on the same way..simple! The torque of the hub, wheel or whatever must not be trying to loosen the nut.
 
I read this somewhere..
Just to set your mind at rest, a quick guide is to spin the hub/wheel in its normal forward direction and make sure the nut spins on the same way..simple! The torque of the hub, wheel or whatever must not be trying to loosen the nut.
Definitely wrong David! If a shaft is spinning clockwise as does the right-hand driveshaft, the inertia of the nut means that it will try to stay still so that with a left-hand thread it will tighten and with a right-hand thread it will loosen. Clearly stated in the workshop manual.
A left-hand driveshaft needs a right-hand thread for the same reason.
 
20211120_160749.jpg


I'm sure everyone will cringe and say "what are you doing" ..... but this chiseled around easily (the marks over it show this is how everyone else has done it too ).

20211120_160436.jpg


Oh, those "brand new re sleeved" brake cylinders. If you want to know what happens if you park a car in a variety of sheds for a couple of decades or so ..... Still working suprisingly, so I'll need to pull them all down and see what's happened to the stainless liners ... maybe they can just be cleaned :confused:

20211120_161052.jpg

20211120_161210.jpg


20211120_161148.jpg

20211120_161310.jpg


This pulls the outer bearing out .... Look at the size of the tool! Its not hugely tight at least.
20211120_161712.jpg


Now you can see down in there at the next nut that needs to be removed for the rear bearing after removing the sleeve.
 
20211120_161840.jpg

tube spanner to get down to that nut

20211120_161912.jpg


This nuts was "snug" on this side. It wasn't going to fall off :)

20211120_163723.jpg


Trying to stop the driveshaft turning. Anything you can fit down into the joint isn't strong enough. Thats one brand new kinchrome prybar (first time its ever been used). ... and the 3rd screwdriver I tried.
 
Another approach is to remove the shaft and swivel together by dismantling top and bottom ball joints. The yoke of the shaft can then be mounted in a vise to prevent it turning. If you look carefully you can see the tab lock washer behind the inner shaft nut. You must knock those tabs all the way back.
 
20211120_163918.jpg


The only tool I have here that fits around the top balljoint nut. Its 1/4 turn away from falling apart as its as wide as it'll go.

20211120_164602.jpg


I did make a tool to unscrew this top ball joint..... its somewhere safe.... Probably next to the boss womens car keys .....

20211120_164843.jpg


Under the top balljoint cap... If your lucky the nut will be nice and mangled for you. It has very narrow shoulders. lift the car by the suspension so the angle of the ball joint point more verticle.

20211120_164907.jpg
20211120_164914.jpg


Everyone owns a 26mm single hex impact socket right ?? I ground the face of it down so it was recessed and would grab the full depth of the nut

20211120_165103.jpg


Yet another special tool. This screw into where the top bearing cap was. i made sure the cars weight was on the suspension so it had the straightest push against the nut ( i found a nut in the shed the same size and pressed on that so I wouldn't further mangle the nuts)

20211120_165347.jpg


I needed to fish this out ... the top of the balljoint before screwing in the breaker tool
 
Last edited:
20211120_170032.jpg


The lower balljoint cover .... it looks like its not just a cover.. it contains the balljoint and has shims that must shim the balljoint slop out.

20211120_170950.jpg
20211120_170942.jpg


The special tool for the lower balljoints. These are the ones my father couldn't get out ... er 20years ago.

20211120_170244.jpg


Who out there owns a 29mm socket ?? I figure this is shifter size. fortunately its only finger tight .... and doesn't contain a split pin even. So i just used a 30mm socket on them.
20211120_171718.jpg


the tool is quite a smart design, the back screw allows you to angle it so your pushing straight against the ball.

20211120_172912.jpg


This is as far as I got before the puller bottomed out. The other side tighted up as it finally came off, and this side it tight to the very end as well. I'm guessing the end of the shaft must be a bit damaged from previous extraction attempts.
 
Top