You have done some amazing work mate. They didn't look this good out of the factory!

You are using an out of date browser. It may not display this or other websites correctly.
You should upgrade or use an alternative browser.
You should upgrade or use an alternative browser.
Dspecial restoration 1975
- Thread starter Le Parisian
- Start date
Looks excellent Phillipe. Well done!
Reading through, can I add a couple of comments:
With the bonded roof, a bed of Sikaflex works well, BUT, you have to make sure you have the 8 d-shaped spacers on the rails to keep it from sinking too far and also tool the Sikaflex to leave the edge of the outer rail free of sealant so the decorative rubber has enough room to seat when the stainless strip is clipped over. Awful job in my experience. If you fit the headliner before fitting the roof, taping plastic sheeting onto the trim edges keeps dirty/sticky hands covered in sealant off while fitting up.
The decorative rubber strip will initially appear to be loose at the corners above the A posts. To get around that, you have to pull it tight around the corner and then it lays over. Obviously, that's a problem because with the bonded roof, you have to fit the side trims first and have the rubber strip at the front loose until you fit up the two trim fittings across the front. Leave the length or rubber across the front a bit short when fitting the side trims and then it will stretch and lay itself over and against the roof panel at the corners. it should also be long enough to continue on in and behind the C-pillar cover. Easier said than done as getting the side trim strips to seat over that decorative strip is quite difficult and the strips are very easily deformed.
With the door bottom rubber strip holders, your panel beater has evidently plug welded them on. Another way to approach this is to use steel pop rivets with a washer behind to secure it and spread seam sealer along the primed contact area. This can help with the original doors as the metal is so thin and it also keep water out. The metal of the repair sections is probably 1.0mm, while the original doors the metal is maybe 0.7mm or less and the pressed form is the source of strength rather than metal thickness.
Last edited:
Looks excellent Phillipe. Well done!
Reading through, can I add a couple of comments:
With the bonded roof, a bed of Sikaflex works well, BUT, you have to make sure you have the 8 d-shaped spacers on the rails to keep it from sinking too far and also tool the Sikaflex to leave the edge of the outer rail free of sealant so the decorative rubber has enough room to seat when the stainless strip is clipped over. Awful job in my experience. If you fit the headliner before fitting the roof, taping plastic sheeting onto the trim edges keeps dirty/sticky hands covered in sealant off while fitting up.
The decorative rubber strip will initially appear to be loose at the corners above the A posts. To get around that, you have to pull it tight around the corner and then it lays over. Obviously, that's a problem because with the bonded roof, you have to fit the side trims first and have the rubber strip at the front loose until you fit up the two trim fittings across the front. Leave the length or rubber across the front a bit short when fitting the side trims and then it will stretch and lay itself over and against the roof panel at the corners. it should also be long enough to continue on in and behind the C-pillar cover. Easier said than done as getting the side trim strips to seat over that decorative strip is quite difficult and the strips are very easily deformed.
With the door bottom rubber strip holders, your panel beater has evidently plug welded them on. Another way to approach this is to use steel pop rivets with a washer behind to secure it and spread seam sealer along the primed contact area. This can help with the original doors as the metal is so thin and it also keep water out. The metal of the repair sections is probably 1.0mm, while the original doors the metal is maybe 0.7mm or less and the pressed form is the source of strength rather than metal thickness.
Certainly David and thank you for adding your experience, there is little information about bonded roof on the internet and I’m sure people wishing to bond their roof back on will appreciate learning from other people’s own experience. I didn’t use the 8 D spacers the reason being I though without the rubber seal it would still seat to low and honestly I didn’t want to tackle the dress rubber, the roof headliner was fitted after mounting the roof back into position by a mobile roof liner. The worst part about refitting the roof is the mess created by the Sikaflex you need to clean the excess rapidly and before its set too hard, you have about an hour window.
I was lucky enough to find a car restorer that really can use a welder and the job he did on my car is unbelievable it’s the best rust repair project ever for me and he does the job meticulously, I wish I would have known him years back and he also sprays so turnkey package
You have done some amazing work mate. They didn't look this good out of the factory!
Hi mate thanks for the support it’s no concourse restoration but it will come out OK. BTW I’ve been reading about your DS23 project and honestly I wouldn’t not be brave enough to tackle it
Dspecial restoration
Another weekend gone and a bit more achieved despite another sticking hot day yesterday so let’s see the rear windows are back in all door inner & outer handles refitted as well as the window seals and door lower rubbers , the bonnet is finally completed and back on the car alignment almost right.


Another weekend gone and a bit more achieved despite another sticking hot day yesterday so let’s see the rear windows are back in all door inner & outer handles refitted as well as the window seals and door lower rubbers , the bonnet is finally completed and back on the car alignment almost right.
Last edited:
Keep the updates and progress up Philippe. You have saved a D and turned it into a masterpiece that all Deesees deserve to be. Have you thought about doing videos? ")
Regards, Syd
Regards, Syd
Getting there phillipe! Hours of work to put the front mudguards together, but the end is very much in sight!
Beautiful alignment of the panels especially the bonnet.
Maybe you could have a look at my car one day and give me some tips re the panel gaps.
Regards, David
Beautiful alignment of the panels especially the bonnet.
Maybe you could have a look at my car one day and give me some tips re the panel gaps.
Regards, David
Getting there phillipe! Hours of work to put the front mudguards together, but the end is very much in sight!
Beautiful alignment of the panels especially the bonnet.
Maybe you could have a look at my car one day and give me some tips re the panel gaps.
Regards, David
hi David
Ive just worked out who you are "Caisson" from Grafton :wink2:
The guards wont take that long once everything is cleaned up and ready to go.
No worries panel adjustment is relatively easy as long as not previous accident detected
Keep the updates and progress up Philippe. You have saved a D and turned it into a masterpiece that all Deesees deserve to be. Have you thought about doing videos?
Regards, Syd
Hi
Ive already posted a video on page 6 anyways here it is again enjoy; doing more videos, well will see as it is time consuming. im happy with the color gris brumaire is just stunning suit the D really well not many on the road in that color and a Citroen color for the purist
https://youtu.be/gCldnhtXS_Y
Dspecial restoration
Good weather this weekend to work on the D, so all windows now fitted with new rail guides, new rubber inner and outer rubber seals and new rubber plugs nice and tight with smooth operation.


Good weather this weekend to work on the D, so all windows now fitted with new rail guides, new rubber inner and outer rubber seals and new rubber plugs nice and tight with smooth operation.
Last edited:
Dspecial restoration
Also fitted all the door cards, after market but surprisingly good quality, windscreen wipers, front plate holder and so on, basically coming to a grand final with just the headlight assemblies to go.
BTW I’m after the 2 aluminium air ducts left and right used to cool the disc brakes. CAN SOMEONE HELP???????
Last edited:
BTW I’m after the 2 aluminium air ducts left and right used to cool the disc brakes. CAN SOMEONE HELP???????
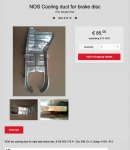
Citroen Andre can hep with NOS for the right hand side, he may also have good used for the left. . .
https://www.citroen-andre-shop.com/...drive-shafts/nos-cooling-duct-for-brake-disc/
The car is looking absolutely superb, love the colour especially with the interior/exterior combination - very classy :headbang:
Cheers
Chris
Thanks Chris I’m very pleased with the colour scheme as well, the only thing is the door cards are slightly darker then the seats but that’s all they had at the time when ordered but very good quality, having said that a little contrast doesn’t look so bad!!!.
My HP pump decided to leak from the body and I definitely want to replace it with one properly rebuilt so I’ve just ordered one from Citrotech so another Au$700 spent expensive so I think before I spend a fortune on those ducts surely someone out there must have a good used pair they don’t need I’m prepared to pay reasonable money for them so come on lift your hand up!!!!!
Pilippe! Send the pump to Ian Steele he wont charge anything like that and it will be good
Hi David
its too late its on its way
Congratulations again Philippe, that colour is perfect, so glad you chose to go with factory colour scheme. A friend had a lovely car ( ID 19 ) in the same colour scheme, I have always admired it. But what you have achieved looks even better.
I know most of, if not all the air intake ducts available are all NOS, but they are only available for the right hand side. Jean Blondeau maybe worth trying for the left hand side, Citroen Andre has the right hand side ones.
I know most of, if not all the air intake ducts available are all NOS, but they are only available for the right hand side. Jean Blondeau maybe worth trying for the left hand side, Citroen Andre has the right hand side ones.
Attachments
Congratulations again Philippe, that colour is perfect, so glad you chose to go with factory colour scheme. A friend had a lovely car ( ID 19 ) in the same colour scheme, I have always admired it. But what you have achieved looks even better.
I know most of, if not all the air intake ducts available are all NOS, but they are only available for the right hand side. Jean Blondeau maybe worth trying for the left hand side, Citroen Andre has the right hand side ones.
Thank you Michael for your compliments, I’m glad I picked this colour, it really looks good on the D. My brother in law bought a Dspecial brand new Gris Brumaire in 1970 and I’ve never forgot how nice it looked thus the reason why I choose this colour.
I’m currently in touch with Andre Citroen he is searching for a set possibly 1 new and 1 second hand also Citroservice is also searching for me. So lets see what happens.
Dspecial restoration
Nice day yesterday so I started working on the headlight assemblies they are quite dirty I managed to clean two sets of front glass and sand back one of the headlight housing, I need to choose the best glass out of the 2 sets I do have. They are all chipped and scratched. I will be replacing the headlights with H4 after market and will need to modify the connectors.
My new Hydraulic Pump arrived on Friday from Citrotech and it looks amazing you can fill the quality it’s a fully rebuild unit expensive but worth it once you see it.
I haven’t picked the colour for the headlight housing as yet but that grey rose colour looks close to the original.
Phillipe,
H4 connectors can be had as a generic part from any auto store (you already knew that) but you can buy a more D specific conector from most of the Euro suppliers these have the correct wire colours and bullet connections so basically plug and play
Wiring connector for headlamp bulb - suitable for use with our H4 headlamps
https://www.citroworld.com/en/webshop//h4-bulb-connector-2D5427352
For painting the headlight buckets I used Anchor brand aerosol paint, a clear plastic primer and Moss Vale Sands as a decent colour match to original. Original are of course a moulded plastic so as such there is no definitive paint colour match, but the colour tends to a light grey/beige, Gris Rose is too pink IMO.


The Anchor paint is acrylic based and gives a nice satin finish, mine have been painted for several years now and still look like the day they were painted - no cracking/crazing/flaking etc. Appears to be a relatively permanent solution if your light buckets need paint to restore - any paint system will need a plastic primer!
Cheers
Chris
H4 connectors can be had as a generic part from any auto store (you already knew that) but you can buy a more D specific conector from most of the Euro suppliers these have the correct wire colours and bullet connections so basically plug and play
Wiring connector for headlamp bulb - suitable for use with our H4 headlamps
https://www.citroworld.com/en/webshop//h4-bulb-connector-2D5427352
For painting the headlight buckets I used Anchor brand aerosol paint, a clear plastic primer and Moss Vale Sands as a decent colour match to original. Original are of course a moulded plastic so as such there is no definitive paint colour match, but the colour tends to a light grey/beige, Gris Rose is too pink IMO.
The Anchor paint is acrylic based and gives a nice satin finish, mine have been painted for several years now and still look like the day they were painted - no cracking/crazing/flaking etc. Appears to be a relatively permanent solution if your light buckets need paint to restore - any paint system will need a plastic primer!
Cheers
Chris