Vince's ongoing DS23...

Vincenzo

Member
VIP Paid Subscriber
Fellow Frogger
Joined
Aug 23, 2014
Messages
198
Location
Auckland, NZ
Gentlemen,

I've been meaning to get onto doing this for some time... Still not as organised as I'd like for a timeline coherent display of my project. I will add a little bit each week with whatever story goes with the pictures. There were some pictures posted many moons ago in the main Citroen board and I will reprise those in this thread at a later stage. Say, next post, to start things back at the beginning which is where many such stories should start of course!

The process of sorting my many photos has taken much longer than I expected as the project is 2 years old now and there have been so many more photo's than I expected take.

The chassis was with the panelbeater for considerably longer time than I expected. He did a fantastic job of my rear-end which will be the subject of another post. There is always a 'but' though right?

In this case it was noticed after it came back to me, that the front caisson, which had been stripped back to metal, primed and re-painted, was covered in little nicks and scuffs which was a little irritating. My good friend Roger had worked very hard on it and he was very disappointed. I wasn't upset as 1. I don't know what I'm doing and didn't understand the implications, and 2. I don't expect other people to take a lot of care beyond their specific tasks - it's a survival technique I use to maintain my sanity after years of working with people who don't give-a-shit

So today I cleaned them up to primed stage and I made a little timelapse video of it for my amusement. Also to prove to SWMBO that I am not cavorting with a younger crowd...

https://youtu.be/_XJS26J0-cI I hope it makes sense.. the end is a bit disappointing (too quick). I have so much more to do, that the next one can only be better.


Cheers
Vince
 
Thanks Enzo. I have a lot more to add yet. I found out the next day that the etch primer I used reacts with the chassis black... good thing I had only done a few small patches and can easily start again. bugger.

I see your double pun there matey - "Enzo" as in NZ, 'enzo as in a contraction of my user name. There ain't half some clever people around. They are the ones that appreciate old Citroen's I think...
 
I found out the next day that the etch primer I used reacts with the chassis black... good thing I had only done a few small patches and can easily start again.

Is that Eastwoods 'Chassis Black' by any chance? I've read that it reacts with etch primer.
 
Yes Budge it was Eastwoods. I may also have not left enough time for all the dewaxer/degreaser/metal prep to evaporate, according to my mate Roger. My understanding is that their 'chassis black extreme' has that problem (even reacting with itself) which is solved by purchasing the 'primer extreme' that matches both product and price... Damn expensive stuff so I decided to touch it back up again using POR15 and continue to use that with the rest of the chassis.

Weekend of May 20th..
1min 25 seconds Youtube. As small as I could get it without being totally awful - just, sort of, acceptably awful.

There were two areas of the cabin chassis rails that needed taking back to the metal (at the rear of the cabin) and drivers side yet to do. I'll probably take that back to the metal as well since my enthusiasm for doing things properly is much higher in the morning...

Next up will be topcoating the rear-end's undercoat when I work out how I'm going to do it. Since it is everything from the rearseat backwards rattle cans are going to get expensive. I just need to find a willing and able compressor and cheap (yet cheerful) gravity gun. A product called Autothane was recommended, I've yet to do the research on it but expect it to be much the same sort of thing as POR15 and I won't have to have retail spraycan prices... Ultimately the entire chassis will be resprayed. The more you do the more you see needs doing - the cantrail is disgusting! No rust, but certainly letting the side down now.

Also, the first torquing down of the headbolts occurred with cold clearances to be set next week.
 
Speedy work! What are you using to strip the chassis back to bare metal? Is it a wire brush wheel or maybe a sandpaper flap wheel? Or something else? I need to do the same job and don't want to leave the metal surface deeply scrtached
 
I first started off with a sandpaper wheel
flap244D.jpg


but it was not strong enough.


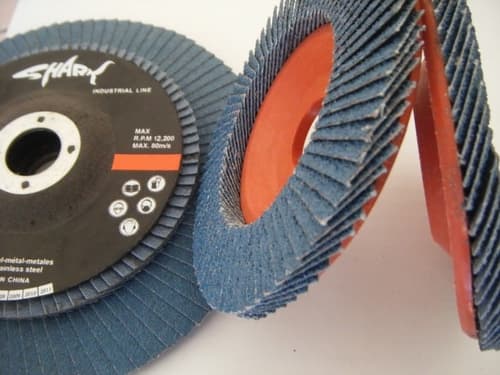
Then I started using a flappy disc attached on an angle grinder (with a very light touch!!).
cbe9caa5_3c4acb8b_e4b8_4c69_836e_77ac3829f247.jpg


When sparks start I move on to another section of paint to be removed, until the panel has been covered. I also stay away from corners and edges!! Since you haven't used one before I highly recommend practicing first on some painted scrap because the flappy disc will be very very aggressive specially when new. After an hour of use it became a bit more reasonable to use. Still, an inadvertent slip will gouge and piss you off. So a very light touch is needed until you get used to it and then just vigilance while using.

Then I use the sandpaper wheel in the drill, to finish areas that need a bit more sustained low pressure and to clean up the corner edges - horizontal transitioning to vertical on the chassis rail. A flappy disc will grind those away in an instant. For the tricky and tight areas I use a dremel wheel or hand sand. A mate put me onto gluing sandpaper wrapped around a popsicle stick for the places that my delicate fingers couldn't reach. Any areas that had scratches were smoothed off using the sandpaper wheel.

Using POR15 covered up minor sins since it is a thick coating which while still tacky can happily get a second coating. I'm told that is the only way to do it as once it cures nothing will stick to it. Not even itself - but is very hard wearing.

That video, which appears to be much darker than it should be on youtube, represents my weekend. I think an experienced tradesman could do what I did in about 5 hours, maybe less. I estimate that I put 10 hours of actual work in on the stripping and recoating. At least 30 minutes of that would be shaking rattle cans.
 
Last edited:
cbe9caa5_3c4acb8b_e4b8_4c69_836e_77ac3829f247.jpg


So a very light touch is needed until you get used to it and then just vigilance while using.

Good advice. I use them to clean up welds, not as aggressive as grinds wheels, but not far off it if one does not have deft touch. I like using them, they are not hard to master.
 
Try the Josco Brumby Strip-It pads on a cheap angle grinder:
https://www.bunnings.co.nz/josco-brumby-strip-it-disc-100-x-16mm_p00307083
This is the NZ Bunnings website and the $47 price for a single unit is crazy. Under $15 here and even less expensive if you buy a box of these or something similar via eBay. These are good because they tend not to cut the steel. You just have to avoid sharp edges as they tend to rip the bonded matrix apart prematurely. Like sandpaper flaps, old sealant and underbody goop will clog them rapidly.
 
Thanks for the tips guys - especially the one about flap wheels on the edges of seams. I've seen those flap wheels in various grades so will probably start out light and see how i get on. I expect a combination of techniques will be called for - possibly including use of paint stripper.
 
Just remember there are different grades on flap discs. 40 is overkill on a panel as they rip too hard. 120 way to go on paint.
 
I checked my flappy discs today and they are 120. Now that they have worn a bit they are much nicer to use. Todays effort was just a short one to finish off the front-right chassis rail so I can move on to other more interesting parts - like the wheel bays.

Youtube Video https://youtu.be/q4MOPLT_ivM

I seriously have to get a proper compressor fairly soon. These rattle cans are starting to drive me nuts.
 
The scope of my current task is becoming clear. The right hand longeron got a good cleaning and few areas needed touch-ups and a final topcoat of por15. There is a layer of sound deadening coating underneath it all. A fairly banal video of degreasing and painting with a spraycan. Not much (any) excitement but it is what I did on Sunday.. youtube video 1minute long

The POR15 spraycans don't go very far, so I'll be testing the fabled 'self-flattening properties' this weekend on the non-visible parts i.e. using a brush. The very thought makes me shudder but I've been told to try it out at least. Save the spraycans for the publicly visible bits.
 
I managed to pick up one of these for about $10 (while replenishing my flappy wheel stock) and gave it a go. I liked it! More robust than a flappy wheel, not as critically destructive as a flappy disc.

Try the Josco Brumby Strip-It pads on a cheap angle grinder:
https://www.bunnings.co.nz/josco-brumby-strip-it-disc-100-x-16mm_p00307083
This is the NZ Bunnings website and the $47 price for a single unit is crazy. Under $15 here and even less expensive if you buy a box of these or something similar via eBay. These are good because they tend not to cut the steel. You just have to avoid sharp edges as they tend to rip the bonded matrix apart prematurely. Like sandpaper flaps, old sealant and underbody goop will clog them rapidly.
 
the POR15 is light sensitive Vince ie it goes greyish somewhat over time when subjected to sunlight. I chose to paint the chassis with a black enamel then coated with a clearcoat of KBS which is the same stuff and cheaper. At least it is here in Australia and a local product. It adheres well and has that chip resistant quality.
 
58 Seconds of my life this weekend

A quick video integrating what I did over the weekend. Left longeron got a spot repair and hand-brushed POR15 - relying somewhat on the much vaunted 'self leveling' qualities of the paint. And the fact that the metal looks a bit ropey from the sound deadening paint.

The second half is a quick clean-up of the left A-pillar for some patches that needed tarting up. Yes, I know I left the rubber bumpstop on, due to me being unwilling to pull it off before I have a replacement part.. I'm quirky that way.

Most of the rest of the chassis is primed in black and just needs a good topcoat. A couple of smallish areas around some joins that need to be stripped back and repainted but otherwise nearly done. Naturally that means at least 3 full weekends to finish this.

the POR15 is light sensitive Vince ie it goes greyish somewhat over time when subjected to sunlight. I chose to paint the chassis with a black enamel then coated with a clearcoat of KBS which is the same stuff and cheaper. At least it is here in Australia and a local product. It adheres well and has that chip resistant quality.

I didn't know about this issue. Should I then clearcoat the POR15 topcoat? I was told that nothing much sticks to POR15 once it has cured so that may be problematic.. Perhaps I should clearcoat it while it is tacky? There are a number of areas that will not be exposed to the light much, if at all. I'll use the litre of por15 that I just bought on those while I look for an alternative.


Also the engine is now officially closed up!


IMG_0029.jpgIMG_0030.jpg
 
no don't bother clearcoating then. Ps make sure you have the exhaust and lower exhaust mounts all attached and done up before plonking motor back in, plus the regulator and anything else hanging off, fuel pump etc. Save alot of grief that way!
 
My apologies for the sameness of the video's - due to my general ineffectiveness in things mechanical, other people are helping with the real jobs. I'm the workshop apprentice (unsupervised and ultimately responsible) so I get to do the "wash the bolts and grind that bit of metal" jobs.

Anyway, Started on the cantrail and tidied up the rear roofrail. I'm into 'previously primed by experts' territory until I get back up to the front of the chassis. Hopefully the boot area will be quick to do. The hand brushing of the POR15 is working out better than I expected - it really is self leveling!!

Youtube video

Until tomorrow!!
 
Top