Thanks Col. I'd never melt anything as precious as a Weber but even if I did the yield wouldn't even cover the cost of lighting the furnace.

You are using an out of date browser. It may not display this or other websites correctly.
You should upgrade or use an alternative browser.
You should upgrade or use an alternative browser.
Sand casting unobtainium parts at home.
- Thread starter 56 Fregate
- Start date
I challenge you Graham. Intake airbox for two DCOE's...
When Alfa Romeo have already done a very good job of them on virtually all 60s and 70s models why bother. I have seen one of the Alfa airboxes fitted to a DauphineG that had a 16TS engine with DCOEs and 16TX 5 speed gearbox fitted.
When Alfa Romeo have already done a very good job of them on virtually all 60s and 70s models why bother. I have seen one of the Alfa airboxes fitted to a DauphineG that had a 16TS engine with DCOEs and 16TX 5 speed gearbox fitted.
Yes but was it diamond shaped with "Robri" etched into it?I challenge you Graham. Intake airbox for two DCOE's...
When Alfa Romeo have already done a very good job of them on virtually all 60s and 70s models why bother. I have seen one of the Alfa airboxes fitted to a DauphineG that had a 16TS engine with DCOEs and 16TX 5 speed gearbox fitted.

I like your arsenal. And yes, French content is indisputable!!Another day - another job done. I needed a clamping plate for a car rear window and to make it easy I decided to not make a closed sand mould but instead made an open air mould in greensand like this.
View attachment 224356
An impression was pushed into a level pad of green sand and the alloy was simply poured in. It's impossible to accurately gauge the depth and meniscus so I overpoured the alloy with the intention of trimming to final size.
View attachment 224357
Trimming to size isn't such a big deal when you have one of these bad boys in your arsenal.
View attachment 224358
Anyway "that's a rap" as they say in the movie business.
Where's the French content I hear you cry? Well I'm pretty sure there's a couple of old Renault intake manifolds in there somewhere.
View attachment 224359

I need to make a new sandcast part for my arsenal soon. Like everything my milling machine is in a constant state of development. And so is my ever expanding job list.

Maybe a slight variation from the above design but the intent is still the same. The spindle screw on my home built milling table was previously cantilevering out 110mm and was unsupported until now. Ah it's good to have the capability to make your own parts. French content? I melted down a Fregate bell housing for this part. The spindle dial was not cast but machined out of aluminium stock bar.


Last edited:
My forelock is wearing out from tugging.Maybe a slight variation from the above design but the intent is still the same. The spindle screw on my home built milling table was previously cantilevering out 110mm and was unsupported until now. Ah it's good to have the capability to make your own parts. French content? I melted down a Fregate bell housing for this part. The spindle dial was not cast but machined out of aluminium stock bar.
View attachment 224875
View attachment 224876
View attachment 224874
Well you better stop doing it.My forelock is wearing out from tugging.
There's been some strange goings on at the facility this week. Boobies and a new mascot for shed 4 that emerged from the scrap pile.


Both have elements of Citroen about them to my eyes.There's been some strange goings on at the facility this week. Boobies and a new mascot for shed 4 that emerged from the scrap pile.
View attachment 224895View attachment 224896
View attachment 224894
That first piece looks like a stick figure skeleton.
I think he might be making one of these, from old Renault parts of course.
I think he might be making one of these, from old Renault parts of course.
If you enjoyed that type of theme I'd suggest you watch this one.


Very good movie. You can get sucked into anything with the right bait .If you enjoyed that type of theme I'd suggest you watch this one.
" always ask the On-lookers"
Ray
Back in post #148 I showed a set of sandcast hubcaps I'd made and although they are usable they don't include the proper logo, I think I can do better. I have improved my processes somewhat and decided to have another lash and make a set via the black art of runnerless casting with thin walls (typically 4-6mm) and including the proper logo.
There's a bit to it so hang on to your forelocks, here we go..
For a perfect end result we first need to start with a perfect pattern. With a bit of black magic and other mumbo-jumbo I took impressions and produced one good pattern from an old original hubcap which is past it's prime and only good as a chimney cap.


Next a simple 2-part sand mould was made with resin bonded sand. The cone shaped object is a pouring cup intended to increase hydraulic pressure in the mould.

Holes were carefully drilled with a masonry drill to produce internal runners. No external runners, gates or sprue are used with this method. This makes final machining and linishing simpler. The holes were NOT DRILLED WILLY-NILLY. They were placed with some forethought and exact trajectory so they all ended up in the dandy pouring basin I had included in the mould design. Not also, I countersunk the holes at each end to assist metal flow in the tight mould cavity. The small holes around the perimeter are vent holes.


Next the mould was set up with the pouring cup and the alloy poured in, slowly at first with increasing speed until the cup was full to the top. The full cup provides good hydraulic pressure and feeds the solidifying metal as it cools and shrinks.

After breaking the sand away we now have a batch of four premium sandcast hubcaps to compliment the four from the last batch.


TBC
There's a bit to it so hang on to your forelocks, here we go..
For a perfect end result we first need to start with a perfect pattern. With a bit of black magic and other mumbo-jumbo I took impressions and produced one good pattern from an old original hubcap which is past it's prime and only good as a chimney cap.
Next a simple 2-part sand mould was made with resin bonded sand. The cone shaped object is a pouring cup intended to increase hydraulic pressure in the mould.
Holes were carefully drilled with a masonry drill to produce internal runners. No external runners, gates or sprue are used with this method. This makes final machining and linishing simpler. The holes were NOT DRILLED WILLY-NILLY. They were placed with some forethought and exact trajectory so they all ended up in the dandy pouring basin I had included in the mould design. Not also, I countersunk the holes at each end to assist metal flow in the tight mould cavity. The small holes around the perimeter are vent holes.
Next the mould was set up with the pouring cup and the alloy poured in, slowly at first with increasing speed until the cup was full to the top. The full cup provides good hydraulic pressure and feeds the solidifying metal as it cools and shrinks.
After breaking the sand away we now have a batch of four premium sandcast hubcaps to compliment the four from the last batch.
TBC
Attachments
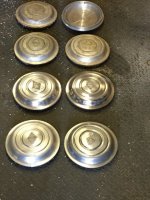
The predrilled runners were snapped off one at a time with a cross-pane hammer. The tits will be machined off on the lathe. The lathe will also be used to assist in the external linishing with some obvious hand work to be done around the losange logo. I now have a set of 8 primo Renault thin-walled sandcast hubcaps in various stages of finish. I think 7 will be perfect and one near perfect to choose from. The fume marks on the rough castings are from the resin in the sand.


All rejoice..

All rejoice..
Last edited:
I'm quite speechless. Wow.
For anyone interested in home hack lathe work check this out. To machine the inside faces of the formerly mentioned hubcaps I made up quite a rudimentry cup chuck with two layers of MDF screwed to a face plate. It worked a treat and the only thing that held the hubcaps in place was friction and the end force from the live centre. I carefully reached in with an over extended round cutter and removed the casting tits. It did quite an efficient and acceptable job.


Meanwhile polishing continues.. 

Aagh, seven wheeler for the straight eight?

