R10 Resto S E Qld

boleropilot

Active member
Fellow Frogger
Joined
Nov 28, 2011
Messages
304
Location
Boonah
I have been lucky enough to acquire this R10 as a Give Away to Good Home unit, from Canberra, which is of course a story in itself. Suffice to say that it wasn't an easy move to Boonah, but work is now finally under way to get the little beasty back on the road. Unfortunately I don't have the skills or funds to make it a top class project, but when finished it will look nice and drive even better.

It is an R1190 that had been whacked up the Khyber many moons ago and put aside for future work. Strong little cars that they are, the rear end is distinctly concave but the damage did not extend to the radiator, so it does run. What I didn't know is that a former custodian change the motor to an 810-05 version, which I believe was fitted to 12s and 15s in Oz. I am hoping that the 10S head and Weber I have managed to obtain will fit, so 1.3 litres plus the 10S head and Weber should make the little beasty get along "quite well".

The exterior has had some 'work', there are signs of some kind of light scraped-on coating for paint renewal (?). As expected, the interior is horrible and will need to be redone. Which brings me to the point - the two big expenses for someone like me is always going to be body repairs and upholstery - I can do just about everything else. I have had a quote for around $1.5k to replace the rear panel, my BFF (thanks again Rob) has gifted me a used rear panel from his collection. That will be done when the suspension had been completed along with the reconditioned brakes, mainly because the car has to have brakes to be able to be moved into the panel shop.

I will try to keep the typing to a minimum and the posts regular.

BP
 
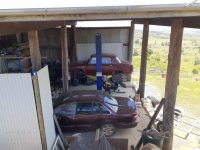
Pic 1 20210128_R10_resized.jpg
 
In case anyone is wondering - the 'workshop' was obviously intended as a tractor/hay barn when we bought the property in around 2000 - it's huge, and with a floor area (now fully concreted) of around 150 square metres, it has been transformed into a very noice working area. Toys include a separate working area with a heavy duty bench, 240 volt overhead winch running on an I beam, and pallet racking down one side.

My lovely old '97 Fairlane Concorde was worth $60k new, now it is worthless. When I ran it around Qld Raceway with the RCCQ, it was voted Best Sounding Car of the Day - the Tickford modified six sings like you would not believe at the redline (straight through 2.5 inch exhaust).

Major 'planned' work for the workshop is to get the main doors made up and fitted and to add a paint booth at the other end.

cheers

BP
 
  • Like
Reactions: COL
Good luck with it! I have an 810-03 downstairs and it is the R10 1300 motor (from an import), just FYI.

You aren't short of R10 skills in Boonah! :)
 
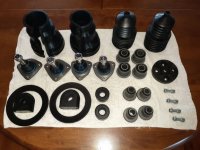
Yeah John I know about Boonah R10 support all right...nice little package arrived from France today, total cost for this little lot was 310 Euros but the mob I bought them from were not quite up the task of customer service. When I asked them to communicate with me in English they told me (in no uncertain terms) that (a) they don't speak English, and (b) to use an internet translator. Lovely. They haven't bothered to answer my request for a credit for the VAT they charged me (which they should not have, according to Austrade).

Next step is to get the other 3 A arms and the steering rack off (the latter basically to replace the main shaft rubbers) so I can get all the new stuff back on. With the steering rack out of the way the install of the recon MC should be a doddle, particularly considering the new allen bolts I will be using.

Cheers,

BP
 

Attachments

  • 20210203_162255_small.jpg
    20210203_162255_small.jpg
    47.4 KB · Views: 171
Yeah John I know about Boonah R10 support all right...nice little package arrived from France today, total cost for this little lot was 310 Euros but the mob I bought them from were not quite up the task of customer service. When I asked them to communicate with me in English they told me (in no uncertain terms) that (a) they don't speak English, and (b) to use an internet translator. Lovely. They haven't bothered to answer my request for a credit for the VAT they charged me (which they should not have, according to Austrade).

Next step is to get the other 3 A arms and the steering rack off (the latter basically to replace the main shaft rubbers) so I can get all the new stuff back on. With the steering rack out of the way the install of the recon MC should be a doddle, particularly considering the new allen bolts I will be using.

Cheers,

BP
It doesn't always go smoothly. Some are better than others in this regard. You're right too, VAT should not be charged.

Gratuitous advice is to get the pedal rod clearance right before you hook up the hydraulic pipes to the MC. It's a common cause of poor "pedal" if wrong and can be a prick of a job with the MC in place and brakes connected. You can imagine how I know......
 
Thanks J, I have read much drama about the dreaded rod clearance issue so that is one of the first tasks I will be focusing on when I start getting all the bits back together.

The little package of goodies received today from France has given me a boost, and I arranged some help today from a mate who has some engineering experience and can help with removing the old ball joints and bushings from the A frames (a lot harder task than I expected).
The lymph node removal has been much more debilitating than I expected so the help he is giving me is keeping me on track.

Cheers for now,

BP
I made up threaded bolt/washer etc arrangement to pull out the bushes from the wishbones, and that wasn't too hard. Popping the ball joints was challenging.... Yours might still have been rivetted onto the wishbones too I guess, if they were original. Not a joy!

I can send photos if you PM me an email address but you might have solved it by now I guess. :)

Don't overdo it!!!! We weren't designed to be assaulted and have bits removed.

Give Rob my regards next time you see him please.

Best wishes
 
G'day m8. Popping the ball joints is indeed a huge challenge! They are the originals (riveted on) and there is absolutely no wear in any of them - the only reason I am replacing them is because the rubbers have perished and as such they will not pass the roadworthy!

I am finding that buying tools like ball joint separators needs to be done after careful measuring - I have had to cut the ends of the joint ball bolts off with a grinder to get my new ball joint separator to fit (my BFF will probably yell at me for buying one, his is probably home made and works a treat!!!). I even tried to use the 'fork and big hammer' method to get them to pop without success. The hammer needed would weigh more than the bloody car and would need a sumo wrestler to swing it!

My engineer mate (does a lot of tractor work so a lot of his techniques entail heavy duty ideas and equipment) got the first set of ball joint rivets off in 5 minutes. He used a grinder with a cutting disc to take the rivets off down to the A arm until the profile of the rivet center just showed. He then hit the rivet with a pointed punch (one hit did it) and the rivets just fell out. He also pointed out that the rivet needed to be ground off from the opposite side of the ball joint flange for easier removal.

One of the front shocks I removed had the lower mount bracket badly bent (got a new one), when I looked at it closer the rubber was completely gone from the lower shock mount, must have been a delight to drive! The front shocks (stuffed, or course) are Monroe A9-823-706, and I am awaiting info from Monroe as to their replacement or their suggestion for the R10. I'd love to put Konis in but the cost is too big for a resto of this calibre - I just want the little beasty to be a nice drive - on the other hand, it does have a 1.3 motor and I am planning on bolting on a a reconned 10S head and a Weber 32.....so maybe I just have to bite the bullet...

Cheers for now,

BP
There's a factory tool to pop the tapers - it expands outward and pushes against both of them. The technique is to tighten it like hell and then give the suspension forging a good whack on one side with a heavy hammer on both sides. They do go in the end but if it is the first time since the car was built, well they are tight. Once undone, you might find a non-standard boot that fits actually. I ended up fitting grease nipples to mine as the grease dried out long before they wore out.

My rivets's ends (first time, back 30 years ago) came off with a cold chisel!

The really difficult job can be the upper wishbone pin. We have colleagues who have had to drill them out - horrendous thought. My R8 had them properly greased at the factory and they slid easily but R10 "fully seized" stories are common. Aaarggh.

If you are upping the power and fixing the suspension and buying tyres, why not invest more in the shocks? Sorry, not assuming you are made of money of course.....
 
Yeah John, I do see exactly where you are coming from. The Financial Director has been suitably sucked up to and Konis it shall be..

Meanwhile, another nasty little surprise has surfaced - I originally noticed that the lower shock absorber bracket is 'significantly' bent and I have bought a replacement (right side). Also noted is damage to the lower shock absorber rubber (missing, basically) in the same area. Imagine how surprised I was to find that the lower A arm on that side is very stiff in movement and of the 4 bolts that hold the mountings on, two are bent and one is jammed and will not release. This obviously indicates that the impact that damaged the lower shock mount also has damaged the other components around the lower A arm area.

At this stage I am thinking that the removal of the lower A arm pivot bolt will allow me to (a) remove the A arm and (b) allow me some extra room to work out how to remove the mounting parts for the A arm. I can then compare the other A arm to this one and check it for any deformation, there has to be some there, either on the A arm or on the chassis itself. Fun times ahead !!!

BP
Good re Konis!!!

Bad re lower arm bolts. They are a mix of 10.5 mm and 10 mm shanks. Sounds like a coffee with our friend might be a good idea - that cross member isn't strong where the four bolts go through. I think it is AVP who has a product that reinforces exactly that area. I bought a set of new bolts from Mecaparts. There'd be RCCQ folk with wishbones that haven't had a whack with any luck.
 
forgot to mention there is an awful looking chassis weld around that area too - Murphy strikes again - BFF, we need to talk.......
 
Some good news, some not so good - I have finally removed the lower A arm by using a grinder with a small diamond tip disc - problem now is that I am hopeful the seized section of bolt in the housing will come out with an EzyOut thingo - fingers crossed. A 'mishap' occurred when I was grinding and I have put a small cut on the main beam that the A arm bushes attach to. I am going to ask my BFF for a coffee so he can advise (I'm too embarrassed to post a pic here).

The good news is that I have made up a tool (based on the brilliant information sent to me by John W - thanks again m8) and the first of four lower A arm Silentbloc bushes came out like a charm, as did the shaft. Just about to head back down to the toy shed to do the others - might try that last nut on the steering shaft connection while I'm at it so the steering rack is off for checking.

cheers big ears,

BP
 
Hi, Great to see another R10 being resurrected from the dust! I know the task quite well. I have many parts here if you require suspension parts etc. there is also a huge stack of spares being sold on Facebook Reno enthusiasts page atm for $500. The 10S head with bolt straight on the 12 motor, but the 12 heads are 8 port standard so basically a 10S head, you will need a 10S inlet manifold, I have a spare. I have a spare set of extractors here, only require a bit of welding. These with the weber really do the business. What colour is your interior? I have a good front seat in black and there is another great front seat, black, in the spares just mentioned. Good luck with the project, all fantastic fun. Cheers, Greg
 
Some good news, some not so good - I have finally removed the lower A arm by using a grinder with a small diamond tip disc - problem now is that I am hopeful the seized section of bolt in the housing will come out with an EzyOut thingo - fingers crossed. A 'mishap' occurred when I was grinding and I have put a small cut on the main beam that the A arm bushes attach to. I am going to ask my BFF for a coffee so he can advise (I'm too embarrassed to post a pic here).

The good news is that I have made up a tool (based on the brilliant information sent to me by John W - thanks again m8) and the first of four lower A arm Silentbloc bushes came out like a charm, as did the shaft. Just about to head back down to the toy shed to do the others - might try that last nut on the steering shaft connection while I'm at it so the steering rack is off for checking.

cheers big ears,

BP
How about the upper arm inner pins?
 
well it goes on - firstly, thanks so much to Greg for your response, I will be keeping your thoughts handy, especially the chance of bolting on some extractors. Even though John W did warn me about 'taking it easy' I did get a little over excited this afternoon and might have to take a few days off - I honestly thought the nymph node removal was a doddle, not so...it's not a good idea to feel a little better and then start belting things with a hammer - 'nuff said

first point - all of the Silentbloc bearings are out now - one of the lower A arm bolts came out beautifully, the one from the 'bent' side needed some 'significant persuasion' - eventually it came out, I checked the 'good' bolt into the 'bent' side to see if there was any significant deviation, it didn't line up perfectly with the other side but it ended up slipping into the other mounting with no problem, indicating to me that the A arm was not twisted or bent

Hey John, I haven't even looked at the upper A arms yet because I have been so focussed on getting the lower arms off and ready for painting and fitting of the new Silentbloc bearings, not to mention the removal of the old ball joints. Not sure I mentioned this - the old ball joints show nil wear, only being replaced because the perished rubbers will not pass roadworthy. Having read some of the horror stories associated with the upper arm pins, I'm not looking forward to that task

still considering the removal of the seized bolt from one of the brackets, hoping an EzyOut will do the trick - otherwise I will probably be looking at a whole new set of mounting brackets including new A arm major bolts

sorry if some of this doesn't make sense, perhaps after a 'fun' day in the workshop I should have reduced the intake of red vino in order to get a good nights sleep....which is what I need to do right now

cheers big ears

BP
 
sorry Greg, forgot to mention, I actually have two R10s, one with an 10S dashboard and the one I am working on now with the R12 motor - did I mention the R16TS that is close to getting on the road....

so many Renaults, so little time...

BP
 
I really don't like the sound of that Easi-out! Others advice, and my own experience, is that they break off (unless the bolt or rod to be removed is not jammed, but free to move). They are hardened steel, and therefore brittle. This makes them a) likely to break when twisted and b) very hard to drill out (much more so than the original bolt or rod).

Hopefully others will have alternative suggestions...

Cheers

Alec
 
Be VERY wary of Eazi-outs. (Ask me how I know!)
Armadillo is right on the money.
A safer way is to Mig weld a nut onto the broken bolt, wait a while e.g. have lunch then unscrew it.
If you can sift thru my Dauphine resto thread you'll see how I removed a broken bolt on the cylinder head.
Even if the broken stud is nearly flush, the nut CAN be welded on successflully
 
Top