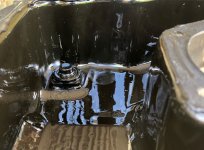
Many Fault Code for 2008, MY 2018 1.2Lt

That's is sounding hopeful. Is there signs of silicon around the motor anywhere? ie: has anyone had it apart in the past and "over siliconed" it on assembly (that stuff finds its way to the pump pickup as well).
Hi Shane.

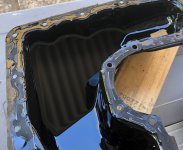
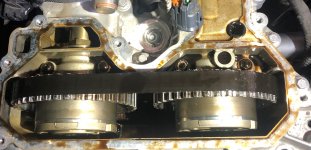
I haven't inspected the lower sump to upper sump join closely, but I don't believe that the sump has been removed previously as it all looks original.

Re the oil pressure, it's partially the reason I have been finalising which OBD2 scanner I purchase, so that I can see live data. But without a known accurate pressure gauge plumbed into circuit, to compare the live data stream to, there is not much point. I also don't know the pressure that the P15A1- low oil pressure fault code is triggered at.

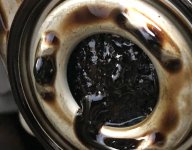
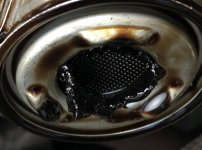
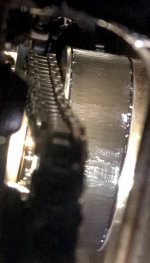
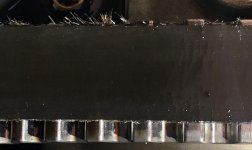
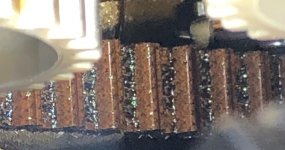
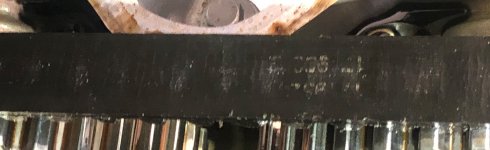
The pragmatic next action now is to remove the lower sump to gain visual access to the cam drive belt and oil pump pickup strainer. I will purchase some sealer, so that I can put the sump back on again to keep the vehicle mobile for Mrs Whippet as she won't drive my vehicle, then schedule a half day to remove, inspect and replace it.

Cheers.
 
You will be able to see the condition of the belt by removing the oil separator / black plastic engine cover. No need to remove the fuel pump or injectors. Finding nothing at the timing electrovalve doesn't mean there will be nothing at the vacuum pump, oil control solenoid or oil pickup. Debris can also accumulate on the hidden side of an oil pickup gauze.
 
Hi.

David S, I agree with your comments regarding the exhaust camshaft timing electrovalve, but it is very easy to remove and inspect so I did it first, then the oil filter, then the engine oil.

I think that I have to sight the oil pump pickup strainer as my next step to rule this out as the cause for the low oil pressure fault code. Depending on what I find, I might also remove the black plastic oil separator / engine cover to get a better visual of the cam drive belt as it is fairly easy to access.

Note: I did have an observer looking at the rear of the timing belt through the oil filler hole, as I was turning the engine over via the crankshaft many times. We couldn't see any part numbers or other markings along the length of the rear of the belt. Maybe the belt never had any markings, or they have worn away via running past the idler and tensioner pulleys. I don't know.

Also I can see via the oil filler hole that the camshaft drive pulley does not have any lips, like I understand the later production engines have.

Cheers.
 
Hi.

I had access to the Mrs Whippets 2008 (Build date: May 2017) for most of today, so I removed the sump from the EB2ADT engine. This is very easy to access and remove.

The below images show that the oil pump pick-up strainer was partially blocked by coalesced debris. When the clumps of debris are opened up it is obvious that they originated from the rear layer of the camshaft drive belt. This will explain why I was unable to see any part numbers on the whole length of the cam drive belt via the oil filler, as per my last post #43.

The debris will also be the cause of partial oil pump cavitation with resultant intermittent low engine oil pressure, hence the in-dash alert warning and logged "P15A1-21 Intermittent Lubrication system-Oil pressure too low in mechanical mode" fault code.

Also you can see that the rear surface of the cam drive belt is smooth and has hairline cracks across the rear, made easier to see as the belt rotates around the crankshaft drive pulley.

The debris cleaned away from the strainer very easily. I consider that the entire layer from the rear surface of the camshaft drive belt has now delaminated and what has coalesced on the oil pump strainer has now been removed. There will be little more remaining to shed, as the entire length of the cam drive belt is smooth.

Cheers.
 

Attachments

  • Oil Pump Strainer - foreign matter A.jpg
    Oil Pump Strainer - foreign matter A.jpg
    728.3 KB · Views: 113
  • Oil Pump Strainer - foreign matter B.jpg
    Oil Pump Strainer - foreign matter B.jpg
    473 KB · Views: 102
  • Oil Pump Strainer - foreign matter CR.jpg
    Oil Pump Strainer - foreign matter CR.jpg
    448.9 KB · Views: 108
  • Oil Pump Strainer - foreign matter DR.jpg
    Oil Pump Strainer - foreign matter DR.jpg
    480.2 KB · Views: 107
  • Camshaft drive belt - Smooth side with cracks - crank pulley view.jpg
    Camshaft drive belt - Smooth side with cracks - crank pulley view.jpg
    329.3 KB · Views: 112
Hi.

Of incidental interest.

After I drained the engine oil from the sump and refitted the drain plug, then removed the sump, I was a bit surprised that there was a reasonable quantity of oil remaining, that is unable to drain due to the recessed drian plug creating a small weir. I tipped this oil into the cut apart oil filter which has a volume of 275ml. These engines have an oil change volume of 3.5Lt.

Cheers.
 

Attachments

  • 275ml undrained oil in sump.jpg
    275ml undrained oil in sump.jpg
    467.9 KB · Views: 96
  • Undrained oil in sump.jpg
    Undrained oil in sump.jpg
    910.6 KB · Views: 95
  • Undrained oil in sump - volume created by recessed drain plug R.jpg
    Undrained oil in sump - volume created by recessed drain plug R.jpg
    431.2 KB · Views: 113
:eek: :eek:

Just as well you didn't ignore that problem. You are going to have to change that belt, or it will just happen again!
 
hence stop driving it as cam belt has had its days, great photos and investigation.

I dont think any regular engine flush would clean that strainer so sump removal must be part of the cam belt replacement??
 
That's actually quite bad, but hadn't yet displaced the pickup gauze.
Your belt has started to crack on the back, but it has not shed the webbing. Compare the photos in post #9. I don't think you are seeing pieces of displaced 'webbing' here, just an accumulation of debris from the teeth of the belt formed against the gauze to look like it is woven.
Remove the cup that retains the gauze and clean the other side of it because it will be choked. You also need to remove the oil solenoid and may find debris at the turbo feed banjo on the block and at vacuum pump oil feed.
That pan appears to have two types of sealant on it, so may have been off before and that's likely why it was 'easy' to remove.
 
Last edited:
Hi David S.

Thanks for your comments.

Your belt has started to crack on the back, but it has not shed the webbing. Compare the photos in post #9. I don't think you are seeing pieces of displaced 'webbing' here, just an accumulation of debris from the teeth of the belt formed against the gauze to look like it is woven.
When I teased out the clumps of debris, most have revealed to be thumbnail size flat pieces. I had assumed that these were from the outside/rear of the cam drive belt, as that would explain why there are no markings on the belt. In the video I posted in #32 the back of the belt looks very similar to mine, smooth with hairline cracks, but the white part numbers are still visible. There are no markings on the rear of the cam belt in our vehicle.

But is saying the above I think that you are correct as the rear of the belt is very smooth and the debris in post #44 are textured like a woven fabric, I now tend to think they are from the toothed side of the belt.

I have yet to sight the toothed/driven side of the cam belt. I will need to remove the upper black plastic cam covers to gain access to achieve this. I might do this in the next few days, now that I have spare sealant.

1674643993797.png

Tomorrow I will wash the remaining debris in petrol and see how many more pieces I can tease out.


That's actually quite bad, but hadn't yet displaced the pickup gauze. Remove the cup that retains the gauze and clean the other side of it because it will be choked. You also need to remove the oil solenoid and may find debris at the turbo feed banjo on the block and at vacuum pump oil feed.
I was unsure if I should have removed the pressed metal cup that is pressed into the alloy housing, thus retaining the gauze; as I didn't want to get in a situation with a vehicle that can't be used for Mrs Whippet. The debris came away very readily from the upstream side of the gauze, so I left it at that.

If debris has clogged the downstream side of the gauze I would have anticiptated some would have also passed the gauze and entered the pump. Hence I am surprised that I didn't find any debris at all when I cut the oil filter in half and opened and washed out the paper filter pleats as per post #39.

Tomorrow I will remove the turbo oil feed banjo and vacuum pump oil feeds to check for debris.

The oil pump solenoid and gauze will have to wait until the sump is removed again.

That pan appears to have two types of sealant on it, so may have been off before and that's likely why it was 'easy' to remove.

As mentioned in post #12, we purchased the vehicle with 8,000km on it as an ex-demo/staff vehicle from a Peugeot dealer in Melbourne, they had several to select from and I believe that we are the second owner. I would not have expected the oil pan to have been removed within the first 8,000km, and I have never been removed it while we have owned it, until today. The oil pan was very easy to access visually and physically, and bolts unscrewed with a battery drill and 8mm socket, but the sealant was adhering well and it took a bit of prying force to initially break the seal and separate the oil pan from the upper sump. I needed to carefully panel beat the bent lip so that the parting surface was flat again. Attached is a better image of the black sealant - (because of the auto white balance the black subject shows as grey in the image).

Note: The two longer studs on each side of the upper sump were very convienient to hold the oil pan up with the nuts loosly started, but not touching the upper sump, during the refitting process.

1674644862598.png


Cheers.
 
Last edited:
have you considered that some of this debris could have come from a belt that was replaced prior to your purchase ,[were did the big chunks come from ] 8k is not a lot but if some of the early belts were problematic ,could be it was replaced as a precaution and ,the sump was never removed !
 
Hi.

I removed the black phaser pulley cover to gain visual access to the camshaft drive belt.

  • There is some fraying on the edges of the belt.
  • I can now see some faint white part numbers on the rear of the belt.
  • (Blurry) Image of the teeth side of belt - it's difficult to hold the light, iPhone, focus and release shutter all at the same time.

As David S mentioned previously the images confirm that the debris is not from the rear of the belt, but the tooth side.

David S and dmccurtayne - Does this look like an original cam belt fitted onto a May 2017 production date vehicle?

Cheers.
 

Attachments

  • Cam Belt - frayed edge.jpg
    Cam Belt - frayed edge.jpg
    381.4 KB · Views: 92
  • Cam belt - teeth side.jpg
    Cam belt - teeth side.jpg
    243.4 KB · Views: 98
  • Cam belt - white part number.jpg
    Cam belt - white part number.jpg
    371.7 KB · Views: 91
  • Top view of phaser pulleys and belt.jpg
    Top view of phaser pulleys and belt.jpg
    729.3 KB · Views: 101
have you considered that some of this debris could have come from a belt that was replaced prior to your purchase ,[were did the big chunks come from ] 8k is not a lot but if some of the early belts were problematic ,could be it was replaced as a precaution and ,the sump was never removed !
Hi pugwash.

Yes this could have occured, I can't rule it in or out.

According to David S the debris originates from the toothed side of the belt.

Cheers.
 
Hi.

The replacement drive belt has finally arrived from Estonia after order placement on 8 Feb 2023. According to my research the Dayco 941128 is the latest revision of these cam drive belts, so I am pleased with that. The cost was AU$43.07 (excluding freight and other parts)

I am now waiting on the camshaft locking tool to arrive from UK.

I also took the opportunity to order the other two drive belts and a set of spark plugs as they were much lower cost than available locally and also to amortise the freight costs.

Cheers

1677802429112.png
 
I assume one of those is the water pump belt, which you should replace with the timing belt. Have you obtained the other sundries you will need as a bare minimum here? 6 x pulley bolts + crank bolt + the two plastic plugs in the front of head + seals. Always replace the bolts, but if you are careful, you can reuse the plugs, seals and maybe even the crank seal, which is relatively costly by itself.
 
Hi David S.

Good reminder, thanks.

I had overlooked the torque to yield bolts, and as they are single use I will investigate sourcing from Peugeot or alternative options. I still have some time until the camshaft locking tool arrives.

I am aware the single crankshaft bolt that clamps the lower drive pulley is Grade 12.9, 18mm AF hex-flanged head as per below snippet.
1677829927183.png


Do you happen to know it's dimensions? I suspect it is M14 - 1.5P x about 70mm length from under the head. The below would be a good substiture if I cannot obtain one from Peugeot.
1677827534123.png

Do you also know if the bolt is assembled dry, or oil lubricated on threads and under the flanged head? I will torque to 50Nm then 180 degree part turn.

The crankshaft mounted pulley on our vehicle has three bolts. I can easily remove one to obtain the size and grade. Torque to 20Nm, then 25Nm then 45 degree part turn.

I was intending to use the same elastomeric sealer on the two plugs as the sump and cam cover, as per you suggestion.

If I need a shaft seal, I can alway obtain one locally, unless it is a bespoke size. There is no leak currently and if I am careful during removal and reassembly hopefully I won't nick the sealing lip.

Yes - the other belts are water pump and alternator/AC compressor drive belts.

PS: I am still trying to make up ground from my three speeding fines ($921) on our Canberra trip last year. Not sure I will ever be released from purgatory. But it's been pleasant enough in here even though I am on red wine rations!

Cheers
 
It is possible to save the crankshaft seal, but it is usually replaced and comes as part of the factory timing belt kit.
Your torque figures appear to be correct.

Don't mess about with the bolts. Just buy them over the counter from the local dealer to get the correct specification as they are inexpensive.
You can confirm via your VIN, but I expect you would want (with approx cost):
1 x 9817665180 Crankshaft bolt. M14X74 ($12)
6 x 9810177780 pulley bolts. M8X125-25 ($3 each)
You may also need the vacuum pump seal 9801728380 ($25)

If you disturb the cam sprocket bolts, you must replace them. These are 2 x 1608706680 M10X100 L35 ($3 each) but if you have the non-lipped sprockets and have bought the later tooling to lock one camshaft via the vacuum pump opening, then you have no need to disturb these bolts.
 
Last edited:
Hi.

Thanks for the information, part numbers and confirming the torques for fasteners.

The cost for the Peugeot fasteners seem reasonable, I will get them ordered locally.

I will assemble the crankshaft bolt with oil lubrication on threads and under the flanged head. I have retrieved my torque wrench from my brother, and will check the calibration prior to use.

The engine in our vehicle has the non lipped cam pulleys, so will plan to leave the camshaft bolts untouched, but at that low cost I might purchase them anyway, so as to not delay the job if they were needed. I have ordered the later AST5255 camshaft timing and holding kit - see below image.
1677878455121.png


I can easily access the vacuum pump, at a later stage if I need to replace that seal.

The job aligns with the 75,000km scheduled engine oil change, so will need to purchase an oil filter. I already have the enigne oil.


Cheers.
 
You certainly prompted everyone to go an look at there cambelts. My father has had a good look at the cambelt in his (cactus). It has quite prominent text still clearly identifiable on the belt. His car is a similar age to yours, so he must have fluked getting the updated belt fitted.

I'm quite suprised this isn't a recall to replace this belt on all vehicles that may have this issue.
You need to look carefully the problem normally starts at the drive side of the belt
 
Top