Is this the best project car you have ever seen?

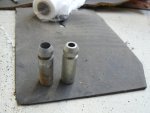
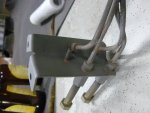
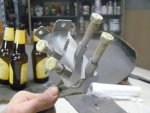
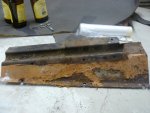
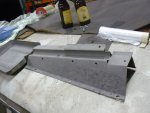
That's curious, Shane, all these sections are aluminium on my '62.

All three here are metal... Betcha someone has changed yours in the last 50years at some point
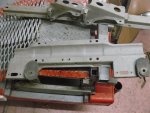
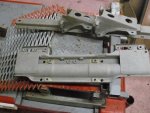
 :) My guess is the metal sections were cheaper and easier to transport without damage for the CKD build cars.

seeya,
Shane L.
 
There could well be a difference between Middlemoon's 62 and Shane's latest project..a 62 doesn't have a radiator duct and from memory both our 61 and 62s had steel U shaped brace to support the spare wheel and a webbing strap that just hooked into the "vertical" walls, with a single 12mm bolt at each end....the inners of the front wings of course are different too ..the Shane projectmobile will have open wings and a first nose the wing inners are totally enclosing as the entire mudguard acts as the ventilation air duct..the rubbernosed Shanemobile will have a cardboard tube duct between the front bumper and the firewall.
 
agree my 62 has no duct and guards have closed fiberglass ducts built in and cross brace is steel as per my d special
 
Oh yeah, forgot his was a 1st nose.... Yep very different. I've never had one here, but even the hull is quite different :)

seeya,
Shane L.
 
Yes mine's all original - you can tell by the consistency of the patina. I've got some good pics of original engine bays you might need when your putting all this back together.....
 
The pre '63s will be very different I imagine :)

I didn't get anything done really over the weekend (kids birthday parties ..... I spent a lot of saturday sand blasting rollers and brackets from my brothers boat trailer .... not only that they drank all my beer while they were here :cheers: :adrink: ).

Anyway, tonight I noticed the sandblaster wouldn't work very well.... Bugger me ... check this out:

attachment.php


It's worn the tip out ... it's actually holed through the side! Gee's they don't last long.

attachment.php


This is the hydraulic lines that run under the motor. The line fitting is M9 x 1.25.... There must be bugger all of them on later cars as that's every single M9 bolt i had there.

attachment.php


attachment.php


attachment.php


Pretty looking thing isn't it .... Pitty I'll have to paint it!

attachment.php


attachment.php


attachment.php


It's interesting to note most ( well all ) stuff on these old cars seems to be bronzed together... Everything on the GS & CX's is MIG/Ark/Spot welded together.

attachment.php


attachment.php


The accellerator pedal mount box looks like it'll be fine too. A bit of surface rust, but ok.

seeya,
Shane L.
 

Attachments

  • P1060003.JPG
    P1060003.JPG
    63.6 KB · Views: 1,059
  • P1050995.JPG
    P1050995.JPG
    71.8 KB · Views: 1,053
  • P1050999.JPG
    P1050999.JPG
    78.9 KB · Views: 1,023
  • P1060001.JPG
    P1060001.JPG
    70.2 KB · Views: 1,047
  • P1060005.JPG
    P1060005.JPG
    86.7 KB · Views: 1,008
  • P1060009.JPG
    P1060009.JPG
    65.4 KB · Views: 1,035
  • P1060010.JPG
    P1060010.JPG
    81 KB · Views: 1,038
  • P1060011.JPG
    P1060011.JPG
    76.3 KB · Views: 1,077
  • P1060013.JPG
    P1060013.JPG
    72.7 KB · Views: 1,396
  • P1060016.JPG
    P1060016.JPG
    66.8 KB · Views: 1,426
Blaster

Hi Shane,
See if you can get the ceramic tipped nozzles next time you buy them as they last a lot longer and they were not much more the last time I got some.

You going to have to change your name from Double chevron to "Blaster" or "Sandman" as you seem to be blasting every bit of the car.....:headbang::headbang::headbang:

Just the best restoration commentary ever... The detail and photos are the best.

keep it coming

Cheers

Colin

Thanks, but no thanks ..... I've stood at the sandblaster long enough to last any one person a lifetime ... over the last week ..... No way do I want to do more. If there was a simpler way of cleaning the paint off all this stuff ..... I'd do it in a heartbeat. Standing there pulling a trigger is easiest that I've found though :roflmao:

My father was asking me am I going to do the gearbox too :roflmao: How bloody nutts do poeple think I am :eek: ... You'd have to pull the damn gearbox down to each and every individual component if you did that to ensure there isn't a trace of blasting abbrasive in it anywhere.

I'll degrease/pressure wash it.... It doesn't matter if it fills with water as I'll drain it and add new oil after it's cleaned either way. If you filled it with abrasive, you might as well chuck it out now and save yourself the effort of pulling it back out the car.

As for piccies, I find them a great resource to refer back to at a later stage for competelly unrelated stuff ( eg: "This is what a CX centering cam looks like" ... if someone wants to adjust the straight running of a car... You go find a piccie where you have dismantled a car to that point and show the adjuster).

Now we can refer back to all these piccies if anyone asks about specific 'D' parts and say "This is the bit you need to adjust/remove/etc...".

seeya,
Shane L.
 
Love the project having been there a year ago. Wish I had that clock. Be careful sandblasting the fiberglass roof!! Left mine with pock marks. Silly.
 
Love the project having been there a year ago. Wish I had that clock. Be careful sandblasting the fiberglass roof!! Left mine with pock marks. Silly.

Thanks,

I'm not going to sandblast any of the panels unless there is no other choice. It's too slow going, those "stripper" discs for sander polishers are more effective IMO. The roof on this car is aluminium... It's a good sound roof, however has quite a few dents.

I don't want to mess with the roof, the other panels I'll be able to get good 'n' smooth and close to "metal finishing" on. However the aluminium I'm concerned will work harden if I go near it. So i'll just shrink any highs down with the shrinking disc.... and not work the lows up at all. I'll put body filler straight over it. The old "Cave and pave" method of bodywork has to be best where aluminium is concerned... especially for someone like me that tends to learn by buggering everything up first ... and there's no replacement roof for me to use :roflmao:

This is a long way off. I intend to get the car on the road, sorted and driving before any of it's body panels are touched.

seeya,
Shane L.
 
do not go near the roof with your shrink'n disc Shane read the disc instructions not for alloy steel only
 
do not go near the roof with your shrink'n disc Shane read the disc instructions not for alloy steel only

They should work, you just need to use them more gently. Far, far less dangerous than trying to shrink with a torch IMO (I'd NEVER attempt that !!).

Aluminium is a bugger to worth with for us tinkerers at home with little experience with the stuff. Normal steel panels you can work to death with little fear of damaging the underlying metal. Aluminium will work harden though!

http://www.metalmeet.com/forum/archive/index.php/t-5617.html

seeya,
Shane L.
 
I was really precious about my aluminium roof when I had to paint and re-seal it. I needn't have worried. Six Vietnamese guys (working in unison) popped it, stripped it with chemical stripper, re-did the channel. It was in primer same day. The two 'elders' had seen it all before. God they were good. Blow me down six years later when there was a bit of electrical activity going on at the margin - popped it again on the spot. 'We friends Tim...I fix for you straight like new'. They did too and charged me bugger all.


In Melbourne with a D and want the best value re-paint and friendliest guys? PM me. And my body colour? 'Very nice colour, French colour - I make for you'. Escale Blonde - they knew it.

Tim
 
Shane aluminum will not shrink with the disc heat you have to use a shrinking hammer ie fine meat tenderizer type and then work it inward I have learn t this from experience
 
Shane aluminum will not shrink with the disc heat you have to use a shrinking hammer ie fine meat tenderizer type and then work it inward I have learn t this from experience

Bugger, I had hopes that would work... I asked on the autobody board, and surprisngly I've had next to no response. I can only assume they replace any damaged aluminium panels on new cars :confused:

The aluminum panels are probably already work hardened from the stamping process.
You can't use steel tools on the dents, but you can use a wooden mallet along with a
block of wood to bump the low spots up. Take it slow and easy and use a propane
torch to warm the metal.

Don't try to get the dent level like you would with steel. Just get the contour close
and then fill it.

This is the only response I've had so far, no mention of using the shrinking disc working though :(

If there's highs in the roof, I guess I'll bang a dent into the blacks cars roof and see if I can shrink it down somehow without damage (it's roofs already trashed, it's corroded away around the edges). If a torch works, so should a shrinking disc too... You see all they both do is heat the metal.

seeya,
Shane L.
 
I'm itching to get back to this ... I haven't had a chance to tinker with the car for a week or so now :(

Now I've looked through the manuals I have here. The damper motor is a "DW" (spotted by Roger). What is a DW ? The manuals I have only really mention that later motors. The original motor just says "ID19P" and the engine number on it's plate.

Maybe it's from a Slough Built "DW" ? This is the only reference I can find to "DW".
http://www.citroenet.org.uk/foreign/slough/d-series/ds-08.html

I wonder what the motor is then ... it's block is cast "DM 114 - I V". I wonder if it's the "huge" :roflmao: 83hp motor rather than 66hp.

I'm getting "flash rust" on the blasted bits almost immediatly. I managed to get a cheapo detail gun of fleabay to prime the small bits with ...................

http://cgi.ebay.com.au/ws/eBayISAPI...eName=STRK:MEWNX:IT&_trksid=p3984.m1439.l2649

A bloody full sized gun has arrived in the mail ... I'll have to email them and ask them exactly what they think a detail gun is :rolleyes: I should have noticed it said "0.6litre cup" ... obviously not a detail gun.

seeya,
Shane L.
 
Oh Yeah,

How amazing and perfect is this:

attachment.php


What would we do without the amazing poeple around this place.

Yeah, I have no idea what it actually says either :roflmao: ...

seeya,
Shane L.
 

Attachments

  • dalek miofiltre2.jpg
    dalek miofiltre2.jpg
    97 KB · Views: 1,273
Oh Yeah,

How amazing and perfect is this:

What would we do without the amazing poeple around this place.

Yeah, I have no idea what it actually says either :roflmao: ...

seeya,
Shane L.

Yep, you won't find those on Ebay :tongue:

Cheers
Chris
 
I won't mention names or some poor b@stard will be in-undated with requests ..... So I certainly won't show these ones :p

attachment.php


attachment.php


Something about changing the oil every 6000kms :confused:

seeya,
Shane L.
 

Attachments

  • Rocker_Breather_art2.jpg
    Rocker_Breather_art2.jpg
    37.9 KB · Views: 1,337
  • Rocker_breather_sticker1.jpg
    Rocker_breather_sticker1.jpg
    98.1 KB · Views: 1,337
Last edited:
Shane.
In the past I have straightened a lot of pressed aluminium m/cycle frames and the method I used to keep track of the temperature was to put a number of marks on the aluminium with a Texta and heat carefully and not localised . When the texta mark goes away stop, the aluminium will be quite workable without danger of melting.I used LPG and Oxygen for heating .On a big area like a roof the heat runs away very rapidly so you need a fair bit of heat from a large soft torch. Hence the Texta to allow you to keep the heat even.
Hope this helps
Regards Dennis.
 
Top