Gawd, another R8 upgrade

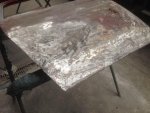
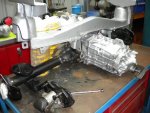
Found a fundamental design flaw in my design. The cross members on the R8 have a hump in the middle that hangs down lower than the outside so it "rocks" on the centre bit unnervingly. I'm halfway through making some 5mm plates to weld two on each corner to pack it up so it sits level.

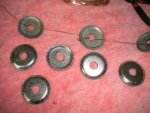
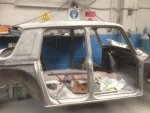
I also made 4 plates that have a long bolt through it with a spacer that I can use as a retaining bracket to ensure the shell doesn't bounce off the trolley when wheeling it around.
 
Well my two plate theory wasn't high enough so I had to cut some 20mm SHS about 70mm long and weld a piece on each side at the front. I'll try it just with the SHS on the front only and see how it goes.

When I threw some old offcuts in there before pulling it out to weld, it seems to level it out nicely so we'll see how it goes. Then discovered I'd run out of teal blue spray cans, so off to the junk shop for a couple of cans - had to economise with only two as they'd gone up to $4 each!
 
Some good news today!
I was supposed to ring the panelbeater yesterday to discuss a start date but couldn't get hold of him. When he rang me back it was during the RCCA meeting and I missed the call - I am seriously impressed at how he ALWAYS returns calls!

Spoke to him today and weather dependent, I'm dropping off the shell to commence next Tues or Wed. I've already lined up a couple of AF'r friends to help man handle the shell onto the trailer. So, the next phase begins!
 
KB
As much as I like your trestle trolley for moving on, I feel it is a bit heavy and difficult to work under the car.

Bolt on frames and 2 channel ramps, and I load it myself. Mainly as there are fewer AF friends this side of the island. They can fit all rear engined cars, with small mods even worked on the R5 mid engine.

Blue G Back from Paint 3 sml.jpg8G to Blast 2 sml.jpgA110 to Paint 2 sml.jpg

Ray
 
Nice Ray. I gather it uses the rear cross member bolt holes at the back. Where does it bolt at the front?

Also, is that reinforcing on the R8G shell at the rear shock tower position std on Gordini's?
I know R8's often split or get damaged there.
 
KB
As much as I like your trestle trolley for moving on, I feel it is a bit heavy and difficult to work under the car.

Bolt on frames and 2 channel ramps, and I load it myself. Mainly as there are fewer AF friends this side of the island. They can fit all rear engined cars, with small mods even worked on the R5 mid engine.

View attachment 79211View attachment 79212View attachment 79213

Ray

Nice idea there Ray.

Do you have pics of the frames on their own?
 
KB, front mounts to front suspension holes on subframe, or like on the Dauph at present with an extension to the front bumper mount positions, as the front crossmember is in process of "repair" to R10. There are 3 main reinforcings on the R8G. The rear crossmember mounts area, front and rear of the front suspension area and bottom of the A pillar just under the bonnet. You need a parts book page to see them all.

Col, I have no pictures of the frames out of the car, as there was only short time between R8G and A110. What I will do is sketch them up with dimensions and post them with more pictures. I have used the idea for a long time, but these were made just recently when I opened my workshop for customer projects. And my Dauph project.
 
Ray, the other advantage of yours over mine is that yours supports the shell front and back whereas mine tends to balance it across the two centre cross members under the car which are fairly narrowly spaced apart - I was concerned about that hence the additional plates to "lock" the shell onto the trolley. I also considered using a tiedown through the front cross member hole as a secondary security measure.

The disadvantage of yours however is that you can't install the rear cross member or presumably front control arms etc without removing it off your trolley somehow. Although if it was the full transmission on mine it would probably over balance also. Do you have another stand or similar for that reassembly stage?

KB
 
I have used the idea for a long time, but these were made just recently when I opened my workshop for customer projects. And my Dauph project.

Sorry to hijack KB, but Ray, do you have photos of the Dauph project for us to drool over? :tongue: In another thread of course, like the Dauph thread :wink2:
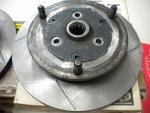
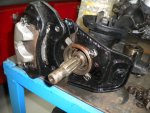
 
Revival of an older Thread,
Sorry it has taken so long to complete the task.
The A110 came back from paint today and I was able to get under and take measurements.

The wheels are Bunnings, and that size to take the load in partial rebuild.

Any questions, just ask !!!

Renault Trans Trolleys.jpgPaint 2.jpgPaint 3.jpg
 
Thanks Ray, good advice and drawings there.
The subject of this thread is still away at the panelbeaters whom I have not spoken to since dropping off the shell early January.
I did intend to ring and get an update or drop over there but with the storm damage to the garage, I'm not keen on hurrying him up at this stage in case he completes it in a rush and wants me to take it back during the garage reconstruction phase. It's safe in his workshop for the moment!
 
I dropped into see the car this week. The panelbeater has had it since early Jan. the body hasn't been touched - apart from sanding dust covering it (at least that may stop it rusting!) and he has started stripping the doors. Lots of bog, dents and poor previous patching evident. Didn't think they'd be that bad but given the state of the bodyshell maybe it shouldn't surprise me. The drain channels are missing off most of the doors so the drain holes drilled in their place may have to remain.

His lack of pace is only balanced by the fact I can't take the car back before July anyhow on account of the storm damaged shed situation.
I'll leave it another month and go again. He did say he'd start the bodyshell "next week". To top it off, I took my camera and it shut down on the first photo I went to take due to flat battery so I only have a few photos on my phone. When I get back to work next week, I'll download them and post a couple up.
 

Attachments

  • IMG_1083.jpg
    IMG_1083.jpg
    40.4 KB · Views: 376
  • IMG_1084.jpg
    IMG_1084.jpg
    37.9 KB · Views: 351
  • IMG_1080.jpg
    IMG_1080.jpg
    37.7 KB · Views: 376
  • IMG_1081.jpg
    IMG_1081.jpg
    44.4 KB · Views: 390
Last edited:
Doing a trial fit of the new rear brake kit I got and reassembling the gearbox ready for when the shell comes back from the panelbeaters.
R16 discs and Fiat calipers :banana:
 

Attachments

  • DSCN2820.jpg
    DSCN2820.jpg
    97.5 KB · Views: 380
  • DSCN2823.jpg
    DSCN2823.jpg
    92.1 KB · Views: 386
  • DSCN2831.jpg
    DSCN2831.jpg
    94.9 KB · Views: 401
Those brakes should be adequate. :) Neat fitting.

How's the body going?

Cheers
 
Those brakes should be adequate. :) Neat fitting.

How's the body going?

Cheers

Elle and I have agreed on a break to see other people for a while. In my case, my wife Roz.
 
It's a miserable wet night in Sydney tonight, so I thought I would have a play with the new plating kit setup I got last xmas. Since the garage drama, I haven't had anywhere to set it back up until now. I bench was constructed over the compressor and most of the kit resides there. This was my first chance to try one of the plating techniques that use the power supply and current. Up until I've done electroless nickel. Tonight I gave the cobalt nickel kit a run.

I think my current may have been too high as the pieces have tiny lumps of coating on them. I also put very little effort into pre-cleaning and polishing prior to plating. Not unhappy with the results for a first play. This one also uses a high temp (50-60C) so evaporation of the plating chemical is also fairly high. Copper and Zinc use ambient I believe.
 

Attachments

  • DSCN2833.jpg
    DSCN2833.jpg
    87.1 KB · Views: 352
  • DSCN2834.jpg
    DSCN2834.jpg
    85 KB · Views: 350
  • DSCN2836.jpg
    DSCN2836.jpg
    99.7 KB · Views: 336
Looks like a good start. Can you redissolve that metal and replate with the kit you have?
 
No John, I don't believe so.
The plating solution can be decanted back into the drum and reused but not the metal itself. I think there is a way of reversing some plating using a reverse current but I've not looked into that.

The anodes need to be rinsed and reused.
The second batch of washers came out much better. I'm currently working on the third batch.

They are shock absorber washers in case anyone didn't recognise them so they'll be largely out of sight.
 
Thanks Kevin,

I guess it would be easy enough to reverse, i.e. dissolve, but you end up with impurities dissolved too, like copper, and I imagine your solution would be quite pure and you'd want to keep it that way.. Nasty stuff too, quite toxic I imagine.

Chromed shocker washers indeed. That's quite flash! I'm off to Bathurst the week after next FYI.

Cheers
 
Top