Hi George, a friend of mine who lived in Warnambool bought the engine and gearbox out of my 57 ID19 to put in his B11L, it was a pleasure to drive. Looks like I might be going Swedish, the C5 is about to go to a new home. $800 to me.A friend of mine restored one of those many years ago. He let me have a drive of it. He had fully restored the car , the engine, everything. It was a truely HORRIBLE experience. No synchro in any gear. You had to double clutch it, it was just no fun at all. I'd be taking those cogs out and replacing them with something user friendly.
Something at least with synchro mesh.

You are using an out of date browser. It may not display this or other websites correctly.
You should upgrade or use an alternative browser.
You should upgrade or use an alternative browser.
Finally ... Repairing a traction gearbox.
- Thread starter DoubleChevron
- Start date
Re slip gauges ") Slip gauges were very expensive in the old days and were not really a commonly used item. In fact i do not believe we were allowed to handle them at all as an apprentice. They were in the inspection department or the tool room for setting up measuring devices or similar, using a precision surface plate, which was reserved only for that purpose. All work using them was done by the 'old hands' and they guarded their equipment. I did a stint in the inspection department and took devices around and picked them up. Someone would offer a bit of information if you asked nicely.
Slip gauges were very expensive in the old days and were not really a commonly used item. In fact i do not believe we were allowed to handle them at all as an apprentice. They were in the inspection department or the tool room for setting up measuring devices or similar, using a precision surface plate, which was reserved only for that purpose. All work using them was done by the 'old hands' and they guarded their equipment. I did a stint in the inspection department and took devices around and picked them up. Someone would offer a bit of information if you asked nicely.
When I was in inspection and we were doing a final measure on the railway axles journels, I had to take the caliper dial gauge and the calibrating block and place it on the bench with the batch of axles, first thing. Then we had a cuppa and noted the numbers first. The measuring equipment had to sit with the items for 30 minutes on the bench to come to the same temperature before doing the measurements. Measured to a couple of tenths of a 'thou'.
Jaahn
Slip gauges were very expensive in the old days and were not really a commonly used item. In fact i do not believe we were allowed to handle them at all as an apprentice. They were in the inspection department or the tool room for setting up measuring devices or similar, using a precision surface plate, which was reserved only for that purpose. All work using them was done by the 'old hands' and they guarded their equipment. I did a stint in the inspection department and took devices around and picked them up. Someone would offer a bit of information if you asked nicely. When I was in inspection and we were doing a final measure on the railway axles journels, I had to take the caliper dial gauge and the calibrating block and place it on the bench with the batch of axles, first thing. Then we had a cuppa and noted the numbers first. The measuring equipment had to sit with the items for 30 minutes on the bench to come to the same temperature before doing the measurements. Measured to a couple of tenths of a 'thou'.
Jaahn
Sounds to me as if you were in the same game as Dad!
The ID 19 still did not have synchro on first and was no easier to use in a traction installation than the original box. I did however give an overdrive ratio on top gear.Hi George, a friend of mine who lived in Warnambool bought the engine and gearbox out of my 57 ID19 to put in his B11L, it was a pleasure to drive. Looks like I might be going Swedish, the C5 is about to go to a new home. $800 to me.
I see how rust we completely mess them up. It would make them measure a lot higher than they are.
https://www.ebay.com.au/itm/SLIP-GU...AAOSwnLtcNHid&frcectupt=true&autorefresh=true
https://www.ebay.com.au/itm/SLIP-GU...AAOSwnLtcNHid&frcectupt=true&autorefresh=true
Am I driving everyone as crazy as I'm driving myself yet ? I can't even do the simplest of things without saying "I need help again".

See the space on the shaft that needs to be taken up. The nut bottoms out before the bearing clamps down against the gear. Yes the key and two slotted washers are locked in there with the synchro housing.
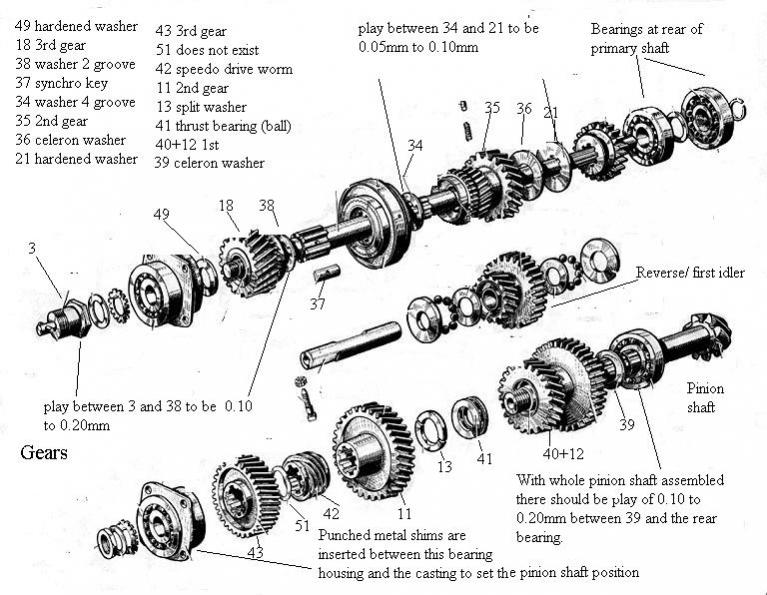
There is a spare washer there, but it doesn't fit ....... Oh, I bet its the lower shaft washer and I need to swap them over. I think the captive nut "cage" will need to stay there or be replaced with a spacer as well.
See the space on the shaft that needs to be taken up. The nut bottoms out before the bearing clamps down against the gear. Yes the key and two slotted washers are locked in there with the synchro housing.
There is a spare washer there, but it doesn't fit ....... Oh, I bet its the lower shaft washer and I need to swap them over. I think the captive nut "cage" will need to stay there or be replaced with a spacer as well.
I think you have left out the thrust washer between the bearing and the 3rd. gear. Part 49 in the drawing! It is a heavy, hardened and ground washer of substantial thickness. It may be hiding in the same place as your spring and dowel pin! If you cannot find it I can send you one!
Have you put in place the locating key way to prevent the gear thrusts between the synchro drum and the gears from turning Part 37? It looks different from the drawing, fits into the sahft sples and has a tabbed end to engage the corresponding slots in the thrust rings!
Throw away that multi tabbed washer and use loctite instead when finally assembling.
Later gearboxes do not have a washer on the lower shaft ( Pinion shaft). I know that part 51 is shown but it is not used in your box.
Last edited:
I think you have left out the thrust washer between the bearing and the 3rd. gear. Part 49 in the drawing! It is a heavy, hardened and ground washer of substantial thickness. It may be hiding in the same place as your spring and dowel pin! If you cannot find it I can send you one!
Throw away that multi tabbed washer and use loctite instead when finally assembling.
Later gearboxes do not have a washer on the lower shaft ( Pinion shaft). I know that part 51 is shown but it is not used in your box.
See
Driving myself crazy!! I was looking that the diagram thinking that was the washer with the oil grooves and slot to retain the key. Ok, I'm off to do some more searching. If I'd just put this thing back together 4years ago .... None of this would have been a problem!Got it. I'd put it aside as a "spare" bearing retainer/shim for reverse idler gear (somehow I ended up with two reverse idler shafts ...). The markings on it made it look like where the ball bearings run. but I ran my thumb nail over it, and there isn't wear there. The marks also match the bearing facing and the gear, so its the "missing" spacer.
It just adds to the challenge .... you have multiples of some parts .... none of others ..... give yourself some time away from it so everything looks foreign and completely unfamiliar .... and it makes the enjoyment of re-assembly all that much better
It just adds to the challenge .... you have multiples of some parts .... none of others ..... give yourself some time away from it so everything looks foreign and completely unfamiliar .... and it makes the enjoyment of re-assembly all that much better
The diameter should be slightly larger than the face on the forward part of 3rd gear and the inside diameter should fit the shaft behind the double race! One side ( the side that faces the bearing will show circular grinding marks the other side will exhibit wear marks where it rubs on the gear face.
The diameter should be slightly larger than the face on the forward part of 3rd gear and the inside diameter should fit the shaft behind the double race! One side ( the side that faces the bearing will show circular grinding marks the other side will exhibit wear marks where it rubs on the gear face.
Yes, its a tight 0.1mm with the spacer fitted. It has to have been this from the factory though (same bearing, same gear, same washer). Everything takes so long, now I need to find a tube with ~58mm OD to push the bearings back into the case with.
Is that the clearance between the front thrust washer and the gear? It sounds a bit too tight! Clearance is set with the thickness of the washers between the gear and the synchro hub. The washer with four oil grooves faces the second gear and the two groove washer faces the third gear! Are they the correct way around?
Is that the clearance between the front thrust washer and the gear? It sounds a bit too tight! Clearance is set with the thickness of the washers between the gear and the synchro hub. The washer with four oil grooves faces the second gear and the two groove washer faces the third gear! Are they the correct way around?
Yes, that's what the manual says (it say 0.1 -> 0.15 for the clearance from memory). It interesting there is no seal to stop the top shaft leaking oil from the crank dog. It looks like the housing is designed to try and drain the oil back.
What is the thread on the outside of the nut/starter dog for ?
Yes it is a screw back seal, the same as the one at the rear in the bell housing and similar to the crankshaft seal. Only the threaded bit rotates in a smooth bore housing and the others have a smooth shaft running in a threaded housing.
0.1 to 0.2mm is the book clearance. Check that everything rotates smoothly!
0.1 to 0.2mm is the book clearance. Check that everything rotates smoothly!
Last edited:
HiI see how rust would completely mess them up. It would make them measure a lot higher than they are.

Moore and Wright 47 Piece Steel Slip Gauge Set Grade 1 700 Series HV820 MW700-08 | eBay
Hardened to HV820 (HRC65). 47 Piece Steel Slip Gauge Set Grade 1 Moore and Wright 700 Series. Supplied with a Moore and Wright certificate of inspection. Moore and Wright History. Moore and Wright. Size and serial number are engraved on each individual gauge block.
www.ebay.com.au
I do not believe you should even talk about rust as that would be sacrilege to a person who had worked with them.

| Nominal Size | No. of Blocks |
| 1.005mm | 1 |
| 1.01-1.09mm | 9 |
| 1.10-1.19mm | 9 |
| 1.0-9.0mm | 9 |
| 10.0-24.0 | 24 |
| 25.00-100.0 | 4 |
jaahn
Well last time I wondered the yard .... I stumbled across this. Impact drivers are water and weather proof right
Apparently the kids were making houses and forts and need this out in the yard a few days back. Obviously my parents don't think this is absolutely hilarious Anyway, I've just been wondering around the yard with micrometer in hand ... searching for the "Citroen Special Tool" to install a Citroen Traction Avant gearbox bearings.... the kids swing set was too small ...as was every other "round" thing I could find...
No, not the citroen steering column (to small), the metal tube across the front of the 4wd (to protect the steering rods)...... 5minutes work with the angle grinder later.
5 minutes later ....
It all rolls over nice and smoothly. There was a momentary panic when I slid the synchro hub over to try the gears and the damn thing locked solid
...... The reverse gear had just moved forward and engaged as well (phew). I just need to fit the diff back on now and we're almost done Bravo!
Whoops Shane! I am afraid that you have the synchro drum in back to front.
In the interest of helping folk reading this thread, if that is a bearing being fitted [no matter what type of transmission] with that piece of 'large diameter' tube, this is not a good practice/method.
It will damage & reduce the bearing service life.
The bearing INNER is what one needs hit on using a small diameter tube that just clears the main-shaft ~ definitely no hitting on the bearing OUTER as appears to be happening in the pic.
It will damage & reduce the bearing service life.
The bearing INNER is what one needs hit on using a small diameter tube that just clears the main-shaft ~ definitely no hitting on the bearing OUTER as appears to be happening in the pic.
Last edited:
In the interest of helping folk reading this thread, if that is a bearing being fitted [no matter what type of transmission] with that piece of 'large diameter' tube, this is not a good practice/method.
It will damage & reduce the bearing service life.
The bearing INNER is what one needs to be hit on using a small diameter tube that just clears the main-shaft ~ definitely no hitting on the bearing OUTER as appears to be happening in the pic.
DEFINITELY BEARING OUTER. The outer is a press fit, the inner slides on/off readily
If you press from the inner, you would damage the bearing!Hey Gerry, really .... I'll have to have another look and see how the synchro drum is directional!