69 404 restoration

Silver is the only way to go, nothing else will work.

Thanks for the feedback guys,

Graham, I am with you on your thoughts about the sealed beams. It was just a thought if I can't find a decent set of SEV Marchals. I know I can get some cheap non-genuine ones from Franzose etc., but they are a little suspect re the reflective quality. Franzose mention something along this line on their website.

Does anyone have a set or know where I can obtain the Valeo Marchal replicas that were available a while ago? Or the last option is to have an old set re-silvered/re-chromed. On that one, I’ve been told chroming headlight pots does not comply with ADR’s etc. Is this true?
 
I'm amazed you built up a windscreen surround. I don't think I'd ever be that brave. Out of interest, have you test fitted a windscreen to see if it'll fit and be leak free :confused: Those patch panels you have made are incredible. Everytime I've tried to make even the most simple of shapes, it's turned out a big mess :( Did you find the "exploded" fabrication diagrams in a manual, or make them yourself :confused:

seeya,
Shane L.
 
I’ve been told chroming headlight pots does not comply with ADR’s etc. Is this true?
Resurfacing the refectrors in not chroming, it's called electrodesposition. It done by a specialist company. It will apply a coating to the reflector as per brand new.

As to ADRs , not many people will have seen a brand new 404 in the flesh, let alone the RWC testers. So I wouldn't worry too much.

PS: I had to explain to the alignment guy about adjusting toe in/out on a single tie rod end on a mates 404. And show him how to move the steering wheel to centre it afterwards.

He was so embarrassed he didn't charge.

Don't worry about RWC - I am positive you will know more about the car than tester.
 
Hi Shane,

The panels are yet to be fitted. As I have said before, I excel in procrastination when it comes to the welding stage. Anyhow I digress. Unfortunately there were no plans/templates available for the panels, so before I took to them with a drill and grinder, I made fibreglass moulds of both panels. Rough but valuable!

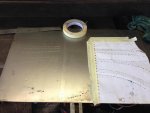
The way we made the templates was fairly agricultural, but effective. Using various bits of paper, it was pressed into the existing panel corners and curves. Then taped up to prevent movement and then using a pencil drew lines on the paper on the out and insides of the curves and folds. When the paper was removed, masking tape was carefully laid (not stretched) at intervals across the profiles top to bottom. Again the fold marks were marked on the masking tape. The paper was laid out on the sheet metal and using a scribe the pencil contour lines were scratched onto the surface. The masking tape was removed and carefully laid across the scratch marks to gauge accuracy. This was done a couple of times, as we weren’t 100% happy with the alignments.

IMG_1556.jpg IMG_1557.jpg

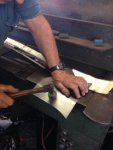
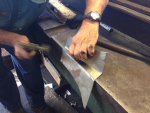
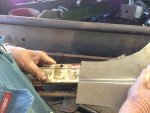
Then using electric shears the base outlines were cut. That’s when the fun begun! Using the square edge of a large brake press as a anvil the shapes were dress on the edge with an array of mallets, hammers and of all things a brickies bolster (Chisel). The wide blade prevented the overproduction of dints an ordinary cold chisel would have produced. The cutting edge was also ground into a curve to prevent puncturing the .9 mm metal. An oxy was utilised to help heat shrink/stretch some of the curves. The heat marks can be seen in the photos. The same process was used front and rear.

IMG_1558.jpg IMG_1560.jpg IMG_1559.jpg

As for the curvature across the panel, that was achieved by placing the panel ends up on blocks of timber and using the bolster and a heavy engineers hammer, starting in the middle and working outwards with lesser force the curve was created. A lot of SWAG (Scientific wild arse guess) or trial and error was used at this stage.
The 10mm windscreen supports were created by using a block of steel welded to a bench, the shape/return was dressed into the panel using the bolster again.

Ray Taylor, the guy who helped me, is from the old school and just a wizard to watch. He taught me so much.

Unfortunately though, the middle section of the rear panel was not a success and I’ve reverted to using a panel from a donor wreck. A few minor rust repairs are required before it can be reused, but in the end it will look a lot better. The fabricated corners will be smeared in lanolin to prevent rusting and kept for another day or somebody who needs to do a rust repair.

As for fitting windscreens I’m nowhere near ready to do that not yet. Again I took plenty of measurements and photographs (thank God for digital cameras), so I’ll just have to wait and see in the long run. The removed panels though do line up with inner panels, like rear parcel shelf and dash vent, so hopefully it should be OK. The front panel will be covered with a genuine NOS Bay Window panel, I found on the web.

Cheers,

Dan
 
Hi Shane,

The panels are yet to be fitted. As I have said before, I excel in procrastination when it comes to the welding stage. Anyhow I digress. Unfortunately there were no plans/templates available for the panels, so before I took to them with a drill and grinder, I made fibreglass moulds of both panels. Rough but valuable!

The way we made the templates was fairly agricultural, but effective. Using various bits of paper, it was pressed into the existing panel corners and curves. Then taped up to prevent movement and then using a pencil drew lines on the paper on the out and insides of the curves and folds. When the paper was removed, masking tape was carefully laid (not stretched) at intervals across the profiles top to bottom. Again the fold marks were marked on the masking tape. The paper was laid out on the sheet metal and using a scribe the pencil contour lines were scratched onto the surface. The masking tape was removed and carefully laid across the scratch marks to gauge accuracy. This was done a couple of times, as we weren’t 100% happy with the alignments.

View attachment 59766 View attachment 59767

Then using electric shears the base outlines were cut. That’s when the fun begun! Using the square edge of a large brake press as a anvil the shapes were dress on the edge with an array of mallets, hammers and of all things a brickies bolster (Chisel). The wide blade prevented the overproduction of dints an ordinary cold chisel would have produced. The cutting edge was also ground into a curve to prevent puncturing the .9 mm metal. An oxy was utilised to help heat shrink/stretch some of the curves. The heat marks can be seen in the photos. The same process was used front and rear.

View attachment 59768 View attachment 59770 View attachment 59769

As for the curvature across the panel, that was achieved by placing the panel ends up on blocks of timber and using the bolster and a heavy engineers hammer, starting in the middle and working outwards with lesser force the curve was created. A lot of SWAG (Scientific wild arse guess) or trial and error was used at this stage.
The 10mm windscreen supports were created by using a block of steel welded to a bench, the shape/return was dressed into the panel using the bolster again.

Ray Taylor, the guy who helped me, is from the old school and just a wizard to watch. He taught me so much.

Unfortunately though, the middle section of the rear panel was not a success and I’ve reverted to using a panel from a donor wreck. A few minor rust repairs are required before it can be reused, but in the end it will look a lot better. The fabricated corners will be smeared in lanolin to prevent rusting and kept for another day or somebody who needs to do a rust repair.

As for fitting windscreens I’m nowhere near ready to do that not yet. Again I took plenty of measurements and photographs (thank God for digital cameras), so I’ll just have to wait and see in the long run. The removed panels though do line up with inner panels, like rear parcel shelf and dash vent, so hopefully it should be OK. The front panel will be covered with a genuine NOS Bay Window panel, I found on the web.

Cheers,

Dan

Dano,

It's a pity your are not near a TAFE College that offers a metal fabrication short course.

A few years ago I did a short course Kangan Batman Richmond Vic.

They had one of these Eckold multi function shrinker/ stretcher/ planisher.

Beware some metal working porn in this link! Especially the videos at the bottom of the page.

Metal Forming Machinery | Headland

Yes, it's a easy as it looks to shape angles....
 
I used to get the reflectors re chromed or re silvered providing the metalwork was good enough. That business is now long gone, but you could consider getting that done if you know a chrominance business near home.

Marschal type lenses can still be found (I think I have 1), and it wouldn't be too hard to make up a suitable rubber gasket.
 
I believe there is a business near Castlemaine Vic, that can chrome anything.
 
Headlight buckets were different depending on the brand of headlight, Cibie or Marchal. Our [long gone ] 404 wagon was African spec and had Cibie lights and matching buckets. Back in the 90's I was unable to source Cibies, so we had to make do with buckets from other brands to accommodate semi sealed 7 inch Hellas. Utes and Wagons often had Cibies apparently but these will not go into a Marshal bucket.
 
Yes, all the wagons and utes had Cibies, these were height adjustable.
There was a batch of 404 sedans in 1967 that had Ducellier.
Graham

Headlight buckets were different depending on the brand of headlight, Cibie or Marchal. Our [long gone ] 404 wagon was African spec and had Cibie lights and matching buckets. Back in the 90's I was unable to source Cibies, so we had to make do with buckets from other brands to accommodate semi sealed 7 inch Hellas. Utes and Wagons often had Cibies apparently but these will not go into a Marshal bucket.
 
I have one headlight in need of refurbishment - lens and base.

If all else fails (IE no one closer), then chap used by 59Floride in the Genenieve restoration would be able to do the job
 
If your lenses are just ok replacing the old globe with halogen one [ fits straight in] makes a huge difference and is quite legal - 60/55w does the job well.Neil
 
Thanks Chris,

It made for interesting reading. You have to wonder about some people though, who'd use spray on product as a reflective surface for headlights. Excuse the puns, but dim witted and not very bright.

Cheers,

Dan
 
Thanks Chris,

It made for interesting reading. You have to wonder about some people though, who'd use spray on product as a reflective surface for headlights. Excuse the puns, but dim witted and not very bright.

Cheers,

Dan

For sure, they're out there though :crazy:

Interesting though that straight chroming is not the recommended process, vacuum metallising gets the nod and really not that expensive - pretty impressive result.

Cheers
Chris
 
Very interesting comments. Zeus seems to be the place. I wonder if they can chrome plastic compounds (N3 306's have a chromed front section which looks mouldy after nearly 20 years or so. I must contact them.
 
Hi Dano,
I have read your thread with great interest. You are doing a fantastic and very thorough job. With regard to the headlights, I agree that vacuum metallising is the way to go. There is a place in Caloundra called Hyqual. They are at 31 Enterprise St, Caloundra and their number is 1800 77 77 44. They specialise in vacuum metallising and did a 1st class job on the reflectors for my CX Prestige. I pulled the headlights apart, took the reflectors to them, and they came out looking as good as new. The CX reflectors (from memory) are two piece....a metal part at the rear which holds the bulb, and a plastic part that fits onto the front of that, and the glass lens is on the front of that. I used a non-corrosive loctite sealant to seal it all up. Once they were assembled, they worked fantastic. They still look great.
I also got Hyqual to do the headlights in my 1958 Rover 105R, as they are the old type with the three spoked thingy inside the lens and the only new replacements available are cheap copies that don't have the "Lucas" (lord of darkness, lol) printed in the middle of the three spoked thingie. I think the Rover headlights cost me about $40 each to have done.
I recently rang Hyqual again to organise to get the headlights on my '87 Toyota Tercel done. They're a similar headlight to the Corollas of the same "vintage", and I was quoted about $140 for the pair.
In the case of my Citroen......wow. I couldn't believe the difference in the amount of light coming out of those suckers after they were done!!:banana:
Cheers
Steve
 
It is almost time for a 'sticky' to be done regarding who/what/where and how of specialist repairers and the locations.
Hopefully it can be done with a drop down menu so it is quick to use and any discussion is not blocking traffic. The last three or so posts can be included as a reference but a reverse scroll is available to keep a link active. (I am starting to loath 'stickies' for events that are well past.)
I'll have a ponder on this and see if I can sketch out a framework that could work, I'm no computer guru so maybe that's an advantage.:confused:
:cheers: Brendan.
 
Hi Steve,

Thanks for the heads up on Hyqual. It's always better to deal local if possible.

The prices are very reasonable as well.

Cheers


Dan
 
When i first bought my Durant, the reflectors had been chromed and the lights were abysmal. I had them re-silvered and the imorovement was amazing, now they are just hopeless. Definitey go for silver plating if you can find somewhere to get it done. 404 headlights are not fantastic at the best of times, so they need every bit of assistance you can give them. A decent set of halogen bulbs doesn't go amiss either.
 
Top