69 404 restoration

It has been awhile since I’ve been able to get any serious work done on my 404. Now I’m on holidays, I should get a good crack at it over the next few weeks.

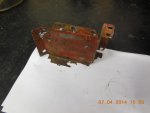
As previously stated there is a fair amount of rust under the windscreen on both sides. The to date, I’ve removed the bay window panel, the bonnet bracket support panel and finally the panel that seals the outside vents into the cabin (?). As this part is no longer available (wishful thinking), it will need to be formed from scratch. Besides being bowed across the front and tapered up on both sides, it also has three different inclines. Because of this, it was decided to make a fibreglass mould just in case the original panel was too badly distorted when removing.
cut and packed with foam.jpgplenty of bog.jpgUgly but effective.jpg

A friend suggested that the panel be tape with brown plastic packing tape to help with the mould releasing process. It was thought that the glass might adhere to firmly to the rusted and pitted surface. Once taped a releasing agent wax was applied. Combined it worked a treat the mould came away nicely. A few air bubbles etc, but in the main, a pretty good mould was produced.
Releasing nicely.jpg
The remaining spot welds were drilled out and the panel was removed. To my surprise, this panel is quite thin, maybe .7 of a mm. The mould and panel will be taken to a friend’s engineering/fabrication workshop and he’ll produce a new one using the parts as templates.
removing spot welds.jpg

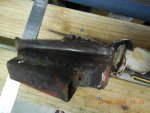
When the panel was removed, the true extent of the rust damage was revealed, the remaining drain panel will require some patchwork as well. There is more rust on the folded section that runs down into the air vent channel and the vertical dash panel. The dash panel will be cut away (About 200 mm) on both corners to get to the rusted sections. This rust was where water over the years has seeped in under the original body filler used to seal the panel during assembly. To be honest the whole corner section where all these panels meet is just plain ugly and all brazed together to give it some strength. In a document about assembling the 404 (in French), I received from the Peugeot Museum, it gives instructions on how to hold it altogether with brazing. Interestingly it also depicts all the various spot welding tips required to complete the assembly of the whole car. There are only four official measurements for aligning the body. They are, between the holes where the cross member bolts onto the chassis rails, between the strut tower mounts on the inner guards, the diagonals across the engine bay and the rear fin from the taillight tip to the base of the rear windscreen. The last measurement has a tolerance on +/- 5mm. Nothing like a bit of accuracy!
The company who is going to do sandblast the body suggests soaking the body in an acidic solution of some type (not sure of the name) to help make the process easier and get into all the cracks and crevices. Sounds logical, but I am a little dubious about what this will do to all the original red undercoat within the various channel sections of the chassis, ie roof panels A,B&C pillars, the side sills etc… If it etches the paint away, how would you get back into there to reprime it……… I would appreciate any feedback suggestions about this.

panel removed.jpgNot surprised anymore.jpgdash panel to cut.jpgpatch repairs required.jpg

Keep you posted on my slow process.

Dano
 
Today was a good day. After heaps of procrastination and waiting for front panels to be made, I decided to start dismantling the rear end.

Stepping back a few weeks, I made the decision to remove the panel under the rear windscreen and above the boot, as it just had too many rusty places or areas starting to show signs of rust. The friend who was making the front panels unfortunately has taken ill and will be out of action for awhile, so I've had to find a new fabricator. The panels are just to tricky to try to make. There are some things that a person with no experience should tackle and multiple fold and bent panels is one of themDSCN0101.jpg

As luck would have it, a colleague at work who is restoring a MG, put me on to a guy he uses. He is 71 years young and does every thing by hand. You should see his workshop, it is just amazing, bits and pieces everywhere and in the middle of all the organised chaos is the work bench. Neat tidy and all his tools laid out. It is like walking back in time to a workshop from around the early fifties.

To help get things moving a fabricated a pretty dodgy fibreglass mouldDSCN0118.jpg , but it will do the job. The fabricator says with it and what ever I can salvage out of the original panel he'll be able to make an exact fit. (I'll post photos when the parts are finished)

Back to today. After drilling what seemed like a thousand spot welds and a fair bit of grinding and cutting, I successfully removed the windscreen panel the two inner panels on the rear wings and all the rear panels between the outer guards. DSCN0150.jpg DSCN0156.jpg

like with very other area of this car I've touched, I have found some more areas that will require some repairs/modifications before I can start to weld back the new parts. Being on holidays for the next two weeks I hope to make some real progress.

Cheers

Dano
 
Yesterday,I finished stripping the rear panels. As I thought, the car has definitely been in three accidents over the years. There was was some very ugly welding and brazing all around the right rear corner.

The jacking points and corner support panels are all in a fairly poor state. I've started to fabricate new ones, hopefully they will be finished on Sunday. Then will come the new floor sections. The complete corners will be removed and replace on both sides. When removing the right jacking point. I found it to be packed solid with dried mud. This got me thinking that besides the dodgy repair after it was rear ended, it may have spent some time under water as well?

It is not all bad though, today I received a set of brand new front discs in the mail. I've been searching for these since I started the restoration. I found them about a year ago and thought that they were just too expensive. Anyhow after a year of searching etc, I contacted the seller in Germany and he still had them. No the price hadn't moved, but still quite expensive compared to all the other parts I have bought over the last two and a bit years, (The most expensive items to date). But a car without brakes is useless.

More to come.

DSCN0198.jpgDSCN0165.jpgDSCN0175.jpgDSCN0180.jpgDSCN0219.jpgDSCN0197.jpgDSCN0218.jpg
 

Attachments

  • DSCN0196.jpg
    DSCN0196.jpg
    88.6 KB · Views: 535
  • DSCN0200.jpg
    DSCN0200.jpg
    92.7 KB · Views: 538
Looking for a new shell

G’day,

Before I progress any further on my project, I thought I’d see if there are any half reasonable late model 404 shells out there. Preferably a1968 onwards is ideal, but not essential. I am not looking for a completely rust free shell, although that would be good.

It’s just my current project has rust in and around the bottom of the right wheel arch, boot floor and the support panel that runs up the wheel arch from the floor to just under the parcel tray. I could just cut out the affected sections and patch them, but I’d just never know if all the rust had been removed. To do it thoroughly I think would require removing the boot floor and outer guard etc. There are other areas that need repair as well.

Over the last two years I’ve purchased and fabricated all the panels etc. to remove rust from the usual places and others that I’ve found due to the extent of the stripping back process. Parts purchased include both front buttresses, front and rear cross-members, rear taillight, tail section between lights, inner rear fin panels and both front and rear panel under the windscreens.

I guess the bottom line is I would prefer to be starting with a better base.

So, if you are in the south of Rockhampton or north of Port Macquarie (inland is OK as well) and you have or know of someone with a shell or wreck that may do the job, please send me an email. Photos would also be good.

Cheers,

Dano

Hi Dano,

You have done so much work now it seems a pity to stop when the end is in sight. The boot floor and rocker panel under rear bumper is not a difficult repair. The panel can be fabricated in a bender and shrunk to shape. Even if you do some cut and shut to form the initial shape.

And depending on boot rust much can be repaired in situ.

I'd suggest a 404 without rust in all the usual spots is either kept by a optimistic (or vision impaired) owner. Or has been fully restored.

Even many "fully" restored cars have new rust, in different places, appearing several years after restoration. So it's a life long job to try to keep them rust free.

I hope this encourages you to keep going with shell you have. Because IMO anything you purchase will be similar or worse and the difference will in the stage of rust.

You are well advanced in getting rid of the rust and have been more diligent than many.

So I'd keep going. And I wish the very best of luck in what seems to be an never ending mission.

cheers

Rob
 
Dear Dano

Agree with Rob - am doing similar project to yours and finding crimes in similar places, although have been a bit luckier. Second body can be a life saver, but is most valuable as organ donor, especially after the work you have already put in. Will probably have some or al of the same problems in the same places.


Donor car has saved my arse on a number of occasions, most notably with windscreen surround - mine was like yours and we despaired ( fabrication from scratch is job for the exceptionally gifted. Rob, who is doing all of the hard stuff, is exceptionally gifted, but even he was looking a bit pale at the thought). Had a flash of inspiration and looked at donor car and this bit was OK, so after a lot of drilling we had replacement.

My donor body is in Melbourne ( white '69 404 ). I am not using the back bits, so have not looked in great detail at their condition, but could report if you tell me exactly what you need. My recollection is that they are not too bad, but I could be wrong.

We are now approaching the scary "how do I put the bloody thing back together" stage and body is essentially done. My plans for the donor car are to remove some mechanical bits and to then find a good home for the rest of it, ideally not a crusher. Transport would be more than the car is worth(unless you really desperate ) but I could do some dissection for particular parts and mail them up.

Will be down at the car on Monday so will have a look and take some photos.

email is watkina@mac.com

Dear Dano

Update:

HAVe had a look and it looks as if my donor has rust starting at margins of floor and back panel, also at base of side strut inside mudguard , where it joins the floor posteriorly. Upper bits of strut look pristine, but it is generally the bottom bit which goes :(

It looks superficially not too bad, but our experience with mine was that once unpicked , new crimes emerged and I suspect that it will be pretty much the same in this one.

Fabrication of new bits at this end of car was not hard ( at least for Rob ). You are clearly able and well supported on the fabrication front, so it may be worth just persevering.

My rear window surround looks good, unless the surface gloss hides deeper crimes - there is certainly no rust at margins and it feels solid. I have not taken it apart, as we didn't need it and I did not want to do any unnecessary destruction, but if you think it would help, I am not likely to have much use for it ( mine is good now and next 404 project likely to be a Ute )


BEst Wishes

Andrew
 
Hi Rob and Andrew,

Thanks for your words of encouragement.

You have both confirmed my instincts that I should just persevere.

I was just living the dream that there may have been a good body lying around somewhere.

Now it is time to trust my welding abilities and start putting it back together. It has been intersesting pulling it back to stage that I have as it has given me a better idea of how they were put together in the first place. The info from the Peugeot museum has also been valuable.

I keep you posted.

Cheers,

Dan
 
Things are moving slowly

Things have been moving along slowly, but time is on my side.

About seven weeks ago, I had the front and rear panels for under the windscreens fabricated. Best week I’ve had in ages, Ray Taylor out Ipswich way offered to make the parts, so long as I helped. We spent a week making the panel. Ray is well into his 70’s and has plenty of stories. All interesting. (As I said before, time was on my side and being on holidays helped). He is very old school and besides bending the profile for the rear section on a folder, everything else was done by hand. Not having the car there was certainly a bit of a hassle. The glass plugs helped a bit, but each night I’d take the bits home and tinker and mark adjustments etc.

The rear panel was made in three sections, as it was just too complicated to be made as one piece. The corners were a good fit, but the middle bit with its some six longitudinal folds was not too successful. It just would bend down or backwards to get the curved profile. It was decided that an original one with little or no rust would have to be used. Luckily Bruce Llewellyn had a few wrecks out on his property and the best was chosen. donor and fab panel.jpg back right corner.jpg

It would appear that I’ve got to it just in time as well. There was no obvious external damage/rust, but once removed there was evidence of some deterioration underneath. Nothing sandblasting and a good coat of POR15 won't fix. Both the original panel from my car and donor panel had bare metal surfaces in the centre part. Obviously the factory couldn’t get a spray gun into the cavity.

The front panel was once piece, but it was easier to cut it into four sections to make the final adjustments and get it to fit.new & old panel.jpgfabricating front panel.jpg All up I am pretty happy with what was achieved. Thanks to Ray, I learnt heaps and this knowledge will help me as I progress. They might look a bit bashed and bruised, but hey we/I made them.


Some of the parts for the repairs to the boot floor and rear sections have also been fabricated. It is amazing what can be achieved with a good selection of hammers and various sized steel bar, both flat and round.
boot bits.jpgboot clamped in place.jpgbrace template.jpgboot clamped in place.jpgjack point comp.jpgfinished Jack point.jpg

The steering rack has been overhauled. Third time lucky. Should have known better then try to choose good secondhand components from various racks and to make a good one. Nothing fits, different wear patterns etc. just plain dumb. The third rack came out of the Rocky wreck (see earlier posting). Besides a slight bit of wear/notchy feeling just on centre it moves freely. Besides the casing, rack and pinion everything else was replaced.
rack 1.jpg rack o:hauled.jpg
The front struts will hopefully be re-assembled next weekend. They to have been completely stripped, sandblasted and repainted. The springs were checked and they appear to still be within original specs, so a quick sandblast, coat of paint and back in they will go.
springs painted.jpg backing plates painted.jpg strut turntables.jpg painted bits.jpg

Although I did look for a new body recently, I’ve decided to continue with what I’ve got, after some sage advice from fellow Froggers.

I do have all the body panels both new (Genuine Peugeot NOS) and fabricated to start putting it back together. Actually, I have just about every part both mechanical and cosmetic to complete the restoration. It is amazing what you will find on the web if you search long and hard enough. My wife once said, “That I had to be looking at unmentionable adult web sites (porn) because she doubted anyone could spend that much time looking for car parts”. One day, maybe when it is finished, I will post the complete list of what I’ve bought (replaced).

Sooner or later, I’ve just got to bite the bullet and trust my welding ability and start putting it back together.
 
Fabulous work there Dano, let me know if I can help with any plastic parts/repairs.

One good turn and all that..:wink2:
 
Thanks Graham,

Maybe not plastic bits as they are pretty much covered, but certainly your contacts for upholstery etc.

Cheers,

Dan
 
Door Pads

Todays a good day!

I've been searching for a set of good door pads since I started the restoration two years ago.

About two months ago whilst searching/buying on EBAy, I made contact with guy in Germany who told me a friend of his would have a set and he'd contact him for me. Long story cut short, they arrived today. One is brand new still in its original box. They also came with a role of new felt strip (between pads and window glass) to replace the ones on the three secondhand pads.

And yes they were reasonably priced. Freight wasn't too bad either. 9 days from Germany to Melbourne another 5 days Melbourne to Brisbane.

IMG_1747.jpg
IMG_1749.jpg
 
Front Struts assembles

Assembled the front legs today. Unfortunately I did not get to fit the hubs and new discs. When spraying the hubs with calliper paint on Friday night, I didn't read the re-coat instructions until too late. Because I did not respray within one hour, they now have to wait 7 days for the next coat. Bugger! Something to do next weekend.
Anyhow I'm pretty happy with the end result.

DSCN0378.jpg DSCN0379.jpg DSCN0384.jpg

DSCN0369.jpgThe blue and white paint/stripes on the coils are as per the factory/parts manual coding. Maybe a little to much detail.

DSCN0375.jpg Home made spring compressors. There is just too much travel for the generic ones from Supercheap/Repco. Unrestrained they are about 1/3 bigger then assembled.
 
That looks really good. Even authentic spring marking color "slashes"

You obviously value your well being, like me, my spring compressor and clamp is almost identical.

I shudder when I see some of cobbled up, downright dangerous methods used to compress springs.

Just word, when fitting the legs to the car, the manual suggests using the weight of the car to compress the springs, then using a 12mm tapered rod to align the cross member holes to bottom control arm. To allow the bolt to be fitted.

I've found the super cheap hook type compressors useful to compress the assembled spring. This will allow the fitting of the control arm bolts while the car is still on stands. I find it easier to work while the whole front is lifted.

Your car will be joy behold when completed.
 
Which headlight pots are correct?

Hi,

Can anyone help?

When tinkering yesterday, I notice I've got two sets of headlight pots that are different. They both appear to be genuine. The more pointed version are the ones that originally came out of the car. I can only ever remember seeing the more rounded versions in all my old cars, but that was 30 years ago, so the memory is a little vague.

It would appears that I could insert non genuine seal beams more easily into the pointed version, as they came with a ring that holds the light in place and it screws into the backing plate. The parts manual shows the ring version, but it appears to have a rounded pot.

Any info would be greatly appreciated.

Dan
DSCN0388.jpg DSCN0386.jpg DSCN0387.jpg
 
You want the one not painted white, which is the original.
Please don't put sealed beams in the car it will destroy the frontal styling of the car and in my view make the restoration pointless.
A straight 404 with the correct lights and painted rims, not chrome, looks fabulous.

Hi,

Can anyone help?

When tinkering yesterday, I notice I've got two sets of headlight pots that are different. They both appear to be genuine. The more pointed version are the ones that originally came out of the car. I can only ever remember seeing the more rounded versions in all my old cars, but that was 30 years ago, so the memory is a little vague.

It would appears that I could insert non genuine seal beams more easily into the pointed version, as they came with a ring that holds the light in place and it screws into the backing plate. The parts manual shows the ring version, but it appears to have a rounded pot.

Any info would be greatly appreciated.

Dan
View attachment 59745 View attachment 59743 View attachment 59744
 
From memory the sedan and commercial vehicles had different headlights, and consequently different buckets.
The ute at home is quite probably a conglomeration of sedan and ute parts, so it's of little help. I know it has chrome headlight surrounds, whereas it should be colour matched to the car.
I've always preferred the more bling surrounds. Weren't the chrome surrounds only offered on 1969 on vehicles?
 
Last edited:
As I interpret the images, the LHS bowls in images are the correct bowls (as per GW)

The others look like something cobbled up to accept a sealed beam 7 inch lamp unit. They may be a BMC head light bowl.
 
Thanks for the feedback guys,

Graham, I am with you on your thoughts about the sealed beams. It was just a thought if I can't find a decent set of SEV Marchals. I know I can get some cheap non-genuine ones from Franzose etc., but they are a little suspect re the reflective quality. Franzose mention something along this line on their website.

Does anyone have a set or know where I can obtain the Valeo Marchal replicas that were available a while ago? Or the last option is to have an old set re-silvered/re-chromed. On that one, I’ve been told chroming headlight pots does not comply with ADR’s etc. Is this true?
 
Top