69 404 restoration

Dano

Well-known member
VIP Paid Subscriber
1000+ Posts
Fellow Frogger
Joined
Apr 13, 2012
Messages
2,451
Location
Brisbane
Hi All
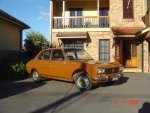
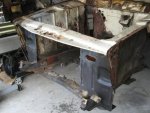
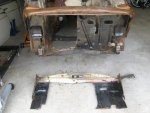
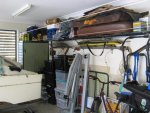
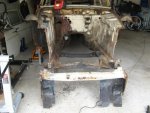
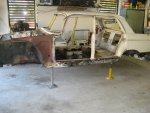
Well since my last post this is how far I have progressed with the restoration. The more I stripped it back, the easier it was to make the decision to take it back to a bare shell. There was more rust and structural damage then I expected (Maybe I was just hopeful).
It would appear that the car has been involved in at least two substantial accidents in the past. The front right corner and the rear end both should signs of previous repairs, of which neither have been done well.
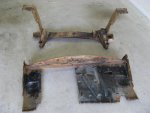
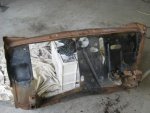
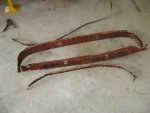
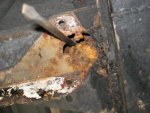
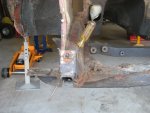
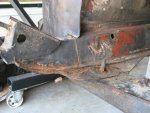
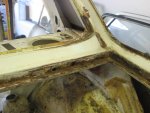
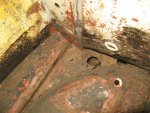
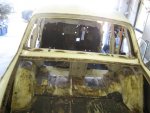
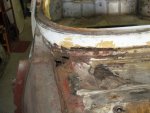
Around both sides at the bottom of the front windscreen the rust damage is extensive. On the right side the holes are big enough to be able to see through into the cabin area. The boot area is also showing signs of being worse for wear due to the poor repairs. It looks as though there was no priming of rust prevention works done whilst it was being repaired. Also the brace (?) plate that runs from the boot floor up to the top of the inner guard is not connected. You can see where the spot welds have either broken or been separated, but not reattached. The floor around the back right hand corner has rusted through and there is evidence of rust damage across the back were the floor meets the vertical panel between the tail lights. As a result I am going to replace the boot floor, the water channels down either side of the boot and the box section under the bumper bar. I have been lucky enough to pick up a couple of rust free channels and fin sections for the rear guards. Currently I am carefully using a spot weld removal bit to split the inner fin/channel sections. If you don’t push too hard, you can feel the bit going through the inner panel and not damage or score the outer guard. Too much pressure and it goes straight through both layers.
The upshot of buying a complete car is, although the internal trims weren’t the best, they were complete so they can used as patterns when replacing them.
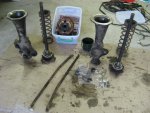
At this stage there is no plan to touch the gearbox or diff. Except for replacing seals where applicable. There appears to be no play in either. When draining the diff oil there was no sign of any brass floaty bits. I couldn’t feel any either when I rubbed some of the oil between my fingers. Eventually everything else will be overhauled. If anyone has a set of good rear reflectors for sale I would be interested to hear from you.
Meeting fellow Frogger Marty 404, has been a bonus. His car had rust in the same areas as mine and his advice/suggestions have been invaluable, considering I have never done and panel work before.
The plan is to put it back on the road in an as original condition as possible when it is finished. Currently it is white, but I will repaint it Sunburst Brown with a black interior. Was Black an original interior colour in 1969? White is so boring! Does anyone know what the colour codes are for Sunburst Brown?
Cheers
Dano
 

Attachments

  • IMG_5665.jpg
    IMG_5665.jpg
    64.4 KB · Views: 1,340
  • IMG_5668.jpg
    IMG_5668.jpg
    60.9 KB · Views: 1,622
  • IMG_5672.jpg
    IMG_5672.jpg
    79.9 KB · Views: 1,395
  • IMG_5680.jpg
    IMG_5680.jpg
    63.7 KB · Views: 1,642
  • IMG_5682.jpg
    IMG_5682.jpg
    67.8 KB · Views: 1,280
  • IMG_5700.jpg
    IMG_5700.jpg
    61 KB · Views: 1,378
  • Rear axle dismantled (2).jpg
    Rear axle dismantled (2).jpg
    66.2 KB · Views: 2,222
  • IMG_5663.jpg
    IMG_5663.jpg
    61.3 KB · Views: 1,425
Marty 404

WOW Dano you really have stripped it since I saw it last its great to see you being so thorough. The rear axle looks deceivingly simple it must have taken a while to pull apart. And your garage is so tidy how are the plans for the rotating stand in the citroen forum there are some pics of others.
Hope to see you at the French car day for some inspiration.
 
In reply to your question about black as an original interior colour - yes it was. I had '68 404 Wagon, which I purchased in '77 and it had black interior.

Is the colour you mean that of the 504 in the photo attached ?
If so, I'm not sure of the colour code that you are seeking for the repaint - but it will go well with the black interior!

Ian.
 

Attachments

  • DSC00253.jpg
    DSC00253.jpg
    99.1 KB · Views: 1,529
Last edited:
In reply to your question about black as an original interior colour - yes it was. I had '68 404 Wagon, which I purchased in '77 and it had black interior.

Is the colour you mean that of the 504 in the photo attached ?
If so, I'm not sure of the colour code that you are seeking for the repaint - but it will go well with the black interior!

Ian.

That's not Sunburst Brown, the 1970 and 1971 504s had Sunburst Brown, also a chocolate colour called Latrobe Brown.
The later car in the photo is another brown altogether.
Graham
 
I had a 70 model 404 sedan in sunburst brown many years ago. If you can't find the paint codes, perhaps a review of the paint charts will help you come up with something close, and then a liitle black or a little yellow might get it right!
 
Thanks guys.

Thanks for your posts and info re upholstery and colours.

IWS, thanks for your photo/suggestion, but that isn't the colour I plan on using. The image below is the colour I was talking about. This car was being displayed at the Perth display a few years ago.

My '70 404 was this colour, so the rebuild is a bit of a trip down memory lane. It was a genuine one owner with low miles (as it was back then). But unfortunately it came to a rough end when I rolled it. A classic case of driving ability outweighing ability.

Went to the Grand Display of French Cars in Brisbane earlier today, it was time well spent. There was a couple of really nice genuine 404's that hepled to confirm a few questions I had about features etc.

Dano
 

Attachments

  • peugeot-404-2.jpg
    peugeot-404-2.jpg
    95.8 KB · Views: 4,063
Thanks for your posts and info re upholstery and colours.

IWS, thanks for your photo/suggestion, but that isn't the colour I plan on using. The image below is the colour I was talking about. This car was being displayed at the Perth display a few years ago.

My '70 404 was this colour, so the rebuild is a bit of a trip down memory lane. It was a genuine one owner with low miles (as it was back then). But unfortunately it came to a rough end when I rolled it. A classic case of driving ability outweighing ability.

Went to the Grand Display of French Cars in Brisbane earlier today, it was time well spent. There was a couple of really nice genuine 404's that hepled to confirm a few questions I had about features etc.

Dano

Hi all,
Progress has been a little slow so far. Not having restored a car before, at times I am unsure what I should be doing or in which order.
During the stripping process I took heaps of photos (you have to love digital cameras) of just about every step and piece removed, both in situ and on the ground. Also every nut, bolt, wiring loom and piece of trim was bagged, tagged and stored. As this is going to be a long term project, I thought it was best not to trust my memory.
As stated in an earlier post, the replacement engine I sourced was an early one (1965 era according to the engine number) and as I want the car to be as close to original when finished, I had to find a later model engine. Thanks to Bruce Llewellyn the problem was solved. He had an XC6 motor, which he knew the complete history of, so there should be no nasty surprises when it comes to rebuilding time.His advice about other issues has also been invaluable.
The more parts I removed, the more rust I found. To get the body back into shape there is going to be a fair amount of cutting, fabricating and replacing of sections to get it back into shape. The TAFE welding course I’ve just completed will certainly pay for itself.
Originally I was going to fabricate a rotisserie to help make the welding process a little easier, but with the amount of rust in the body in key areas, there was nothing stable enough to swing it off. So the plan now is to just lower it off the axle stands and roll it over onto her side. I will place some old tyres under the body along sill frames and gutter sections to protect the sides.
The areas that need repairing are,
·The three layers of metal under both sides where the windscreen panel, bulkhead and inner guards meet.
·The channel across the car under the windscreen.
·The two sub-frames under the front floors.
·The radiator support cross member.
·The sole plates under the under the two front chassis rails.
·The rear channel and panel between the taillights and jacking points.
·The boot floor or sections of may be replaced as well. But I won’t know until I remove the rear panels.
·The water channels on both sides of the boot and some of the channel along the top.
·A small section at the top of the rear windscreen, where is at least one pin hole of rust evident.
Spent the last week removing panels and stripping donor parts, in preparation for the repairs. These included,
·The panel under the windscreen.
·The front buttress (panel between the inner guards that houses the radiator etc.) The original part was damaged and poorly repaired in a previous accident. Also sections had been hacked out to fit a 505 radiator, when a 504 motor installed.
That should keep an inexperienced welder/fabricator busy for a while.
Last Friday I spent some time with Marty404, looking at his restoration project and fibre glassing up the outside of the glovebox shells in both our cars. There were both in fairly good condition, so it was more of a preventative measure. Leaving the insides as cardboard will still make them look original.Because his car had rust in some of the same places as mine, I will be able to use some of the templates he has created to fabricate replacement sections. Being able to talk to Marty, and seeing his repairs have been a huge help.
That’s it for now.
Cheers,

Dano
 

Attachments

  • IMG_5771.jpg
    IMG_5771.jpg
    90.2 KB · Views: 943
  • IMG_5766.jpg
    IMG_5766.jpg
    42.9 KB · Views: 936
  • IMG_5764.jpg
    IMG_5764.jpg
    91.2 KB · Views: 988
  • IMG_5774.jpg
    IMG_5774.jpg
    45.4 KB · Views: 973
  • IMG_5779.jpg
    IMG_5779.jpg
    40.7 KB · Views: 922
  • IMG_5796.jpg
    IMG_5796.jpg
    44.3 KB · Views: 888
  • IMG_5800.jpg
    IMG_5800.jpg
    98.8 KB · Views: 944
  • IMG_5818.jpg
    IMG_5818.jpg
    48.2 KB · Views: 1,029
  • IMG_5775.jpg
    IMG_5775.jpg
    46.3 KB · Views: 939
Dano,
The colour of the 404 pictured in your post *6 is.. Dulon E type Laquer "Sunburst Brown" 566-11430.
All this from its Perth owner Gordon.:wink2:
 
Thanks Wildebeest

Greatly appreciate it. Now all I have to do is convince the wife that it is a good colour. I think it will end up being white again.

Cheers,

Dano
 
A 1965 engine is slightly questionable as regards compatibility. Earlier 404s had 3 bearing crankshafts, but I'm not sure of the change-over year. They are not a desirable motor (in comparison anyway). 1965 engines would have run a generator, whereas you would run an alternator, so your brackets would be different
 
Widebeest: is that the colour universally known throught the 70's as baby shit yellow?:evil:
 
The brown looks good when in good knic a bit less common you should use it and get 'Poogeot' number plates, How about the green one next to it in the photo
 
That's a great looking colour for a 404.

Anyway in my opinion an old car in really good condition with shiny paint and chrome looks good in any colour.
 
404 Chassis Specifications/Measurements

Hi,

Would anyone know where I could obtain a copy of the specifications for realigning a 404 chassis. I am looking for information similar to that which is displayed in the image below for a 505.

505 alignment specs.jpg

Due to the amount of rework (rust removal) being done on my restoration project, this information would be very helpful.

So far the radiator support panel, front panel between the inner guards, sole plates along the front sub-frames, buttress panels and badly rusted sections of floor under the buttress panels have all been removed. The replacements sections are either new (ex Franzose) or been fabricated using original parts that I have been lucky enough to borrow and use as templates. Although what was left of the inner guards was braced, there is still a fair bit of movement in them, thus the request for information. It would be good to ensure the chassis is straight prior to welding in the new sections.

Likewise, once the front is repaired, the rear end will undergo a similar overhaul. The panel between the tail lights, rear jacking points, cross-member and some sections of the boot floor will be replaced, again with either new or re-fabricated parts. See photos.

Cheers,

Dano
IMG_2.jpgIMG_6.JPGIMG_7.JPGIMG_9.JPGIMG_5.JPGIMG_15.jpgIMG_16.jpg
 
Hi,

Would anyone know where I could obtain a copy of the specifications for realigning a 404 chassis. I am looking for information similar to that which is displayed in the image below for a 505.

View attachment 38308


Due to the amount of rework (rust removal) being done on my restoration project, this information would be very helpful.

So far the radiator support panel, front panel between the inner guards, sole plates along the front sub-frames, buttress panels and badly rusted sections of floor under the buttress panels have all been removed. The replacements sections are either new (ex Franzose) or been fabricated using original parts that I have been lucky enough to borrow and use as templates. Although what was left of the inner guards was braced, there is still a fair bit of movement in them, thus the request for information. It would be good to ensure the chassis is straight prior to welding in the new sections.

Likewise, once the front is repaired, the rear end will undergo a similar overhaul. The panel between the tail lights, rear jacking points, cross-member and some sections of the boot floor will be replaced, again with either new or re-fabricated parts. See photos.

Cheers,

Dano
View attachment 38309View attachment 38311View attachment 38312View attachment 38313View attachment 38310View attachment 38314View attachment 38315

I have nothing this time unfortunately.

The manual only shows the hull fitted to Cellette body bench (custom made for the 404?).

However , if you pm your email address I'll email the full 404 Factory manual in pdf format.
 
Hi robmac,

I appreciate your offer, but I was fortunate enough to obtain genuine copies of the workshop manual and the spare parts manuals a few months ago. The parts manuals have been an absolute God send, especially sourcing parts via Ebay etc.

I've seen a French journal/manual titled Revue Technique Carrosserie (Body) on EBay France which covers 404 & 204 coupes and convertibles. So I am now searching for an English version that covers sedans. I'll let you know how I get on.

Cheers

Dano
 
That's a great looking colour for a 404.

Anyway in my opinion an old car in really good condition with shiny paint and chrome looks good in any colour.

Except, perhaps - pink.

404's came out in pink one year , probably 1964. I remember seeing one for sale in a car yard in Blabkburn (Vic) in the mid 1970s, just after I bought my first 404.
 
Hi robmac,

I appreciate your offer, but I was fortunate enough to obtain genuine copies of the workshop manual and the spare parts manuals a few months ago. The parts manuals have been an absolute God send, especially sourcing parts via Ebay etc.

I've seen a French journal/manual titled Revue Technique Carrosserie (Body) on EBay France which covers 404 & 204 coupes and convertibles. So I am now searching for an English version that covers sedans. I'll let you know how I get on.

Cheers

Dano

Hi Dan

Your request sent me rooting through some boxes which remain - mostly - unpacked from our most recent move. I found a complete 404 manual but like yours it does not give specs for the chassis.

Let me know if you find what you're looking for, we may be able to share costs.

Do you - or anyone here - have the parts manual in a pdf format?

All the best

Peter
 
Don’t go looking for things you don’t want to see!!!!

It has been about three months since any serious work has been done on the Four 0, but today with the help of a few friends (Marty404 and Manny) some real progress took place.

A while ago, the decision was made to replace both the front inner guard (still available through Franzose) as the existing ones are fairly rusted in parts and damaged whilst removing the lower sole plates and jacking points. The new guards were fabricated in Argentina and let’s just say they don’t have the same quality control procedures as the original Peugeot parts. The guards are two-piece and spot welded together on a fold about 25 mm from the top (see photos). Who knows why they weren’t pressed as one piece. The jacking points were fabricated from light gauge sheet metal folded into shape and not fully enclosed at the ends (Water would just run down the tubes and into the sub-frames). The folded jacking point/tubes were not weld closed. The bumper bar mounts just looked wrong! Manny, TIG welded the gaps closed, inserted blanking plates at the ends of the jacking tubes, stitched the two parts of the inner guard together to prevent moisture getting between the overlaps and to give them some added strength and the original bumper bar supports were grafted into place. Even after having to do this rework, they are still a lot better then the originals.

Like all good Four 0’s the panel under the windscreen had rusted out badly in the lower corners and around where the wiper arm spindles come through. Whilst trawling the internet for hours (OK, days and months) I managed to find a genuine Peugeot new old stock (NOS) windscreen panel.

With two of us (Marty404) working on it, it took about 2 hours to brace the A pillars and drill out all the spot-welds that hold the 3 layers together. That is when I found what I didn’t want to see, more rust on the inner panels. It will take some serious fabrication work to re-manufacture the damaged areas.

The next step is to make a fibreglass mould of the inner panel and try to fabricate a new one using the glass mould as a jig.

Ah well, I have always said it was to be a long-term project.

On the upside though, I have been able to acquire just about very body panel, trim item, door rubbers and seals of all shapes and sizes etc. required to completely restore the body. Most of these are NOS.

What did we do before the internet?

seam weld.jpgseam weld 2.jpgsplit jack point.jpg2nd split jack point.JPGremove jacking point.JPGpanel removal.jpgoh no!!.JPGit could be worse.jpgit is worse.jpgwindscreen panel.jpg
 
Top