203 Wagon Restoration

Now having great fun screwing on all the new and shiny bits. Pity about the greasy bits still lying about the shed. However, I do have an excuse as painting weather in Canberra is slipping away with the dead hand of winter upon us. However, refitting the glass and sundry rubber bits should keep me occupied for some time.

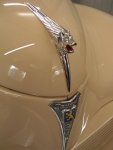
It is great to see a 203 without pimply door handles and mascot. Yes, they do exist, even though I had to have the new old stock door handles replated in order to get rid of the scratches and sub-standard original chrome. I picked the mascot up in a Dijon junk shop. It had minimal pimpling but still required replating.

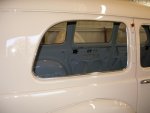
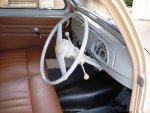
I repolished the stainless steel grille bars and window surrounds using a kit from Bunnies - grey buffing soap with a sisal wheel to remove scratches and white with a calico wheel to polish, finishing with Autosol for good measure. This is a monotonous task but the results have been worth it.

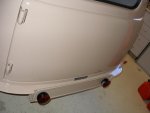
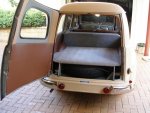
The back end now looks better with the tailgate ding removed and proper Frankani 180 tail lights fitted. The bumpers are still with the plater but should set off the whole thing.

A set of 185x16 Michelin X tyres have now arrived from Longstones at a rather advantageous price - free shipping and air delivery from England in six days!

More photos attached.
 

Attachments

  • Copy of P1010312.jpg
    Copy of P1010312.jpg
    86.5 KB · Views: 811
  • P1010337.jpg
    P1010337.jpg
    91.1 KB · Views: 694
  • P1010338.jpg
    P1010338.jpg
    86.8 KB · Views: 692
  • P1010340.jpg
    P1010340.jpg
    93.8 KB · Views: 806
from what i have been led to believe over the years the pimpling was pretty much there from day one as the material used was of a sub standard and hence didn't plate very well

it's all peugeot had to play with after the war

also, although it looks good, i thought commercial grilles were sans chrome strips ???

the car is looking great BTW
 
The U8 camionette bachee and plateau (two varieties of the ute) were not fitted with the stainless steel grille strips. The other U series had them - one of the few luxury touches. Speaking of luxury, the Australian asembled wagons (limousine commerciale) had two sun visors, compared with the one provided in the French versions. This is not to mention the hubcaps deemed necessary with the Australian made 16 inch wheels. The French did without them.

The rest of my wagon is pretty hair shirt. No trip meter, no trafficator warning, no ashtray, no stainless steel dash or side strips, no armrests, only one door pocket, manual courtesy light, cheap hard rubber steering wheel etc, etc. It should prove to be a breath of fresh air after years of air conditionong and power everything. At 45 horsepower pulling 21 cwt it is also down on power power! But it is rated to carry 450kg and from memory, first gear is remarkably useful with a load on.
 
230 wagon restoration

simply beautiful restoration. more pic please. can you advise on the hours so far.
thanks
 
this looks a great project and authenticity is a major factor in restoration.
really worth the effort you are putting in
i subscribe to the do it once and do it properly task-approach.

great to see you're going in boots and all and taking photos.

a French 203 which we used at Romsey on the farm, had a metal sliding sunroof.
I recall the French car having better fitting panels than the Australian assembled sedans and station wagons.

a two door panel-van and utility body were popular as well that may have been French imports.

this 203 wagon looks a treat with a new coat of paint and i hope the panels are all a good fit.
Now the car will last for another fifty years. :wink2:

things can go wrong over-doing restoration procedures
i tried a land-rover galvanised chassis which cracked all over the place due they say to hydrogen-embrittlement the galvanizing causes in the metal.

lately i read a resto of a Ford t-bird where he uses powder coating for many parts of the engine and it looks great
still that might be over-doing it
he pre-heats the engine block at 400 degrees for half an hour which seems a worry :crazy: would that alter the block metal temper? :confused:

you do have to be meticulous and you have a clean workshop these days stripping metal in tanks is non-caustic :confused:
and yet the fear is residues may weep from joins at a later date.
well this car looks the goods and a compliment to Peugeot. :cheers:
 
Not sure about the hours so far but the strip down started in January 2011. The shell was ready for blasting and painting in April 2011. However, the painter could not start until November. In the interim I cleaned up and repaired innumerable small bits. Being retired, I have been able to do something most days but a trip to France mid-year and the Canberra winter slowed me up a bit.

Latest drama has been fitting the door glass and fighting the outer sealing strips. Each front door assembly has been apart more than once but I am convinced that next time will be the last. I managed to dent one of the stainless steel surrounds and hoped that it woulld still look OK - wrong. It will have to come off for the dents to be picked up and polished out. Of course this will require removal of the quarter window again.

More photos of the wagon as requested.
 

Attachments

  • Copy of P1010300.jpg
    Copy of P1010300.jpg
    100 KB · Views: 641
  • Copy of P1010305.jpg
    Copy of P1010305.jpg
    90.5 KB · Views: 648
  • Picture 037 (2).jpg
    Picture 037 (2).jpg
    87.8 KB · Views: 633
After some time I should report on the progress of this job. In short, the progress is slow and painstaking.


After much frustration most of the glass and door fittings are in place. The front door glasses have been in and out at least three times each in an attempt to get the outer glass seals to work as intended and to be the right shape. The seals I got from Zero 4 in France are better that those available locally but are still a slightly different shape to the originals. Some of you may be aware that these are staked between the outer window trims and an inner stainless steel locating strip. The problem is getting the rubber seal located so that when secured it follows the curve of the window trim. It also needs to protrude just the right distance so that it does not curl under when the window is lowered. After much frustration I discovered that the best way is to glue the rubber to the window trim with contact cement before re-staking the locating strip. Please contact me if you need some tips about removing and replacing front windows - I'm now a past master!
P1010402.jpg

Most of the brightwork is now in place. I polished the stainless steel myself and forked out for the chrome. The Australian bumpers look pretty plain but at least they shine. The headlight reflectors were re-silvered.

P1010399.jpg
P1010406.jpg

The next big job was the wiring. I was dreading this but, with a couple of my usual glitches it turned out OK. I carefully measured the three loom pieces and bought 100 metres of 3mm black cotton braided wire expecting that this would more than do the job - wrong. It appears that I overlooked the fact that the main power feeds use 4 mm. While the 3mm is good for 10 amps - well within what I thought would be peak load, the regulator is rated at 14 amps. I am sure that the larger wire was there for a purpose. I now have a an excess of 3 mm wire!

Anyway, by following the old looms and a wiring diagram I manage to make up the new looms bound with the correct linen tape. These are now indistinguishable from the old, except that the terminals are not numbered - not a problem as I now know each wire by its location (anal retention is not a bad thing in these circumstances). The one departure is the deletion of the second horn wire - unnecessary as only one horn was fitted from new. As this wire united the front part of the lighting loom I now have wiring in four rather than three parts. The next photos show the re-wired dash resting on five new Michelin Xs, the dash front and where the whole mess will go.
P1010404.jpg
P1010405.jpgP1010401.jpg
 
Hi Pete

I got the quarter window rubbers as a generic kit from Spectrum in Sydney. They were not cheap, do not fit as well as I would have hoped and had to be cut to suit - a very fiddly job. Ready to fit rubbers are available from France, the cheapest I have seen is 90 Euros from Comptoir-carosserie (www.comptoir-carosserie.fr ).
 
Thanks Tony.
I have some from Scotts', thought they were very ordinary, would love to have some new ones for my 403 wagon, but so un-impressed with the Scotts' ones that I am going to re-use my old ones.
cheers Pete
 
Scott's are only an agent for Spectrum - these are the same product.

I have just about fixed all my rubber problems with the exception of rear side window seals. These are a U section with a particularly thick (6 MM) base which is ribbed on the bottom. If all else fails I can use the old ones with a liberal dose of sealer.

Speaking of rubber, I am still looking for lower front floor mats in a better condition than those I have and a good air cleaner hose. Please see my ad in parts wanted.
 
Nearly There- Finally

This has been some time coming. After nearly a year of work on the drivetrain the whole lot came together in August 2014. After a protracted delay at the trimmer I finally got the whole mess back in March this year. At that point I discovered that a couple of screws had penetrated the rear wiring loom, shorting out the tail and stop lights. An intervening trip to Europe meant that it was not until June that the trimmer could come over from Goulburn to pull out the new headlining.

That matter resolved I attempted to start the engine. Having no faith in my ability I had the final assembly done by an experienced Bugatti mechanic. The input was balancing, hard valve seats, new pistons and sleeves, bearings, new timing chain and a reconditioned clutch. No start but plenty of P1010698.jpgP1010484.jpgP1010690.jpgcoughing back! A few days bum scratching revealed that the distributor drive had been inserted 180 degrees out. A quick rearrangement of the plug leads saw what was an expected result - instant starting and quite as a mouse. You will see the slightly strange arrangement in one of the attached photos - something I can live with for the time being. Now all I have to do is carefully bed the rings in and I will have as new performance (a relative term for a standard 203 wagon). However........

The clutch refused to fully disengage - more bum scratching. The wagon has the early type release mechanism which operates below the bell housing. The release fork moves right to the end of its slot so that part of the process is OK. According to the factory workshop manual the forward movement of the clutch thrust is only 1.5 mm. The only part I did not replace was the thrust, thinking it looked OK. My current theory is that I was wrong and the thrust was slightly worn - not compatible with a new unworn clutch plate. There is probably only a poofteenth in it as the engine will turn freely on the starter with the handbrake engaged but the car inches forward with it off. All this means that the engine will have to come out - aaggghh!

The Canberra winter has not been conducive to this process - the shed has ranged from zero to six degrees over the past couple of weeks. Today it is raining and snow is forecast for Sunday. My rationale is that I could risk hypothermia but running the car before spring would not be pleasant due the lack of a heater. All this represents a cop out I can claim due to age and infirmity.

I am now able to contemplate over four year's work and the results are a little underwhelming. In seeking authenticity I probably forgot how basic the 203 utilitares were. The overall effect is rather hair shirt. Possibly the only concession to luxury is the carpet in the load area. However, this is a non-authentic touch to preserve the painted surface and is easily removed.

All this aside I am now (puffs out chest) claiming what is probably Australia's, if not the World's, most authentically restored 203 wagon. I make this claim on the basis that even the one in the Peugeot museum has been dolled up with familiale trimmings. All claims to the contrary will be carefully considered.


The question remains as to whether I now have an asset or a liability. Perhaps I should have spent the money on fast women and slow horses.
 

Attachments

  • P1010691.jpg
    P1010691.jpg
    98.1 KB · Views: 536
  • P1010700.jpg
    P1010700.jpg
    96.1 KB · Views: 523
  • P1010689.jpg
    P1010689.jpg
    92.1 KB · Views: 538
  • P1010693.jpg
    P1010693.jpg
    94.8 KB · Views: 523
  • P1010694.jpg
    P1010694.jpg
    91.4 KB · Views: 542
  • P1010692.jpg
    P1010692.jpg
    94.4 KB · Views: 521
  • P1010699.jpg
    P1010699.jpg
    94.9 KB · Views: 514
  • P1010695.jpg
    P1010695.jpg
    94 KB · Views: 527
  • P1010696.jpg
    P1010696.jpg
    96.8 KB · Views: 556
  • P1010701.jpg
    P1010701.jpg
    95.3 KB · Views: 521
  • P1010703.jpg
    P1010703.jpg
    95.1 KB · Views: 572
That is one beautiful looking 203. What a fantastic job.
 
Please allow me to be overwhelmed for you.
I am really surprised by all the upholstery, but then mine had obviously had a hard 22 years before my custody - and the less said about that the better ...
Could you move to FNQ?
 
Won't be the thrust, you can adjust the play out of this.
More likely the pressure plate is se t up wrongly.
Graham

This has been some time coming. After nearly a year of work on the drivetrain the whole lot came together in August 2014. After a protracted delay at the trimmer I finally got the whole mess back in March this year. At that point I discovered that a couple of screws had penetrated the rear wiring loom, shorting out the tail and stop lights. An intervening trip to Europe meant that it was not until June that the trimmer could come over from Goulburn to pull out the new headlining.

That matter resolved I attempted to start the engine. Having no faith in my ability I had the final assembly done by an experienced Bugatti mechanic. The input was balancing, hard valve seats, new pistons and sleeves, bearings, new timing chain and a reconditioned clutch. No start but plenty of View attachment 71633View attachment 71634View attachment 71635coughing back! A few days bum scratching revealed that the distributor drive had been inserted 180 degrees out. A quick rearrangement of the plug leads saw what was an expected result - instant starting and quite as a mouse. You will see the slightly strange arrangement in one of the attached photos - something I can live with for the time being. Now all I have to do is carefully bed the rings in and I will have as new performance (a relative term for a standard 203 wagon). However........

The clutch refused to fully disengage - more bum scratching. The wagon has the early type release mechanism which operates below the bell housing. The release fork moves right to the end of its slot so that part of the process is OK. According to the factory workshop manual the forward movement of the clutch thrust is only 1.5 mm. The only part I did not replace was the thrust, thinking it looked OK. My current theory is that I was wrong and the thrust was slightly worn - not compatible with a new unworn clutch plate. There is probably only a poofteenth in it as the engine will turn freely on the starter with the handbrake engaged but the car inches forward with it off. All this means that the engine will have to come out - aaggghh!

The Canberra winter has not been conducive to this process - the shed has ranged from zero to six degrees over the past couple of weeks. Today it is raining and snow is forecast for Sunday. My rationale is that I could risk hypothermia but running the car before spring would not be pleasant due the lack of a heater. All this represents a cop out I can claim due to age and infirmity.

I am now able to contemplate over four year's work and the results are a little underwhelming. In seeking authenticity I probably forgot how basic the 203 utilitares were. The overall effect is rather hair shirt. Possibly the only concession to luxury is the carpet in the load area. However, this is a non-authentic touch to preserve the painted surface and is easily removed.

All this aside I am now (puffs out chest) claiming what is probably Australia's, if not the World's, most authentically restored 203 wagon. I make this claim on the basis that even the one in the Peugeot museum has been dolled up with familiale trimmings. All claims to the contrary will be carefully considered.


The question remains as to whether I now have an asset or a liability. Perhaps I should have spent the money on fast women and slow horses.
 
Graham, there is no adjustment left at the thrust. The nut on the rod only gives the necessary 19mm free play at the pedal by bringing the thrust back from the clutch lever ring. My initial thought was that raising the ring by adjusting the clutch levers would solve the problem. However, I am not sure if this process would cause other problems. My question is can it be done and by how much? If so I could use a surface plate and height gauge to ensure all three levers are at an equal height.

All ideas/opinions greatly appreciated.

Tony

AFAIK Graham is referring to the adjustment of the "fingers" on the pressure plate . This adjustment is critical in fichtel and sachs style clutch because it sets the released and engaged position of the ring the carbon thrust contacts.

No amount of actuator rod adjustment will correct for incorrectly set "fingers" on the pp.
 
Try reducing the pedal free play to 10 mm and see if there is any improvement, quick and easy to do and may be a pointer as to where to go to next.

Graham, there is no adjustment left at the thrust. The nut on the rod only gives the necessary 19mm free play at the pedal by bringing the thrust back from the clutch lever ring. My initial thought was that raising the ring by adjusting the clutch levers would solve the problem. However, I am not sure if this process would cause other problems. My question is can it be done and by how much? If so I could use a surface plate and height gauge to ensure all three levers are at an equal height.

All ideas/opinions greatly appreciated.

Tony
 
Reducing the free play does not make any difference as the release fork still cannot go beyond the end of the slot to provide more release. I am left with three possibilities - worn thrust, clutch plate too thick or incorrectly adjusted fingers. I gave the specs to the rebuilder who provided a new driven plate and reconditioned the pressure plate. As the specs indicate a range of two mm for the plate thickness I have just about ruled that possibility out. Again, the specified total movement at the thrust is 1.5 mm. If I could bring the fingers up by an amount within that measurement the problem might be solved. Has anyone done this before?
 
Top