
You are using an out of date browser. It may not display this or other websites correctly.
You should upgrade or use an alternative browser.
You should upgrade or use an alternative browser.
1951 11BL
- Thread starter MichaelJH
- Start date
Michael. I too am to embark on a sill repair. My TA was bought complete however the sill and floor is severely rusted. Please advise if the sill sections were bought ready made. From whom did you get them? It appears from the photos that the sill came as three parts. Did you join all three then attach to the car or insert the pieces separately. Is the car body stable when the sill is cut away or do you require structural support to prevent warping?RnR
Hi RnR I do not know all the answers, but if the sills are rusted badly and/or you cut them out for replacement then you must structually support the body in reasonable alignment. It gets pretty floppy as it is a monoque construction relying on the sills and box sections for strength.Michael. I too am to embark on a sill repair. My TA was bought complete however the sill and floor is severely rusted. Please advise if the sill sections were bought ready made. From whom did you get them? It appears from the photos that the sill came as three parts. Did you join all three then attach to the car or insert the pieces separately. Is the car body stable when the sill is cut away or do you require structural support to prevent warping?RnR
My mate and I after stripping the mechanicals, sat the body on blocks on a flat driveway slab, at the rear under the suspension mountings, then at the front, and adjusted the body on blocks and packing so it was not warped as best we could by eye and measuring. We used straight timber pieces across the body and on the mountings, and the front suspension bolts, to get the twist out of it, and checked as the panels were tacked in place. If you do not do this it will be twisted after welding in the panels and pieces.
Good luck or you can get one of these ?? Jaahn
This does show the important strong points to measure from. From the old workshop manual you should have.
Hi RNR,
I'm definitely not an expert in this, but as jaahn says you will need a jig to hold the body in position when you remove the sills, and especially if you remove the floor, otherwise the whole body will distort.
I made myself a rotisserie which picks up on the mounting points in the Citroen bodywork jig, and also allowed me better access to the sills and floor when working on the car.

There are a few things I'd do differently, but in general it worked well and was worth the time and effort.
I bought the sills from Jose Franssen in Belgium - they do come in three parts. Depending on how bad your sills are you may not need all of them. They also sell the inner panels which form the inside of the shell, but I didn't need those.
I fitted all three parts first, then tacked them in, and had the final welding done. I also had access to a spot welder for the seam along bottom edges of the inner and outer sills.
Jose Franssen won't ship the floor to Australia, so I bought the floor from CAS in the Netherlands. It arrived rolled up, but was fairly easy to flatten out again. The v channels on the under side of the floor are also too long to ship, but they are easy to make.
 www.cas-shop.com
If your sills are like mine, you will need to repair the inner structural parts of the sill too - I couldn't find any parts for that though, so had to make up my own sections.
Hope this helps,
Michael
I'm definitely not an expert in this, but as jaahn says you will need a jig to hold the body in position when you remove the sills, and especially if you remove the floor, otherwise the whole body will distort.
I made myself a rotisserie which picks up on the mounting points in the Citroen bodywork jig, and also allowed me better access to the sills and floor when working on the car.
There are a few things I'd do differently, but in general it worked well and was worth the time and effort.
I bought the sills from Jose Franssen in Belgium - they do come in three parts. Depending on how bad your sills are you may not need all of them. They also sell the inner panels which form the inside of the shell, but I didn't need those.
I fitted all three parts first, then tacked them in, and had the final welding done. I also had access to a spot welder for the seam along bottom edges of the inner and outer sills.
Jose Franssen won't ship the floor to Australia, so I bought the floor from CAS in the Netherlands. It arrived rolled up, but was fairly easy to flatten out again. The v channels on the under side of the floor are also too long to ship, but they are easy to make.
Classic Automobile Service | Citroën Traction Avant specialist
Bent u op zoek naar Citroën Traction Avant onderdelen? Classic Automobile Service is uw Citroën Traction Avant specialist. Bestel direct of neem contact op!
If your sills are like mine, you will need to repair the inner structural parts of the sill too - I couldn't find any parts for that though, so had to make up my own sections.
Hope this helps,
Michael
Your sills must have been very rusty for the inner structure that supports the rear axle frame to need replacing. All I had to do was reskin the rearmost 10 inches of outer panel the rest inside was perfect. The internals are now coated with at least 5 litres of fishoilene.
Hi Gerry,
It was very rusty - especially on the drivers side. Not just the support for the rear axle frame, but all the way along.
I have some new inner panels, a new part in the internal reinforcement, and new outer sill panels front to back both sides.


Michael
It was very rusty - especially on the drivers side. Not just the support for the rear axle frame, but all the way along.
I have some new inner panels, a new part in the internal reinforcement, and new outer sill panels front to back both sides.
Michael
That work is Epic! Congrats on such a good job!
I'm in awe of your rust repairs..... Congratulations on both the work and the bravery!!
So, I'm making progress. I have repaired the rear parcel shelf, which was a bit like Swiss cheese.
I do have a question though - I'm not sure what the bracket on the left (the one with the threaded insert) does / is supposed to look like. I have the bracket, but I think I was twisted out of shape, and I'd like to bend it to the correct shape before I weld it back on.
Can anyone help?
Michael


I do have a question though - I'm not sure what the bracket on the left (the one with the threaded insert) does / is supposed to look like. I have the bracket, but I think I was twisted out of shape, and I'd like to bend it to the correct shape before I weld it back on.
Can anyone help?
Michael
Hi Michael the bracket with the threaded nut holds the lower end of the inner trim rail. The other end of the trim rail attaches to the rear of the upper side door frame. To this rail, the 'ear shell' trim board is attached. the lower edge of the trim board slots into the channel that you can see on the parcel shelf, hope this helps!
Should be one on each side, Michael! Sorry about the rag in the way on the RHS. The other bracket along side clamps the lower trim board that blind fixes the headlining under the window and onto the parcel shelf!

Yes, that bracket locks in the lower rear headlining board as I said. It is the long board with the notches below the two B pillar boards in this pic.

Busy working on the map shelf and battery compartment at the moment.
I've put new threads on the battery straps, as the old were were very worn:
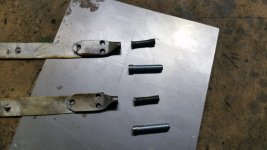
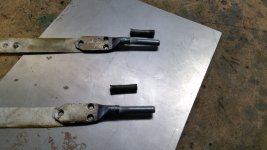
The handbrake mounting plate is spot welded in:
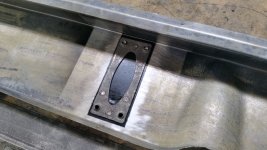
And the whole assembly (upper and lower map shelves and battery compartment) is ready to be spot welded together and then plug welded into the car tomorrow:
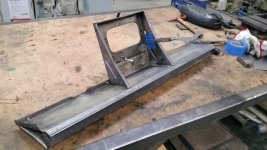
Michael
I've put new threads on the battery straps, as the old were were very worn:


The handbrake mounting plate is spot welded in:

And the whole assembly (upper and lower map shelves and battery compartment) is ready to be spot welded together and then plug welded into the car tomorrow:

Michael
I have a brand new rear window on GC that I don't need.
@MichaelJH Looks great!
Did you turn down a couple bolts to make the new threaded ends or start from round stock?
Did you turn down a couple bolts to make the new threaded ends or start from round stock?
The most amazing metal work I have ever seen on an Australian Traction restoration!
Ringer,
I do have the original rear window, but it's been a long while since I looked at it, so I don't know what condition is in. If I need one I'll be in touch!
Pete,
I turned down the heads of a couple of (M7) bolts.
Gerry,
Thanks! Of course if I hadn't started with a rust bucket......
I had a slight change of plan - I'm repairing the scuttle vent surround before I put in the battery compartment assembly, as the access is easier with the big hole where the battery compartment should be.
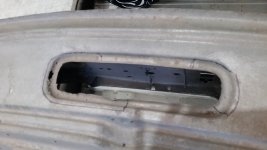
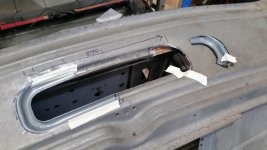
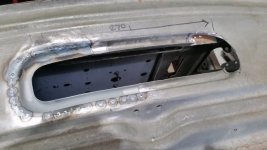
Michael
I do have the original rear window, but it's been a long while since I looked at it, so I don't know what condition is in. If I need one I'll be in touch!
Pete,
I turned down the heads of a couple of (M7) bolts.
Gerry,
Thanks! Of course if I hadn't started with a rust bucket......
I had a slight change of plan - I'm repairing the scuttle vent surround before I put in the battery compartment assembly, as the access is easier with the big hole where the battery compartment should be.


Michael
They are a pain in the neck to get right!