1951 11BL

MichaelJH

Member
VIP Paid Subscriber
Tadpole
Tadpole
Joined
Jul 17, 2022
Messages
32
Location
Sydney
Hello,

I'd like to introduce my (very long term) restoration project - a 1951 11BL.
I bought this car as a sad looking non runner in the mid 90's, and have been working on it on and off ever since.
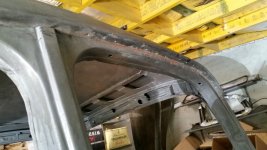
In the last couple of years I have been repairing the body, and replaced the sills and floor, with the help of the guys at MotorRetro in Parramatta.
Most recently I have been working on the boot floor, which was pretty much like a sieve, and the body work under the boot.
Next area I'm going to attack is the battery compartment and fire wall. I have removed the battery box and the shelf which runs the width of the car, and will make new ones to go in there.
I've attached some pictures of the car as I bought it, and some of the body work in progress.
Michael

11BL 01.jpg11BL 03.jpg11BL02.jpg

20201211_072251.jpg20201217_072615.jpg20201218_081115.jpg20220708_145824.jpg20220708_114055.jpg
 
Welcome to the forum. your repairs look great. If you look at you original boot floor you will see two drilled holes in the well. The boot is designed to leak into the well. the holes are there to let the water out.
great to see another Traction on the way to being back on the road.
 
Hi Michael,
Cool to see another 11BL doing sill repairs. I'm close to starting on mine.

I really like your rotisserie - do you have a shot of how the car is supported at the rear?

Pete
edit: Did we run into each other on another forum? I'm working my way towards an EV conversion on mine - once the rust repair is complete.....
 
Hi Tractionfan,
Thank you for the comment about the holes in the boot floor - I will make sure I put them in.
The drainage of the boot seems to me to be a pretty bad bit of design - no wonder the boot floor was completely rusted out.
I have been considering the possibility of adding some sort of channel (with drainage tubes through the boot floor) along the bottom of the boot opening to stop water draining into the boot while I have the opportunity.
Has anyone else bothered to do that? It would be interesting to see any solutions.

There are many other areas of the car where I don't have any idea what the original metal looked like, as it's rusted away. I will be asking for photos and help!

Hi Pete,
Yes - I we did meet elsewhere. I may follow you lead and go electric!
I've attached a couple of pictures of my rotisserie. I picked up on the front horns, the engine mounting plates, and the rear cross member mounting points (from inside the car). Sorry it's not a great picture of that. I'm happy to share more details if you are interested.

Michael

20200813_162344.jpg20200813_162801.jpg
 
The rotisserie is slick. I see the three pickup points - I was curious if you had another further back past the rear crossmember plates, but it doesn't seem like you need it.

I'd like to use the crossmember plates on mine, but the rearmost captive nut mounting and all its surrounding sheetmetal (both sides) has completely rusted away. I was thinking that I'd need to stay clear of mounting anything there to provide access. You've given me lots to think about. Did you have to rebuild the center layer of the three sill layers in that area? The layer with the captive nut?

I guess, if I keep the support brace further forward, I can just leave the rearmost bolt out and use the temporary cross member plate as a template for where to put the captive nut when I reattach it.

Do you get any measurable flex in the main beam?
Pete
 
Hi Pete,

I don't think you need anything past the cross member plates - there isn't much to attach to anyway. The beam I used is 89 x 89 x 3.5mm. Probably way heavier that needed, so no appreciable flex.

The rear captive nut on one side of my car was also rusted out, but as you can see, you can still pick up on the other two mounting points. I ended up having to cut the mounting plate to get at that area, and then weld it back together. If I was doing it again I'd make the mounting point for the rear bolt removable, but I'd still have it there as a positioning point for the bolt and to have everything as stiff as possible when replacing the floor.

The last image shows all of the mounting points.

I'd be a happy to share CAD files for the rotisserie if you are interested.

Michael

20201022_133819.jpg20201022_151243.jpg20201026_150054.jpg20210115_121416.jpg
 
Hey Michael, l sold you this 11BL! Really pleased to see you doing a top notch resto on it. This was one of three tractions l bought from Wentworth Falls back in the early 1990’s l think. Also good to see some glimpes of my old Camperdown workshop which is no longer there. Good luck with the rebuild.
Ps l have since bought another 11BL and have commenced a rebuild.
 
Hi Geoff,
That's amazing - I do remember that you had a least on other traction (a big 6?) in the workshop. You had a great space with a ramp up into it, I think?
How is the rebuild on your 11BL going?
I am making progress, but very slowly! Next job is removing the gutters over the doors as it's very rusty in the seam - particularly on the drivers side for some reason.
Michael
 

Attachments

  • 20221119_131521.jpg
    20221119_131521.jpg
    729.8 KB · Views: 148
Hi Michael,
I’ve never owned a Big 6 unfortunately, must have been my L15 which is nearing completion. My 11BL is very original and would be a great candidate for a “rat rod” look which l will attempt. I’m rebuilding two front cradles at the moment.
 

Hi Geoff,

I have a sense of deja vue!

Gerry - that's' an impressive effort - I'm inspired!

Yesterday I made new parts for the map shelf under the dash.
Next job is to make the battery box.
As you can see it's missing most of the bottom edge - does anyone has a photo of how it should look?
I've attached an image of my CAD model of how I assume it should be.

20221218_1439581.jpg


20221218_1441171.jpg


Battery Compartment 0-01.png


Michael
 
You are on the right track Michael the diag looks spot on! I did not need to do any work in that area other than clean and paint. My rust repairs were all confined to the boot floor and the bottom 5 inches around the rear wheel arch from the shock well aft around to the lower ext. panel between the boot hinges I hand-made all of these associated panels with only a hammer and dolly and using a six-inch deep 8 foot long I beam of steel for forming straight folds. Real bush panel work!
 
Hi Geoff,

I have a sense of deja vue!

Gerry - that's' an impressive effort - I'm inspired!

Yesterday I made new parts for the map shelf under the dash.
Next job is to make the battery box.
As you can see it's missing most of the bottom edge - does anyone has a photo of how it should look?
I've attached an image of my CAD model of how I assume it should be.

View attachment 214054

View attachment 214055

View attachment 214056

Michael

That's amazing, how on earth did you make that recess in the panel with the folds there?
 
On that battery box diag., there would also be a floor to rest on the narrow folds it also overhangs the front edge sheet metal when installed and then is angled down to match the sloped face of the firewall!
 
Hammer and dolly work, and a bit of shrinking on the turned up edge.
I actually folded the edges after forming the raised shapes.
I'm working on my skills, and surprised that it came out as well as it did.... the 0.8mm thick steel is relatively easy to work which helps.
My understanding of how the battery box sits is like this - on the top map shelf part that I just made, with the two angled down faces which are spot welded to the firewall.
Firewall 0-01.png


Firewall 0-02.png


Michael
 
1000000066[1].jpg
If you look very carefully to the left of the gear change mounting you will see a small tab of metal overlaying the metal of the map shelf as you have made it and shown in your diagrams. That is the fold-down of the battery box floor that I was speaking of. It projects almost two-thirds of the way down the panel and is spot welded to the part of the map shelf that is visible from the engine bay. Above that is the drop-in battery tray that the cars had for extra corrosion protection. Sorry, the photo shows up the dust. I will have to clean it again!
 
Last edited:
I'm finding it a bit difficult to read your photo, but I found this photo of my car, so I can see there is an extra sheet of material which folds down over the front lip at the edges of the recess. Is that the piece you mean?
20220609_115203.jpg

Michael
 
Top