‘74 DS Resto

KAndy

Member
Fellow Frogger
Tadpole
Joined
Jul 24, 2019
Messages
133
Location
Melbourne/ Inner Nth
icon1.gif
‘74 DS resto

Hello all,
I’ve been lurking awhile.
Learning, watching, taking in all your wisdom then I struck last year.
I was “lucky” enough to pick up this DS from this lovely bloke:
C48797CF-65FB-4260-B611-A18D9D8C9772.jpeg
Terrific looking vehicle, exactly what I had been looking for.
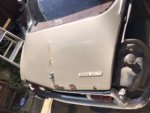
A 1974 DS 23 Pallas.
However all great things come with a challenge, the first being a bit of rust
F6F3477D-147F-45CD-9E57-66531EBB910B.jpeg
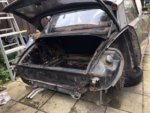
Which launched me into a resto project, which will take some time...
To date, I’ve started on the back end, removed the rust
F9174D29-AB89-4972-8D00-3117BC23765D.jpeg
F91C7D1F-6F78-412E-BDDE-271D2F0FE03D.jpeg
If there is more interest I’ll keep posting.
and apologies for the images, still learning to drive this app.
- and thank you all for the silent inspiration you gave me to launch into this. :eek:
Andy
 

Attachments

  • F6F3477D-147F-45CD-9E57-66531EBB910B.jpeg
    F6F3477D-147F-45CD-9E57-66531EBB910B.jpeg
    25.6 KB · Views: 689
  • F9174D29-AB89-4972-8D00-3117BC23765D.jpeg
    F9174D29-AB89-4972-8D00-3117BC23765D.jpeg
    33.8 KB · Views: 690
  • F91C7D1F-6F78-412E-BDDE-271D2F0FE03D.jpeg
    F91C7D1F-6F78-412E-BDDE-271D2F0FE03D.jpeg
    35.5 KB · Views: 686
There definitely is some interest!
Please keep posting!
 
Of course keep posting! I don’t want to be the only one chatting about DS restorations here. We need a few more crazy people that want to tackle fixing up rust and other items. :headbang:

keep em coming!
 
Always good to see another madman joining in the fun of fixing up a DS. Looks like you've got a good base to start with
 
that one doesn't look that bad at all. Do you have some higher resolution piccies of the boot area :confused: A lot I've seen were a lot worse than that one 20years ago!
 
is your car a manual or auto and does it have efi? aircon?

23's are beasts! Looks like that will keep you amused, frustrated and grease stained in equal portions.
 
She’s a 5 Speed manual, Weber Carby and all plumbed for aircon but missing the compressor - something I’ll have to hunt down...
I’m going to have to read up on posting better images...
 
When replacing the A/C compressor I suggest you go with a modern alternative. The piston reciprocator types ( York ) are rough and vibratory and are known to cause fatigue cracks in the mounting hardware. A nice modern Sanden swash plate design is way superior.
 
Cutting it out

Still cutting out the rust ...
D1CC99C9-00B8-46A9-B3BB-AC688DA03838.jpegD1CC99C9-00B8-46A9-B3BB-AC688DA03838.jpeg]
Aim to start welding in patched soon,

Also had a go at the boot:
Close to final: 5E04882F-42E2-46A7-9F0B-08E11D3D6288.jpeg
In prep: 08FC49DD-27BB-4F6E-9F11-AF1AB4B566DF.jpeg

This business certainly does take time!

Andy
 
She’s a 5 Speed manual, Weber Carby and all plumbed for aircon but missing the compressor - something I’ll have to hunt down...
I’m going to have to read up on posting better images...

Hi i have a DS23 with air con you can com and have a look to see how mine is done if you like, when you get to that stage.
PM me.
 
OK, this is an appeal to the brains trust, my roof rails are in poor shape (rusted) and the bonded roof will have to come off.
I’ve read all the posts on roof removal, “what sealent to use”, “Leaky DS roof”, “74 D Special” ... A major question remains for me:

What’s the recommendation, replace (got to find a bonded roof version) the rubber which sits between the roof and rails, or seal the roof on with just Silka/ Wurth/ other product?
With no rubber will the roof sit too low?

The rails do look bad, but I’ll only know how bad once I get the roof off - that will trigger the dilemma of replacing them with a supplied product or make something up myself... Lets see what is revealed eventually..

Just doing the research before I dive into it
Thanks,
Andy
 
Hi Andy
What you've found is a typical problem. On the positive side, others have been down this path before so there is a lot of experience to call on.

In can't speak directly from experience as my roof is a bolt-on, but whereas a bolted-roof car has a big, thick, rubber lip all around the roof edge and it is that, that is clamped down into the channel, on a bonded roof car, there is only a thin black rubber 'seal' added to the top of the roof edge after bonding - mostly to give a good finish and for looks. It doesn't go under the roof edge. The roof edge just sits in/ on the bonding material, with the seal on top last, and so the roof cannot be "too low" without that seal.

On your search through the threads, did you find Greenblood's excellent cutaway photo of a bonded roof. It's really helpful for understanding roof construction. I took the liberty of labelling a copy up and attach it here. You can clearly see how the roof just sits on a bed of sealant. So the choice you have is to bond and just smooth the top face of the bonding (i've seen that and it can look great), or bond and leave an allowance to put the finishing strip on the top after. That finishing strip is readily available from the parts suppliers.

In terms of your actual chassis, be prepared to find a lot of damage to the rials/ gutter once the roof is off. If so, you can buy some repair sections and will need to patch other areas too. The alternative is to find a donor roof from a scrapped car and replace the lot - or large parts of it - in one go.

Roof cutaway labelled.jpg

Budge/ Paul
 
The roof edge just sits in/ on the bonding material, with the seal on top last, and so the roof cannot be "too low" without that seal.

Budge/ Paul

Only gottcha there is to ensure the thick spacer washer sits under the bolt brackets (labeled metal clamp in your labeled image). Without the spacers the roof can sit too low and will give problems especially fitting the rear stainless indicator trumpets.

Cheers
Chris
 
Only gottcha there is to ensure the thick spacer washer sits under the bolt brackets (labeled metal clamp in your labeled image). Without the spacers the roof can sit too low and will give problems especially fitting the rear stainless indicator trumpets.

Cheers
Chris

Good point Chris. I did look at that, and see that the crimped bracket was raised - but couldn't remember whether the bit under it was spot welded to the roof channel or loose and so a risk/ problem if not there.

In terms of Andy's question about whether to use a finishing strip or not, the only thing holding that trim in place seems to be the stainless steel trim on the roof edge. And in terms of that, the rubber finisher looks as though it stops the trim snapping fully into place as it was originally intended to do.

Yes, I've suggested trimming about 5mm from the leg of the rubber trim, as in the diagram. . . also ensure the mastic sits well below the cant rail edge.

attachment.php


Cheers
Chris
 

Attachments

  • Roof finishing strip.PNG
    Roof finishing strip.PNG
    52 KB · Views: 1,614
I've combined your cutaway photo with the factory diagram on the attached Chris - to allow for easier side-by-side comparison.

roof cutaway.jpg
 
Top