
Resurrecting a Goddess.......Twice
- Thread starter faulksy
- Start date

Episode 20: All the Trimmings
Ages ago back in April I took a road trip to visit Denton Christie at European Autocare in Penrith with the aim of obtaining an entire car's worth of Pallas trim. I figure seeing as the interior was ruined why not upgrade? The same thought occurred when the car was first being put together but there is no point making a Pallas unless you can do it properly with all the pieces. To that end, I roped in a mate and a mad road trip was planned. We ended up driving to Penrith, crawling over many wrecks and driving back to Melbourne in just over a day. It was worth it though


There are approximately 60 extra pieces of trim on a Pallas and it took many hours to fight them off the wrecks. Go knows what Citroen made the screws from but they were to rusty to unscrew and yet drill bits got nowhere the trying to drill them out. Seeing as most of the trim is fitted to holes that don't currently exist on my car a bunch of holes needed to be drilled before it goes for paint.


The interior trim was easy as the trim itself can be used as a template. The exterior ones required running masking tape down the panels and painstakingly measuring the location of every hole. There is supposed to be 96 or so just for the thin trims at the top and bottom of each panel. The only things I haven't been able to source are a set of reflectors, interior light lenses and C pillar trim with the DS badge instead of the pallas badge. If anyone out there can help, give me a shout.
The car is now devoid of all bodywork and the panels are off at the painter being taken back to bare metal.
Ages ago back in April I took a road trip to visit Denton Christie at European Autocare in Penrith with the aim of obtaining an entire car's worth of Pallas trim. I figure seeing as the interior was ruined why not upgrade? The same thought occurred when the car was first being put together but there is no point making a Pallas unless you can do it properly with all the pieces. To that end, I roped in a mate and a mad road trip was planned. We ended up driving to Penrith, crawling over many wrecks and driving back to Melbourne in just over a day. It was worth it though
There are approximately 60 extra pieces of trim on a Pallas and it took many hours to fight them off the wrecks. Go knows what Citroen made the screws from but they were to rusty to unscrew and yet drill bits got nowhere the trying to drill them out. Seeing as most of the trim is fitted to holes that don't currently exist on my car a bunch of holes needed to be drilled before it goes for paint.
The interior trim was easy as the trim itself can be used as a template. The exterior ones required running masking tape down the panels and painstakingly measuring the location of every hole. There is supposed to be 96 or so just for the thin trims at the top and bottom of each panel. The only things I haven't been able to source are a set of reflectors, interior light lenses and C pillar trim with the DS badge instead of the pallas badge. If anyone out there can help, give me a shout.
The car is now devoid of all bodywork and the panels are off at the painter being taken back to bare metal.
I'm not looking forward to putting my pallas trim back on. Luckily, that's a long way off! As well as a few details inside, there are some other Pallas bits outside - such as the chromed boot lid hinges and a chromed boot lid knob - did you get those as well or are you not fussed?
I'm sort of hoping fitting the trim will be a lot easier than removing it. The boot lid finger pull was chrome plated on my car when it came to me. It could just be an export market fitment or all standard DS got chrome ones while ID had to make do with polished aluminium. On that note, I'll stick with the polished aluminium boot hinges, they can always be chromed later. Can't wait to start putting it all back together, shiny stainless and black leather should make a pretty nice combo!
To those follow this saga,
I am restoring another car in the same garage where faulksy has his Citroen. The speed/quailty of rebuild is amazing considering where he started from...i.e. a barbeque.
I am restoring another car in the same garage where faulksy has his Citroen. The speed/quailty of rebuild is amazing considering where he started from...i.e. a barbeque.
Episode 21: Let there be light!
It's been a bit of a mission but 220m, yes you read that right, (750ft) of wire later and the car now has brand new wiring front to back. The final task was to make up the rear loom which completes almost a full lap of the car. Here it is laid out on the floor next to a GS!

Colour coding all the ends took ages, not helped by the fact I had aparently used two different wiring diagrams at some point and put the wrong colours on. The new bullets seem much more strudy than the original ones, time will tell...

Running the wiring in the sill is tedious to say the least. Access to the brackets is restricted by the bundle of hydraulic lines that also run down the passenger side. Now for the last great unknown.....Does it all work?
Connecting all the switches, lights and sensors up brought the warning lights to life so that was a good sign. However turning the headlight switch produced some very weird results. No matter which way it was turned, pushed and pulled a random combination of lights came on, even an indicator at one point! checking the grounds and other connections revealed everything to be in order and left me wondering how I'd managed to stuff it up that badly. Working on a hunch that the switch might be buggered I directly connected the switch outputs to +12 and to my surprise all the lights worked properly. Putting a meter across the switch proved it was not behaving so time to do some digging.

For those playing at home, black is +12, mauve is the parking lamps, green is low beam, yellow is high beam and red is the driving lamps. Without a relay for the high beams there would be 220W of power being drawn through the yellow wire! There is a reason I doubled the wire gauge for the headlights when building the new looms.
Drilling out the 4 brass rivets that hold the switch together released several springs and brass plates which all had to be picked up off the floor and accounted for. The switching action is achieved by rotating a brass plate across several contacts embedded in the back cover of the housing.
 The square plastic part is what provides the notches. There is a small spring loaded pin on one side which is what activates the driving lamp switch.


The push switch for the driving lamps is very similar to the mechanism in a retractable pen.

It all looked brand new inside so I assumed something had gotten out of alignment. Reassembly is achieved through a careful balancing act requiring three hands. Not feeling overly confident the switch was plugged back in and amazingly worked perfectly! Even the indicators worked.


Feeling somewhat pleased, I decided to quit while ahead and call it a night. Next up, upholstery........
It's been a bit of a mission but 220m, yes you read that right, (750ft) of wire later and the car now has brand new wiring front to back. The final task was to make up the rear loom which completes almost a full lap of the car. Here it is laid out on the floor next to a GS!
Colour coding all the ends took ages, not helped by the fact I had aparently used two different wiring diagrams at some point and put the wrong colours on. The new bullets seem much more strudy than the original ones, time will tell...
Running the wiring in the sill is tedious to say the least. Access to the brackets is restricted by the bundle of hydraulic lines that also run down the passenger side. Now for the last great unknown.....Does it all work?
Connecting all the switches, lights and sensors up brought the warning lights to life so that was a good sign. However turning the headlight switch produced some very weird results. No matter which way it was turned, pushed and pulled a random combination of lights came on, even an indicator at one point! checking the grounds and other connections revealed everything to be in order and left me wondering how I'd managed to stuff it up that badly. Working on a hunch that the switch might be buggered I directly connected the switch outputs to +12 and to my surprise all the lights worked properly. Putting a meter across the switch proved it was not behaving so time to do some digging.
Drilling out the 4 brass rivets that hold the switch together released several springs and brass plates which all had to be picked up off the floor and accounted for. The switching action is achieved by rotating a brass plate across several contacts embedded in the back cover of the housing.
The push switch for the driving lamps is very similar to the mechanism in a retractable pen.
It all looked brand new inside so I assumed something had gotten out of alignment. Reassembly is achieved through a careful balancing act requiring three hands. Not feeling overly confident the switch was plugged back in and amazingly worked perfectly! Even the indicators worked.
Feeling somewhat pleased, I decided to quit while ahead and call it a night. Next up, upholstery........
Last edited:
Nice post Faulksy. I'm sure there are a lot of folks curious to see what's in those switches.
It will be interesting to see how you get on with those connectors too. Presumably the tags on trends are available in enough different colours to replicate the Citroen colour-coding scheme?
It will be interesting to see how you get on with those connectors too. Presumably the tags on trends are available in enough different colours to replicate the Citroen colour-coding scheme?
Thanks Paul. I was a bit surprised at how simple the internals were given Citroen's penchant for over engineering everything. For the more ambitious out there, the circular driving lamp symbol can be prised out to reveal the fixing for the knob allowing it to be removed and the stalk rechromed.


I'm going down a similar route with my earlier style stalks. I thought about re-chroming, but instead i'm going to mix and match stalks, knobs and bodies from the various bits and pieces I have.

The parts were used between 62 and 68 so are not that hard to find. I've got a few spare bits and bobs tucked away. i think there is more completion for the 69 to 75 parts and so higher prices so I'm sure you efforts to press things back into use will be well received.
Episode 22: One Year On
So, It's just over a year since the fire and I think it's time to see where things are at. The hydraulics have been rebuilt and brought back to life, new wiring has been laid front to back, the frame has been stripped cleaned and painted, new insulation all around the cabin and panel work has started. Since the last update there have been many discussions with the panel beater about the sorry state of the panels I supplied him. Turns out under the paint was more rust damage than anyone had thought with the rear passenger door being the worst of them all.

Not exactly a show winning repair. We decided it would be more economical to source some better panels rather than repair. Meanwhile the upholstery saga is taking over my living room with bits of seat everywhere. It is worth it though as the results are pretty good. Heres a bit of before and after.


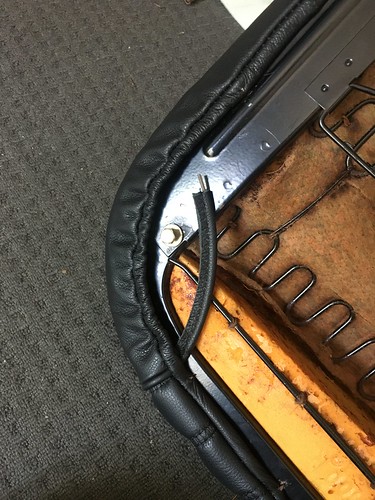
A fair bit of adjustment with new foam was required to get the covers fitting nicely. They seem to have been made slightly to big, either that or the 50 year old foam has shrunk more that I'd expect. a final bit of assembly and they can go back in. If you've ever wondered why there is a piece of wire sewn into the bottom edge of the front seat bases here is the answer. It needs to be pulled tight to pull the front corners in to follow the curve properly.

The dashboard is once more taking price of place in the interior. It still needs a few more of the silver trims to be redone but is otherwise finished.

The cabin blowers and windscreen wipers were the last electrical items to be sorted. Fixing the blowers ended up being a mission as they had to be totally dismantled to free the motors. Incidentally, the motors spin in opposite directions. I discovered this when swapping the motor out of a drivers side blower into the heater blower and wondered why no air was coming out of the vent.

The wipers were a bigger problem. I have a replacement switch from a wreck but the stalk is rusty and the plastic has turned a nasty shade of green. This lead me to order a NOS one from Europe but here in lies the problem. I connected up the switch and found that the motor only had one speed. Double checking the wiring revealed all was wired properly and yet it refused to work. A post on here from some time back gave a hint in suggesting the LDH and RHD switches are different and incompatible but the posters had no idea what was different about them. To make things more confusing, none of the factory wiring diagrams match the 3 wire bosch motor fitted to most AUS spec cars. Putting a meter across the switches gave a hint as to the difference but they still made no sense. The only consistency seemed to be that the black wire was the power input to the switch.

When taken apart the difference is immediately apparent. The LHD (top in photo) switch connects the white and blue wires together in the off position then black to blue and finally black to red for the 2 wiper speeds. The RHD switch connects red and blue together in the off position then black to blue and red and finally black to blue for the 2 wiper speeds. The challenge is how to bridge power between the wires on the LHD switch for the 2 speeds. Enter 2 7A diodes as it turns out the unloaded motor draws 3.5A. One between the red and blue and the other between the white and red to get the auto park working.


The diodes are the black blocks inserted into the connectors. Not a very elegant mounting method but for now it works. With that sorted the I think I can call the electrics finished! Enough for now, till the next one.....
So, It's just over a year since the fire and I think it's time to see where things are at. The hydraulics have been rebuilt and brought back to life, new wiring has been laid front to back, the frame has been stripped cleaned and painted, new insulation all around the cabin and panel work has started. Since the last update there have been many discussions with the panel beater about the sorry state of the panels I supplied him. Turns out under the paint was more rust damage than anyone had thought with the rear passenger door being the worst of them all.
A fair bit of adjustment with new foam was required to get the covers fitting nicely. They seem to have been made slightly to big, either that or the 50 year old foam has shrunk more that I'd expect. a final bit of assembly and they can go back in. If you've ever wondered why there is a piece of wire sewn into the bottom edge of the front seat bases here is the answer. It needs to be pulled tight to pull the front corners in to follow the curve properly.
The dashboard is once more taking price of place in the interior. It still needs a few more of the silver trims to be redone but is otherwise finished.
The wipers were a bigger problem. I have a replacement switch from a wreck but the stalk is rusty and the plastic has turned a nasty shade of green. This lead me to order a NOS one from Europe but here in lies the problem. I connected up the switch and found that the motor only had one speed. Double checking the wiring revealed all was wired properly and yet it refused to work. A post on here from some time back gave a hint in suggesting the LDH and RHD switches are different and incompatible but the posters had no idea what was different about them. To make things more confusing, none of the factory wiring diagrams match the 3 wire bosch motor fitted to most AUS spec cars. Putting a meter across the switches gave a hint as to the difference but they still made no sense. The only consistency seemed to be that the black wire was the power input to the switch.
When taken apart the difference is immediately apparent. The LHD (top in photo) switch connects the white and blue wires together in the off position then black to blue and finally black to red for the 2 wiper speeds. The RHD switch connects red and blue together in the off position then black to blue and red and finally black to blue for the 2 wiper speeds. The challenge is how to bridge power between the wires on the LHD switch for the 2 speeds. Enter 2 7A diodes as it turns out the unloaded motor draws 3.5A. One between the red and blue and the other between the white and red to get the auto park working.
As a side note, anyone who wants larger versions of the photos can get them from here
https://www.flickr.com/gp/146554466@N02/uDZ77W
There's images there going all the way back to when I first bought the car and rebuilt it the first time.
https://www.flickr.com/gp/146554466@N02/uDZ77W
There's images there going all the way back to when I first bought the car and rebuilt it the first time.
Thanks Faulksy. Someone in the UK was recently asking about a replacement light stalk and found that they are different from the European ones. I pointed him to your post no.92, though I don't know whether he is confident enough to pull his apart to find out why it's stopped working.
The switch isn't so bad to take apart, drill the top off the rivets and you're done. Unlike the headlight switch there aren't a whole lot of parts to fall out besides a spring and ball bearing which gives the detents. If there isn't 12V on the black wire then that would explain why it's not working. Could also be the ground wire connecting the motor body to earth has given up.
Episode 23: Time for Some Shiny Bits!
Things are still ticking along nicely although I am running out of jobs to do till the panels come back. First up is the headlights. They were silvered the last time round and I had hoped that they would be alright. A closer look revealed a lot of black spots on the reflectors which seemed to be soot. Hot soapy water didn't shift it so I bit the bullet and took the glass off.

The black spots are actually the primer coat under the aluminium and no amount of cleaning will fix it. After calling around a few places I settled on Hyqual up in QLD. Just over a week they came back looking perfect.


The inner high beam reflector is spring mounted and can be independently aimed from the low beam.


The biggest problem with the Amplilux lights is how light from the low beam globe is bounced out of the lens. There is an assembly at the back where the bulb is inserted that directs the light to the top half of the reflector. If its corroded or dulled then most of the light energy will be absorbed not reflected.
Next up is the sill trim. Salvaged from several wrecks in Sydney with a lot of elbow grease they polished up nicely. The grey door rubbers needed a good scrub but also came up well.

Due to a mix up last time round I happened to have the right carpets for a pallas so have fitted them temporarily to see how they look. I've been tossing up weather to get the carpets form Coverdale in the UK or stick with the set I got last time from Germany.

The final bit of work recently is the B pillar covers and fitting the switch pod under the steering wheel. The leather doesn't really show up well in photos but the cap for the base of the pillars gives a good idea.

It's not till you look straight down the pillar that you realise how weirdly shaped it is.

How often do you reckon this piece of rubber goes missing when taking the switch pod off? Its also not a bad angle to show off the dashboard finish.

Things are still ticking along nicely although I am running out of jobs to do till the panels come back. First up is the headlights. They were silvered the last time round and I had hoped that they would be alright. A closer look revealed a lot of black spots on the reflectors which seemed to be soot. Hot soapy water didn't shift it so I bit the bullet and took the glass off.
The biggest problem with the Amplilux lights is how light from the low beam globe is bounced out of the lens. There is an assembly at the back where the bulb is inserted that directs the light to the top half of the reflector. If its corroded or dulled then most of the light energy will be absorbed not reflected.
Next up is the sill trim. Salvaged from several wrecks in Sydney with a lot of elbow grease they polished up nicely. The grey door rubbers needed a good scrub but also came up well.
Due to a mix up last time round I happened to have the right carpets for a pallas so have fitted them temporarily to see how they look. I've been tossing up weather to get the carpets form Coverdale in the UK or stick with the set I got last time from Germany.
The final bit of work recently is the B pillar covers and fitting the switch pod under the steering wheel. The leather doesn't really show up well in photos but the cap for the base of the pillars gives a good idea.
As always, thank you for sharing Faulksey. I have Cibie lights on my car and am contemplating getting them re-silvered. I understand the technique for removing the lens is to heat the unit in an oven to a particular temperature, then gently prise the glass off. Is that right? How did you remove yours please? Follow on question is perhaps obvious. What did you use to put the lens back on? I've heard of one of the 'Sikaflex" products being used. Not sure which one, or even plain silicon sealant. I'm really surprised that you can't but the proper grey/ white stuff as originally used? Or maybe you can and I'm just not looking in the right places?
Pallas trim. Removed all mine and bent a piece in the process It's one of the rear bit that sits on the flat surface. it's tucked between the bottoms of the B and C post areas and 'bent' rather than 'bowed'. I'd already nicked it with an angle grinder trying to remove the rusty screw right at the back at the C pillar. how on earth did you get you ones of intact?
Rubber bits. They really give a nice (and as-intended) finish. The sometimes wriggle off in use and fall inside the dash - leaving bits to rattle and chip. I'm pretty sure the European suppliers sell it as report part these days.
Pallas trim. Removed all mine and bent a piece in the process
It's one of the rear bit that sits on the flat surface. it's tucked between the bottoms of the B and C post areas and 'bent' rather than 'bowed'. I'd already nicked it with an angle grinder trying to remove the rusty screw right at the back at the C pillar. how on earth did you get you ones of intact?Rubber bits. They really give a nice (and as-intended) finish. The sometimes wriggle off in use and fall inside the dash - leaving bits to rattle and chip. I'm pretty sure the European suppliers sell it as report part these days.
I have to confess that the hard part of removing the original mastic was done by the first chap I took the lights to for restoring. There are two schools of thought, one is heat and the other is paint thinner. You can heat the lamps to about 120C to soften the mastic and then carefully run a knife around and prise the glass off or soak the mastic in paint thinner to soften and then do the same. Either way there is a risk of breaking the glass and indeed I had to source a new lens for one of the driving lamps.
This stuff is about as close as you will get to the original stuff https://www.theretrofitsource.com/oci-butyl-glue.html. It's a high temp, high strength adhesive which is why headlights are such a pain to dismantle. I used sikaflex 221 which should handle the heat but won't find out for a little while. Either way you need a non-acid curing high temp adhesive otherwise it will eat away the plating as it cures.
The pallas trim was fun to remove. The cars i took them off were so rusted that I could prise the screws out of the sills very easily. That turned out to be less destructive than trying to chill out/cut the screws. I did manage to drop and bend the ends of a couple of them but they are fairly easy to straighten by clamping in a vice and gently bending back.
Interestingly that rubber part isn't listed by anyone however the same rubber profile is used between the two halves of the earlier style dashboards and that part is available. It comes as one long length https://www.franzose.de/en/ALLE/Alle/Armaturenbrettverkleidungen/ANR38278/
that is going to be one hell of a sweet ride when finished.
Thank you as always for indulging my questions Faulksy. I'm looking forward to your next installment.
Budge
Budge