Removing bonded roof 74' D Special

GreenBlood

Administrator
Staff member
Administrator
VIP Paid Subscriber
Fellow Frogger
Joined
Mar 17, 2001
Messages
8,571
Location
Brisbane
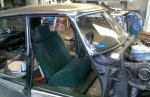
With the work on my D Special progressing. I now see the need to remove the roof and re-seal leaks.
http://www.aussiefrogs.com/forum/showthread.php?p=935368#post935368

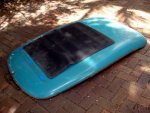
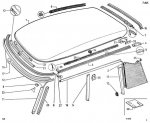
I've never taken the roof off a D, and as I understand it, mine is the bonded stye rather than the bolt on roof. I've had a look at Tony Jackson's PDF and am still a little wary!! My car has a Webasto style sunroof (vinyl top slide back type) this is mounted with what looks like a black anodised frame.

My thoughts are that I would leave the sunroof in place when removing the roof, it should give the fibreglass roof a little more strength than if it were not there?

Questions

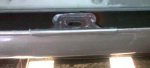
Once I have removed the trim, 5(?) bolts, how easy will breaking the seal and lifting the roof be?

Can I re-use the external rubber seal which appears to be in good condition?

Do I need to remove the windscreen (I have a new windscreen rubber)?

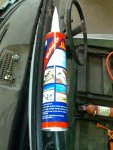
What now is the recommended sealant when replacing the roof (brand and product code whould be appreciated - not just Sikaflex, there is a huge range of Sikaflex products)?

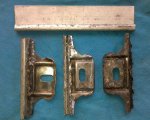
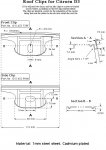
Any tips on removal and replacemnt of stainless trim.

Are there any parts that I should order now before removal?

I'm sure there will be more questions, thanks in anticipation :wink2:

Cheers
Chris
 
Gee's don't we all wish we lived closer to GB.... Would could come around and help. I'll bring the beers, someone else can bring the deck chairs and we can all point and laugh while someone else struggles with the cars for a change.......

With that big hole removing a lot of roof strength. I'd suggest starting at the back edge of the roof and working your way towards the front of the car. Once the back edge has lifted and broken away, you may find it easier to cut/remove the adhesive as you move forward where the roof is more frail.

seeya,
Shane L.
 
I heard a rumour that Shane was setting up a viewing area in his own garage for the amusement of all and sundry.
 
roof removal

hi ive just removed mine and this is what you need to do

remove windscreen and stainless trims and coronets then undo bolts in the gutter from inside the car then use a small jemmy bar and were the indicator coronets are lever the roof up and break the seal down each side as the rear doesnt actually stick. quiet a bit of force is needed but fibre glass is very flexible, once the sides are loose you can lift it at the back and the rest will come buy itself.

i put mine on with non harding sikaflex and the eliminated the little external trim and use hardening sikaflex number FC11 and mask a even strip around roof then fill it with sealant and removed the tape to give me a seal that looks like the original but is bonded to the roof and then you wont have any leaks or rust starting in the gutter
 
I was advised that the best way to remove a stubborn bonded roof was to apply pressure between the floor of the car and the roof using a hydraulic jack and leave overnight. Maybe a piece of plywood to spread the load on the fibreglass would be a good idea.

I don't believe the "seal" on a bonded roof actually does any sealing, it is just a dress up to hide the bonding beneath. If yours is in good condition I guess you could use it but a new replacement is very cheap from Roger Parker.

I wrote to Sikaflex to ask advice but the reply was useless:

"Once our adhesive is set there is no way of it coming off.
It really does stick. The only way to remove it, will be mechanically.
Thank you for your enquiry." :confused:

Bostik did not even reply.

I am planning on re bonding mine this week using Sikaflex 291 so will report back on the progress.
 
Gee's don't we all wish we lived closer to GB.... Would could come around and help. I'll bring the beers, someone else can bring the deck chairs and we can all point and laugh while someone else struggles with the cars for a change.......

With that big hole removing a lot of roof strength. I'd suggest starting at the back edge of the roof and working your way towards the front of the car. Once the back edge has lifted and broken away, you may find it easier to cut/remove the adhesive as you move forward where the roof is more frail.

seeya,
Shane L.

Thanks Shane, moral support goes a long way... :wink2:

I heard a rumour that Shane was setting up a viewing area in his own garage for the amusement of all and sundry.

Craig, I might just join the CCCNSW and come down for a Tech day, we could send the live footage via webcam back to AF and give everyone a good laugh :roflmao:

hi ive just removed mine and this is what you need to do

remove windscreen and stainless trims and coronets then undo bolts in the gutter from inside the car then use a small jemmy bar and were the indicator coronets are lever the roof up and break the seal down each side as the rear doesnt actually stick. quiet a bit of force is needed but fibre glass is very flexible, once the sides are loose you can lift it at the back and the rest will come buy itself.

i put mine on with non harding sikaflex and the eliminated the little external trim and use hardening sikaflex number FC11 and mask a even strip around roof then fill it with sealant and removed the tape to give me a seal that looks like the original but is bonded to the roof and then you wont have any leaks or rust starting in the gutter

Thanks Balki, I'd rather keep the original outer seal (or replace with new) but some useful tips there.

I was advised that the best way to remove a stubborn bonded roof was to apply pressure between the floor of the car and the roof using a hydraulic jack and leave overnight. Maybe a piece of plywood to spread the load on the fibreglass would be a good idea.

I don't believe the "seal" on a bonded roof actually does any sealing, it is just a dress up to hide the bonding beneath. If yours is in good condition I guess you could use it but a new replacement is very cheap from Roger Parker.

I wrote to Sikaflex to ask advice but the reply was useless:

"Once our adhesive is set there is no way of it coming off.
It really does stick. The only way to remove it, will be mechanically.
Thank you for your enquiry." :confused:

Bostik did not even reply.

I am planning on re bonding mine this week using Sikaflex 291 so will report back on the progress.

Good stuff Michael, could you take some pics and either post here/ in your resto thread or email to me greenblood(at)aussiefrogs(dot)com I'd like to see the underside of the roof, the lower seal and just how much Sikaflex you use? Are you going to use tie down straps across the roof as described in the PDF 814-2 on Tony Jacksons site?

Cheers
Chris
 
Can you keep this post going as to where you are, what you are doing and the full saga of doing the roof as I have two to do and everyone has told me "Don't do it" get it done by someone who knows how to do it.

I still fancy the challange of doing it myself, so I am reading everything you guys are doing and getting the courage up.

Cheers thanks for sharing this.:cheers:
 
A messy process, but necessary. You may well find rust along the side rails...
Removing the back indicator trumpets is done by removing the indicator lens, then the retaining bolt / screw that holds the outer ring and the lens clip. These are often rusted in place and may require drilling to remove them ( and the subsequent rebuilding of the mounting) The trumpet then comes off easily, after springing back the tab under the door arch.

Next remove the front corner trims. Small screw in centre of top windscreen trim removes the centre piece. Small bolt in front corner of the door arch, and the trim can be gently lifted UP and off.

Removing the side stainless steel trims is tricky. A small screwdriver under the back lower edge will start to roll it off the sill. GENTLY, as these are easily marked and look lousy if dented.

At MOST, the roof will have 7 locating bolts ( frequently fewer!) Back corners, half way along the side sills, front corners and front centre. You need to lift up the inner trim to access the nuts at these points.

The rear of the roof is not bonded, and so the best place to start.
I have found the laying on the back seat and using your feet to apply pressure on the roof is the best. Careful not to get too energetic and hurry the process. Some help slicing the old bonding may be useful.

Once the roof is free, now is a good time to get it re-upholstered!!

Clean the side rails and paint with Rustguard. A new roof seal is essential. As it is, this does NOT guarantee the end of roof leaks.
Clean the new seal of all traces of wax, inside and out. To be really sure of long term success, I ALWAYS run a bead of silicone on the inner before fitting it to the roof edge. Make a temporary fitting of the roof so that the rubber seal is in the final position while this sets. (Good idea to do a test fit beforehand!) Roof needs to be pushed forward into the rail lip FIRMLY, and the rubber seal checked for rolling.

After the inner seal has 'set', remove the roof again, and apply another line of sealant along the rails where the new seal sits, and another line into the corner of the rail to make a seal along the side of the rubber seal. Make sure that all bolt fittings are working during your TEST fit and first roof / rubber seal bonding.

Clean up excess sealant, and paint the rails with Rustguard just before you refit the trims. Helps seal the rubber to the rails, as well.

Having done this on .....10 or more cars over the years... do this on all 4 wheels, not on jack stands. It's amazing how much the top rails can twist while on stands!!!!!

A non-setting sealant is fine providing that the roof has at least 5 securing points - some don't !! In which case you will need to use an adhesive bond. Black may seem like a good idea... but can be disastrous if you muck something up and have to remove the roof during the fitting. Go for a clear sealant if possible.

This is a bit of a process, but the alternative is worse!

Stuart.
 
^^^ Thanks skp :wink2:

...so when are you next in Brisbane :clown:

Do you have the actual product brands/codes for the sealant you used?

I've got all the rear apart on my car at the moment (and yes drilling out the holding screw was part of the procedure. I've new clamps with caged nut and spring clips odered for re-assembly).

I plan to remove the windscreen this weekend, so may get a bit of an idea of rust in the front rail. I'll remove the stainless carefully as you suggest, should give me a bit of an idea of how rusty the rail is?

I'm just hesitant because of the Webasto sunroof, that hole is going to weaken the roof and I'm worried I might be looking for a replacement roof.

The plan as you suggest is to re-line the roof once it's off, I'm keen to find a vinyl product that mimics the original for a D Special. Mine has the grey velour stuff at the moment.

Thanks for your input :wink2:

Cheers
Chris
 
This is a bit of a process, but the alternative is worse!

Stuart.

Stuart, this is the best! I have printed it out and am following your steps on my 73 D Special
and so far so good the trumpets are off.
The boot and side panels are off as well to look for rust, so far none. Happy camper.

Am now stuck on the screw in the front centre clip it is rusted solid.

I have bolts all around the roof and three across the front would that mean its not a bonded roof?

Cheers
 
Tackled mine today :wink2:

Success, though it did put up a fight but not where expected.

The two front bolts (left and right) on mine whilst in place had no nuts :eek:
Whoever had the roof off last not only had not bolted the front but the two roof clamps are missing, obviously water has been getting in, and the bolts that had no nuts were rusted solid to the roof rail brackets. The only way I could remove them was with the angle grinder cutting them off from the inside.

After that, the rest was a breeze, my fears of cracking the roof (because of the sunroof hole) were ill founded. I little bit of leverage at the rear and the seal was easily broken. I reckon it was a crap job by whoever fitted it last time.

Despite that, the rails are in excellent shape, thrilled :D

Thanks guys, I lived in fear of this job for years... I'll update my thread in the restoration forum with much more detail :wink2:

attachment.php


Cheers
Chris
 

Attachments

  • Roof off1.jpg
    Roof off1.jpg
    45.4 KB · Views: 4,657
well done Chris... You must be breathing a sigh of relief after all the concerns leading up to this operation! Good news about the roof rails too.

I have let you down badly though because I refitted my roof yesterday using Sikaflex 291 but have no useful photos to show. I can tell you though that it was really easy and only took around an hour. I used a bit less than one and a half tubes of goo. I cut one nozzle quite wide to put a bead around 5mm deep all around the trough and then dropped the roof on, pushing it well forward and fastening the 5 bolts (mine was a bonded roof) and adjusted the gap between gutter and roof to be as even as possible before tightening. The Sikaflex oozed really well both inside and out.

A second nozzle cut to a finer point was used to fill the outside of the gutter to within a few mm of the top. I am sure it bonded well as the material does not skin for about 25 mins. It could be easily tooled and cleaned up easily and completely with turps.

I also used the Sikaflex to fill the roof/rail gap behind the trumpets and to plug the unused bolt holes in the rails. For the hoop over the rear window I used the original rubber seal with the addition of a little more Sika.
 

Attachments

  • Roof bracket.jpg
    Roof bracket.jpg
    60.8 KB · Views: 534
  • Roof bracket rear.jpg
    Roof bracket rear.jpg
    100.5 KB · Views: 529
  • 10032011674.jpg
    10032011674.jpg
    92.6 KB · Views: 532
  • Sikaflex.jpg
    Sikaflex.jpg
    96.7 KB · Views: 594
  • Roof and screen.jpg
    Roof and screen.jpg
    99.2 KB · Views: 581
well done Chris... You must be breathing a sigh of relief after all the concerns leading up to this operation! Good news about the roof rails too.

I have let you down badly though because I refitted my roof yesterday using Sikaflex 291 but have no useful photos to show.

No Problems Michael, it's good to have someone that is a few steps ahead. You are posting really useful info whilst it is still clear in your head. Now that I have the roof off I understand better how the fixing work.

I'll have to order in the seals, roof clamps, those strange clips (what do they actually do) and replacement nuts/bolts and washers.

BTW, I've got mail ready to send to you, you shoud get it during the week :wink2:

Cheers
Chris
 
Thanks Chris,

As yours is a bonded roof you have three of those clips. You also have two bolted on brackets near the trumpets. I was lucky that the brackets on mine were ok, except that I replaced the nuts before cleaning and painting.

The three clips were completely corroded away where they fit to the fibreglass roof but the top part was salvageable. It was easy to fold up a "U" section in zinc rich steel and then weld to the remaining parts. The "U" needs to be slightly rolled over to grip the small flange on the outside of the fibreglass so needs to be formed over a wire. I then crimped these onto the roof edge using vice grips and a little epoxy adhesive to be sure.

If your clips are too badly corroded there are drawings with Tony Jackson to make your own.

These five bolt down points must only be considered devices to locate the roof while the bonding is set but the slotted bolt holes allow you to adjust the position while the adhesive is still wet. Beware of over tightening as it distorts the brackets and flexes the roof out of position.
 

Attachments

  • Roof Clamps.jpg
    Roof Clamps.jpg
    98.4 KB · Views: 467
  • Roof Clip Drawing.jpg
    Roof Clip Drawing.jpg
    64.1 KB · Views: 506
'Course, if you can't be bothered , then try these ones, they are as per the originals

http://www.citroworld.com/tableaux/index.php?pageId=24&catId=132&returnId=132&itemId=1484

Cheap when one considers the time involved.
michaelr; good one, Sika product is the ticket especially for bonded roofs.

Hope this helps.

Thanks Richo, just placed my order, Geert has front and side clamps :wink2:

...so what do you guys think about this stuff as a close approximation of the original D Special roof lining?
3375832.jpg


Cheers
Chris
 
Thanks Richo, just placed my order, Geert has front and side clamps :wink2:

...so what do you guys think about this stuff as a close approximation of the original D Special roof lining?


Cheers
Chris

Hi Chris,
I can take a picture of the roof lining of my D Special 1972 as its all original and send it to you if that will help.

Colin:wink2:
 
Hi Chris,
I can take a picture of the roof lining of my D Special 1972 as its all original and send it to you if that will help.

Colin:wink2:

Thanks Colin, I've plenty of sample pieces so no need for a pic. :wink2:

I'm a bit interested in the vinyl lining as I realise that when I removed my sunroof it was virtually all that was holding the fabric lining in place. The thin foam backing had turned to dust, 'it' was mounted on 25mm of insulation foam that was as good as the day it was installed.

It needs to be a two part process because the sunroof mount is 25mm below the roof interior. So the plan is to use 25mm. foam as the spacer, and glue a vinyl to that.

BTW, how did you go with getting your roof off?

Cheers
Chris
 
These five bolt down points must only be considered devices to locate the roof while the bonding is set but the slotted bolt holes allow you to adjust the position while the adhesive is still wet. Beware of over tightening as it distorts the brackets and flexes the roof out of position.

Hey Michael, can you confirm that the two bolts at the front, left and right, do no more than hold the stainless trim? My roof has no clips at these locations and I thought it may have contibuted to my roof leaking, seems perhaps not? My now understanding is that as you say the five bolt down points with clips are really only to correctly locate the roof, and the seal and sikaflex are what actually seals out water?

Cheers
Chris
 
Yes, three "clips", one bolted front centre and two behind the B pillars. If you look at the Tony Jackson drawings you will see they are similar except for the orientation of the slot.... all three are aligned so as to allow the roof to be pushed forward into the gutter over the windscreen.

Again, the "seal" on the bonded roof would not actually keep out water and must be considered only as decoration. It sits between the stainless gutter trim and the top surface of the roof panel. The seal edge you see on a bolt down roof is very different being part of the big U shaped seal between roof frame and fibreglass. In the attached drawing "9" is the seal used in bolt down fitting, "28" is the smaller dress trim/seal for bonded roofs. I bought a new later seal from Roger Parker.

The holes in the roof rails above the A pillar are for the trim fastening (though today I had to remove the rubber plugs I had put in those holes on the assumption they were redundant).
There are suggestions that you can convert a bonded roof to a bolt down roof by adding more clips at the other bolt hole locations. Maybe if you order extra clips you can add them to the A pillar locations too. Surely the more the merrier? However, the clips only fasten by crimping to a small bulge in the edge of the fibreglass so would not do much to actually hold the roof on. The original bolt down roof I believe has a ledge fastened all around the roof perimeter, if it has not rusted away.

If you seek out photos of crashed D's you will often see that the roof has simply torn off in the impact. :(
 

Attachments

  • Roof seals.jpg
    Roof seals.jpg
    50.9 KB · Views: 929
Top